Wireless Configuration
RansNet SD-WAN branch routers (UA, HSA, and XE series) include built-in dual-band Wi-Fi 6 (802.11ax) capability, supporting both 2.4 GHz and 5 GHz radios simultaneously. Refer to the Product Overview for hardware specifications by model.
Each router can operate in one of three wireless modes:
| Mode | Description |
|---|---|
| AP Mode | Router serves as a wireless access point for client devices. SSIDs are configured directly on the device or pushed via a template. Includes adaptive radio optimization (power, channel, bandwidth management) and comprehensive enterprise roaming features (802.11k neighbor reports, optional 802.11r fast roaming) for dense deployments. |
| STA (Station) Mode | Router connects as a wireless client to an upstream AP, using the Wi-Fi link as a WAN backhaul. See Wi-Fi as WAN. |
| EzMesh (Multi-AP) | One router acts as an EzMesh controller and propagates SSID configuration to agent routers automatically over a mesh backhaul. |
Standalone AP
In standalone AP mode, each router manages its own SSID configuration independently. This is suitable for single-site deployments or when per-device customization is required.
GUI Configuration
Navigate to Device Settings → Network → Wi-Fi.
The page is divided into two sections: Radio Settings and SSID Settings.

Radio Settings
Each router has two radios. Configure the operating parameters for each:
| Field | Description |
|---|---|
| Radio | Radio identifier — Radio0 operates at 2.4 GHz, Radio1 at 5 GHz |
| Country | Regulatory domain — determines permitted channels and maximum transmit power for the deployment region |
| Channel | Operating channel. Select a specific channel or leave on Auto to let the radio choose the least congested channel at startup |
| Width | Channel bandwidth. 2.4 GHz supports 20/40 MHz; 5 GHz supports 20/40/80/160 MHz. Wider channels increase throughput but are more susceptible to interference |
| Power | Transmit power level. Reduce this in dense deployments to limit co-channel interference between adjacent APs |
| Enable | Enables or disables the radio entirely |
SSID Settings
Multiple SSIDs can be configured on a single device. Each SSID can be assigned to one or both radios, with independent security and network segmentation settings:
| Field | Description |
|---|---|
| SSID Name | The wireless network name broadcast to client devices |
| Operating Mode | AP Mode — serves wireless clients; STA Mode — connects as a client to an upstream AP (Wi-Fi as WAN) |
| Security | Encryption method: Open, WPA2-PSK, WPA/WPA2-PSK (mixed-mode for legacy client compatibility), WPA2 Enterprise (802.1X RADIUS), WPA3 SAE, WPA3 Enterprise |
| Radio 2.4 GHz | Broadcast this SSID on the 2.4 GHz radio |
| Radio 5 GHz | Broadcast this SSID on the 5 GHz radio |
| Broadcast | Controls whether the SSID is visible in wireless scans. Disable for hidden networks |
| VLAN | Tags client traffic with a VLAN ID for network segmentation — e.g. separate guest traffic from corporate traffic |
| Bridge | Bridge group to attach this SSID to — determines which LAN segment client traffic enters |
| Client Isolation | Prevents wireless clients on the same SSID from communicating directly with each other. Recommended for guest networks |
| Fast Roaming | Enables 802.11r Fast BSS Transition — reduces handoff latency when clients roam between APs on the same ESS |
| Enable | Enables or disables this SSID |
Tip
Ensure the VLAN interfaces and bridge groups referenced by each SSID are already configured under Interfaces before saving. A misconfigured bridge or VLAN reference will prevent the SSID from passing traffic.
CLI Configuration
interface wifi 0
 ssid corpnet
  encryption WPA2-PSK key pskpassword
  vlan access 10
  enable

interface wifi 1
 ssid corpnet
  encryption WPA2-PSK key pskpassword
  vlan access 10
  enable
In this example, wifi 0 (2.4 GHz) and wifi 1 (5 GHz) both broadcast the same SSID. Clients connect to whichever band their device supports and prefers.
Verification
Verify the SSID is broadcasting and clients can connect:
This displays active SSIDs, operating channels, transmit power, and current client count. Verify: - SSID name matches configuration - Both 2.4 GHz and 5 GHz radios are enabled (if configured on both bands) - Channel and width are as expected - Client count shows connected devices
View connected clients and their signal quality:
Each client entry shows IP address, connection band, signal strength (RSSI), and data rates. Verify clients are connected to the correct VLAN and SSID.
Comprehensive Enterprise Wireless Features
For large-scale wireless deployments in dense RF environments (malls, office complexes, stadiums, conference centers), RansNet provides three complementary features that work together to ensure optimal client experience, minimal interference, and seamless roaming:
Adaptive Radio Optimization + 802.11k + 802.11r = Enterprise-Grade Wireless
Overview: How the Three Components Work Together
| Feature | What It Does | Benefit |
|---|---|---|
| Adaptive Radio Optimization | Minimizes co-channel interference, adjusts power, reduces bandwidth in congestion | Improves RF quality on each AP, reduces frame retransmissions, extends coverage |
| 802.11k (Neighbor Reports) | Enabled by default — Provides APs a list of nearby APs so clients can make informed roaming decisions | Clients discover better APs before signal degrades, reduces unnecessary roaming attempts, faster AP discovery |
| 802.11r (Fast Roaming) | Enables fast BSS transition (FT) — clients can roam between APs with minimal latency | Seamless handoff for voice/video calls, no dropped packets during movement |
How They Work Together:
-
802.11k (enabled by default) — When a client's signal weakens on AP-A, the AP provides a list of nearby stronger APs (AP-B, AP-C) via neighbor reports. The client can pre-authenticate with these APs without breaking its current connection.
-
Adaptive Optimization — Meanwhile, the APs are independently optimizing their RF environment (reducing interference, adjusting power) to provide the best coverage and handoff candidates.
-
802.11r (optional, recommended) — When the client decides to roam to AP-B, 802.11r enables a fast transition (typically <50 ms) so voice/video calls remain uninterrupted.
Combined Effect: A client moving through a dense office or mall experiences:
- Better RF at each AP — Adaptive optimization ensures optimal RSSI and minimal interference at every location
- Smart roaming decisions — 802.11k helps the client find the best next AP before current signal degrades
- Fast handoff between APs — 802.11r enables seamless transition (<50 ms vs. 200+ ms without FT)
- No dropped calls — Voice and video applications remain uninterrupted during movement
IEEE 802.11k Details (Enabled by Default)
802.11k (Neighbor Reports / RRM) is automatically enabled on all APs to provide roaming assistance. It allows:
- APs to advertise themselves to clients in range
- Clients to request a list of nearby APs sorted by signal strength
- Clients to pre-authenticate with candidate APs before roaming
- Better roaming decisions based on actual neighbor data, not just signal strength
No additional configuration is required — 802.11k is active by default and works transparently.
Enabling Fast Roaming (802.11r)
To enable Fast Roaming (802.11r, optional but recommended for enterprise), configure it on all SSIDs:
interface wifi 0
 power adaptive
 channel adaptive
 bandwidth adaptive
 ssid corpnet
  encryption WPA2-PSK key pskpassword
  fast-roaming enable        # Enable 802.11r Fast BSS Transition
  enable

interface wifi 1
 power adaptive
 channel adaptive
 bandwidth adaptive
 ssid corpnet
  encryption WPA2-PSK key pskpassword
  fast-roaming enable        # Enable on 5 GHz as well
  enable
For deployments with 10+ APs in close proximity, this combination is essential for professional-grade wireless.
Enterprise Use Cases
Large Office Complexes
- Multiple APs deployed across multiple floors in close proximity
- Co-channel interference causes poor handoff performance and client frustration
- Manual channel planning requires frequent adjustments as tenants change
- Solution: Adaptive optimization continuously monitors neighbor density and adjusts channels, ensuring optimal client experience as RF conditions change
Shopping Malls & Retail
- High client density with multiple guest Wi-Fi networks
- Channel congestion varies by time of day (peak hours vs. off-hours)
- Adjacent retailers may deploy uncoordinated Wi-Fi with overlapping channels
- Solution: Each AP autonomously optimizes its RF footprint, reducing interference from neighbors while maintaining coverage for legitimate clients
Conference Centers & Stadiums
- Large crowds with thousands of clients per event
- Temporary events create RF congestion not present during normal operation
- No time for manual reconfiguration between events
- Solution: Optimization runs nightly and on-demand, adapting to changing client density and neighbor presence
Multi-Tenant Environments
- Independent tenants manage their own Wi-Fi networks
- No central coordination between neighboring APs
- Co-channel interference inevitable without per-AP optimization
- Solution: Each tenant's AP optimizes independently; passive neighbor detection avoids coordination overhead
Adaptive Radio Optimization
Adaptive Radio Optimization is the intelligent RF engine that continuously optimizes transmit power, channel selection, and channel bandwidth on each AP. Combined with 802.11k neighbor awareness and 802.11r fast roaming (covered in Comprehensive Enterprise Wireless Features above), it provides a complete enterprise wireless solution for dense deployments.
Prerequisites
To use Adaptive Radio Optimization, your deployment must meet the following requirements:
| Requirement | Details |
|---|---|
| Firmware Version | Branch series routers running firmware 20260724-2100 or later |
| Template | Routers must be provisioned with or updated to Template_Branch |
| Configuration | At least one radio must have adaptive optimization enabled (power adaptive, channel adaptive, or bandwidth adaptive) |
| Management | Access to device CLI or mfusion orchestrator for configuration and on-demand optimization |
Note
If your router is running an older firmware version, upgrade via Device Settings → System → Firmware. Edit host provisioning to use Template_Branch.
Warning
Impact on Connected Devices: Optimization causes WiFi to restart after changes are applied. Connected clients will briefly disconnect (typically 5-10 seconds) and reconnect. This is normal behavior.
Recommendation: Schedule on-demand optimization (test wifi) during maintenance windows when client impact is minimal. The automatic nightly optimization (3 AM by default) is designed to run during off-hours to minimize disruption.
Benefits
| Benefit | Details |
|---|---|
| Reduced Co-Channel Interference | Automatically detects neighboring APs on the current channel and switches to less congested alternatives, improving RSSI and reducing frame retransmissions |
| Optimal Transmit Power | Adjusts power based on worst-case client signal strength — reduces power when coverage is good (energy efficient) and increases when clients are distant (extends range) |
| Adaptive Channel Width | Narrows channel bandwidth in congested environments (HT80 → HT40 → HT20) to improve link reliability and reduce vulnerability to interference |
| Zero Central Coordination | Each AP optimizes independently using passive RF scanning — no controller required, no mesh signaling overhead, works with standalone and distributed deployments |
| Minimal Operational Overhead | Runs automatically at 3 AM or on-demand — no manual per-AP tuning required |
How It Works
Measurement and Decision:
- Each AP passively scans the RF environment to detect neighboring APs and their signal strength
- Client RSSI is extracted from monitoring reports to assess coverage quality
- Decisions are made locally based on three criteria:
| Optimization | Trigger | Action |
|---|---|---|
| Power | Client RSSI < -75 dBm | Increase to 23 dBm (extend range) |
| Power | Client RSSI > -65 dBm | Reduce to 17 dBm (energy efficient) |
| Channel | ≥3 neighbors on current channel | Switch to channel with fewer neighbors (if improvement ≥1 neighbor) |
| Bandwidth | ≥5 neighbors on current channel (5G) | Reduce to HT20 (improved reliability) |
| Bandwidth | ≥3 neighbors on current channel (5G) | Reduce to HT40 (medium congestion) |
| Bandwidth | <2 neighbors on current channel (5G) | Use HT80 (maximum throughput) |
All three optimizations run sequentially in a single pass, with WiFi restarting only once at the end to maintain RF stability.
Execution Methods:
| Method | Frequency | Use Case |
|---|---|---|
| Automatic (Nightly) | 3 AM daily | Default behavior; runs during off-hours to avoid client disruption |
| On-Demand (CLI or mfusion) | Manual execution | Individual AP troubleshooting; verify optimization before/after |
| mfusion Mass Update | Staggered (2 min between APs) | Push optimization across all APs without RF scanning collision |
GUI Configuration
Adaptive optimization is enabled per radio, from either of two places depending on your deployment setup:
- Wireless template (fleet-wide) — navigate to ORCHESTRATOR → Configuration → Templates → Wireless tab and edit the template's Global Wireless settings; the configuration applies to all hosts linked to the template.
- Individual host — navigate to Device Settings → Network → Wi-Fi on the device to configure a single AP.
In the Wi-Fi Radio Settings table, select Adaptive from the dropdown for each option you want the AP to manage automatically:

| Field | Example Value | Description |
|---|---|---|
| Radio | Radio0 2.4Ghz, Radio1 5Ghz |
Each physical radio is configured independently |
| Country | Singapore |
Regulatory domain — determines the permitted channels and power limits |
| Channel | Adaptive |
Select Adaptive for automatic channel selection, or a fixed channel number |
| Bandwidth | Adaptive |
Select Adaptive for automatic channel-width adjustment, or a fixed width (e.g., HT40) |
| Power | Adaptive |
Select Adaptive for automatic transmit-power tuning, or a fixed dBm value |
| Enable | ✓ | Enable or disable the radio |
Note
The three options are independent — you can mix adaptive and fixed values (e.g., Adaptive channel with fixed power). Setting all three to Adaptive enables the full optimization described above.
CLI Configuration
Enable adaptive optimization for individual radios:
interface wifi 0
 power adaptive
 channel adaptive
 bandwidth adaptive
 ssid testwifi
  enable

interface wifi 1
 power adaptive
 channel adaptive
 bandwidth adaptive
 ssid testwifi
  enable
Parameter Descriptions:
| Parameter | Description |
|---|---|
power adaptive |
Automatically adjust transmit power based on worst-case client RSSI: 17 dBm (good coverage) to 23 dBm (extend range) |
channel adaptive |
Monitor neighboring APs on current channel; switch if ≥3 neighbors detected and alternative channel has ≥1 fewer neighbor |
bandwidth adaptive |
Reduce channel width in congested RF (5G: HT80 → HT40 → HT20; 2.4G: HT40 fixed) based on neighbor density |
To disable adaptive optimization and return to static configuration:
On-Demand Optimization
Run optimization immediately from the CLI during a maintenance window when client impact is acceptable:
Or execute from mfusion device control panel.
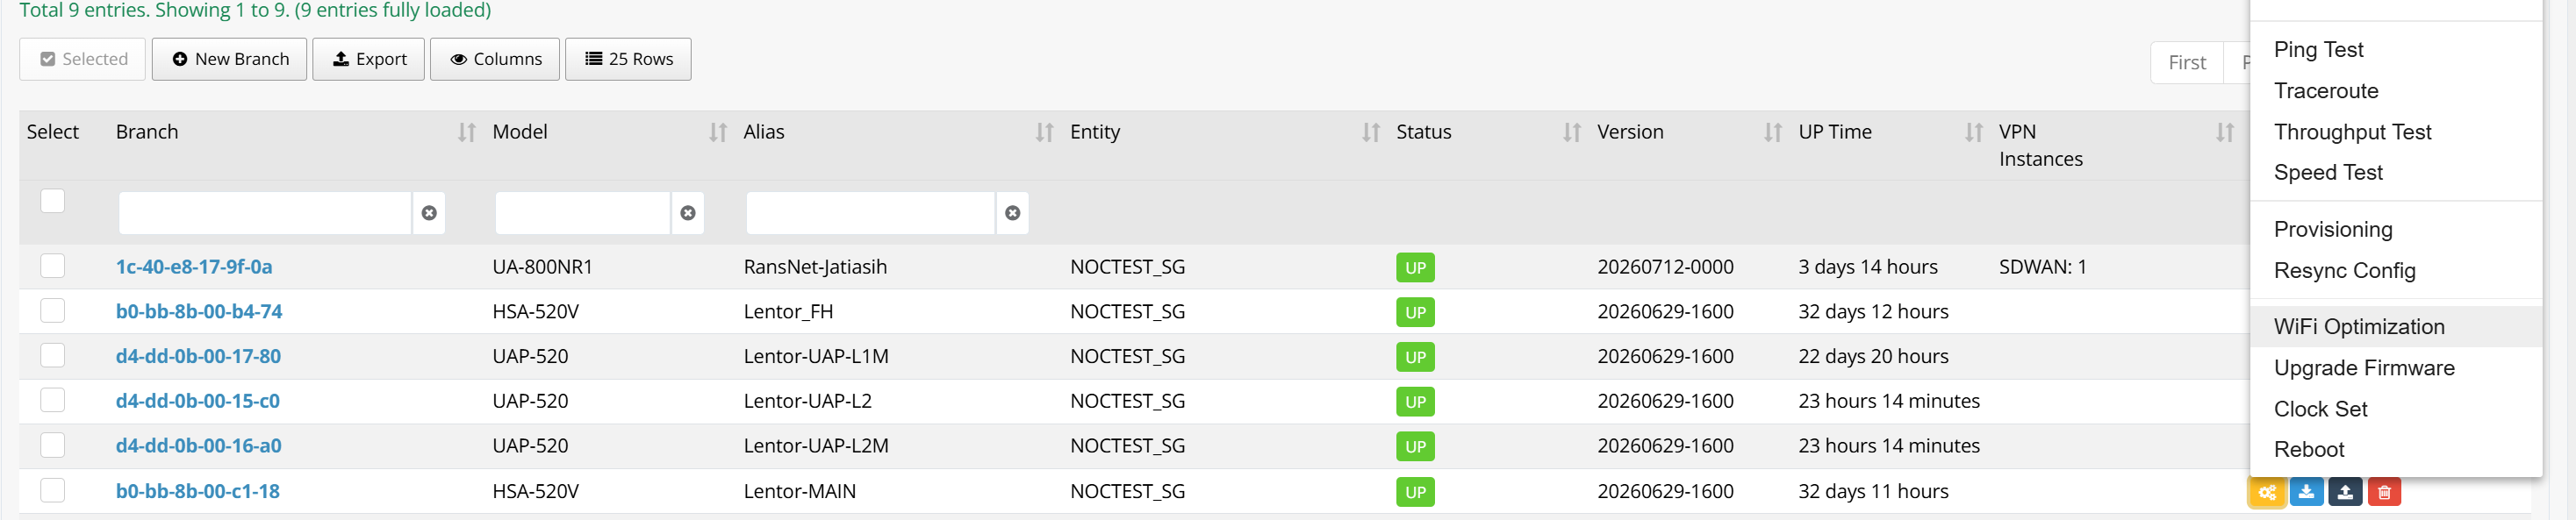
Tip
Schedule during maintenance windows — Connected clients will briefly disconnect (5-10 seconds) while WiFi restarts with optimized settings. Avoid running on-demand optimization during peak business hours.
This executes power, channel, and bandwidth optimization on all configured radios and displays a summary of changes:
[info] running adaptive radio optimization for wifi0...
[info] executing sequential optimization (power → channel → bandwidth)...
[info] adaptive radio optimization completed
[info] 2026-01-15 03:30:45 UTC: ath0 - optimization applied, restarting wifi
mfusion Mass WiFi Optimization
To optimize multiple APs across a deployment:
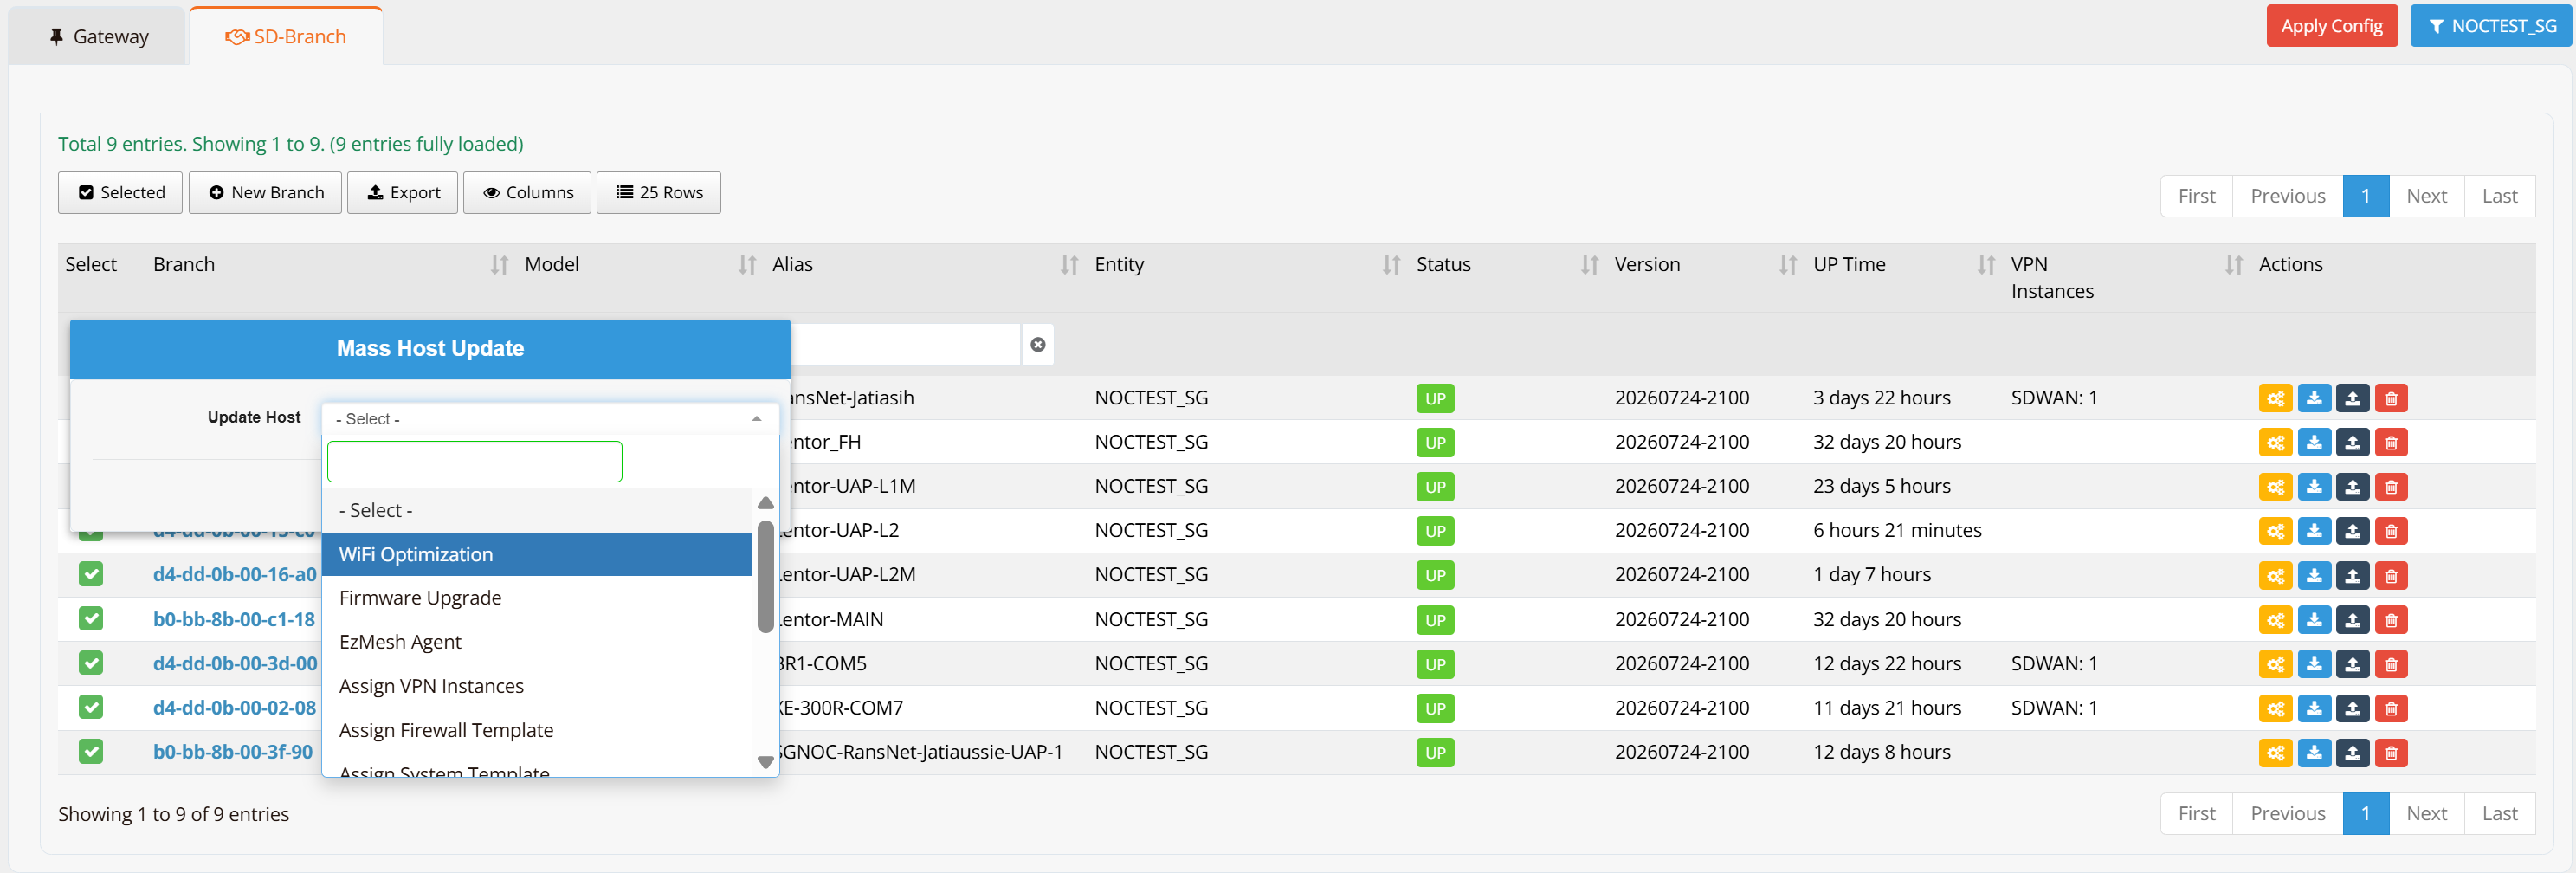
- In the mfusion orchestrator, navigate to Configuration → Branch Devices
- Select multiple APs using checkboxes
- Click Mass Update and select WiFi Optimization
- The orchestrator will push the optimization to each AP sequentially (2 minutes apart) to prevent simultaneous RF scanning
Verification
Verify radio settings:
Verify:
- Power level is appropriate (17, 20, or 23 dBm)
- Channel reflects optimization (may differ from original config if adaptive enabled)
- Bandwidth adjusted based on congestion (2.4G stays HT40; 5G may be HT20/40/80 based on neighbors)
- Both 2.4 GHz and 5 GHz radios enabled
Check syslog for optimization details:
This shows detailed logs of each optimization decision, neighbor counts, and state changes.
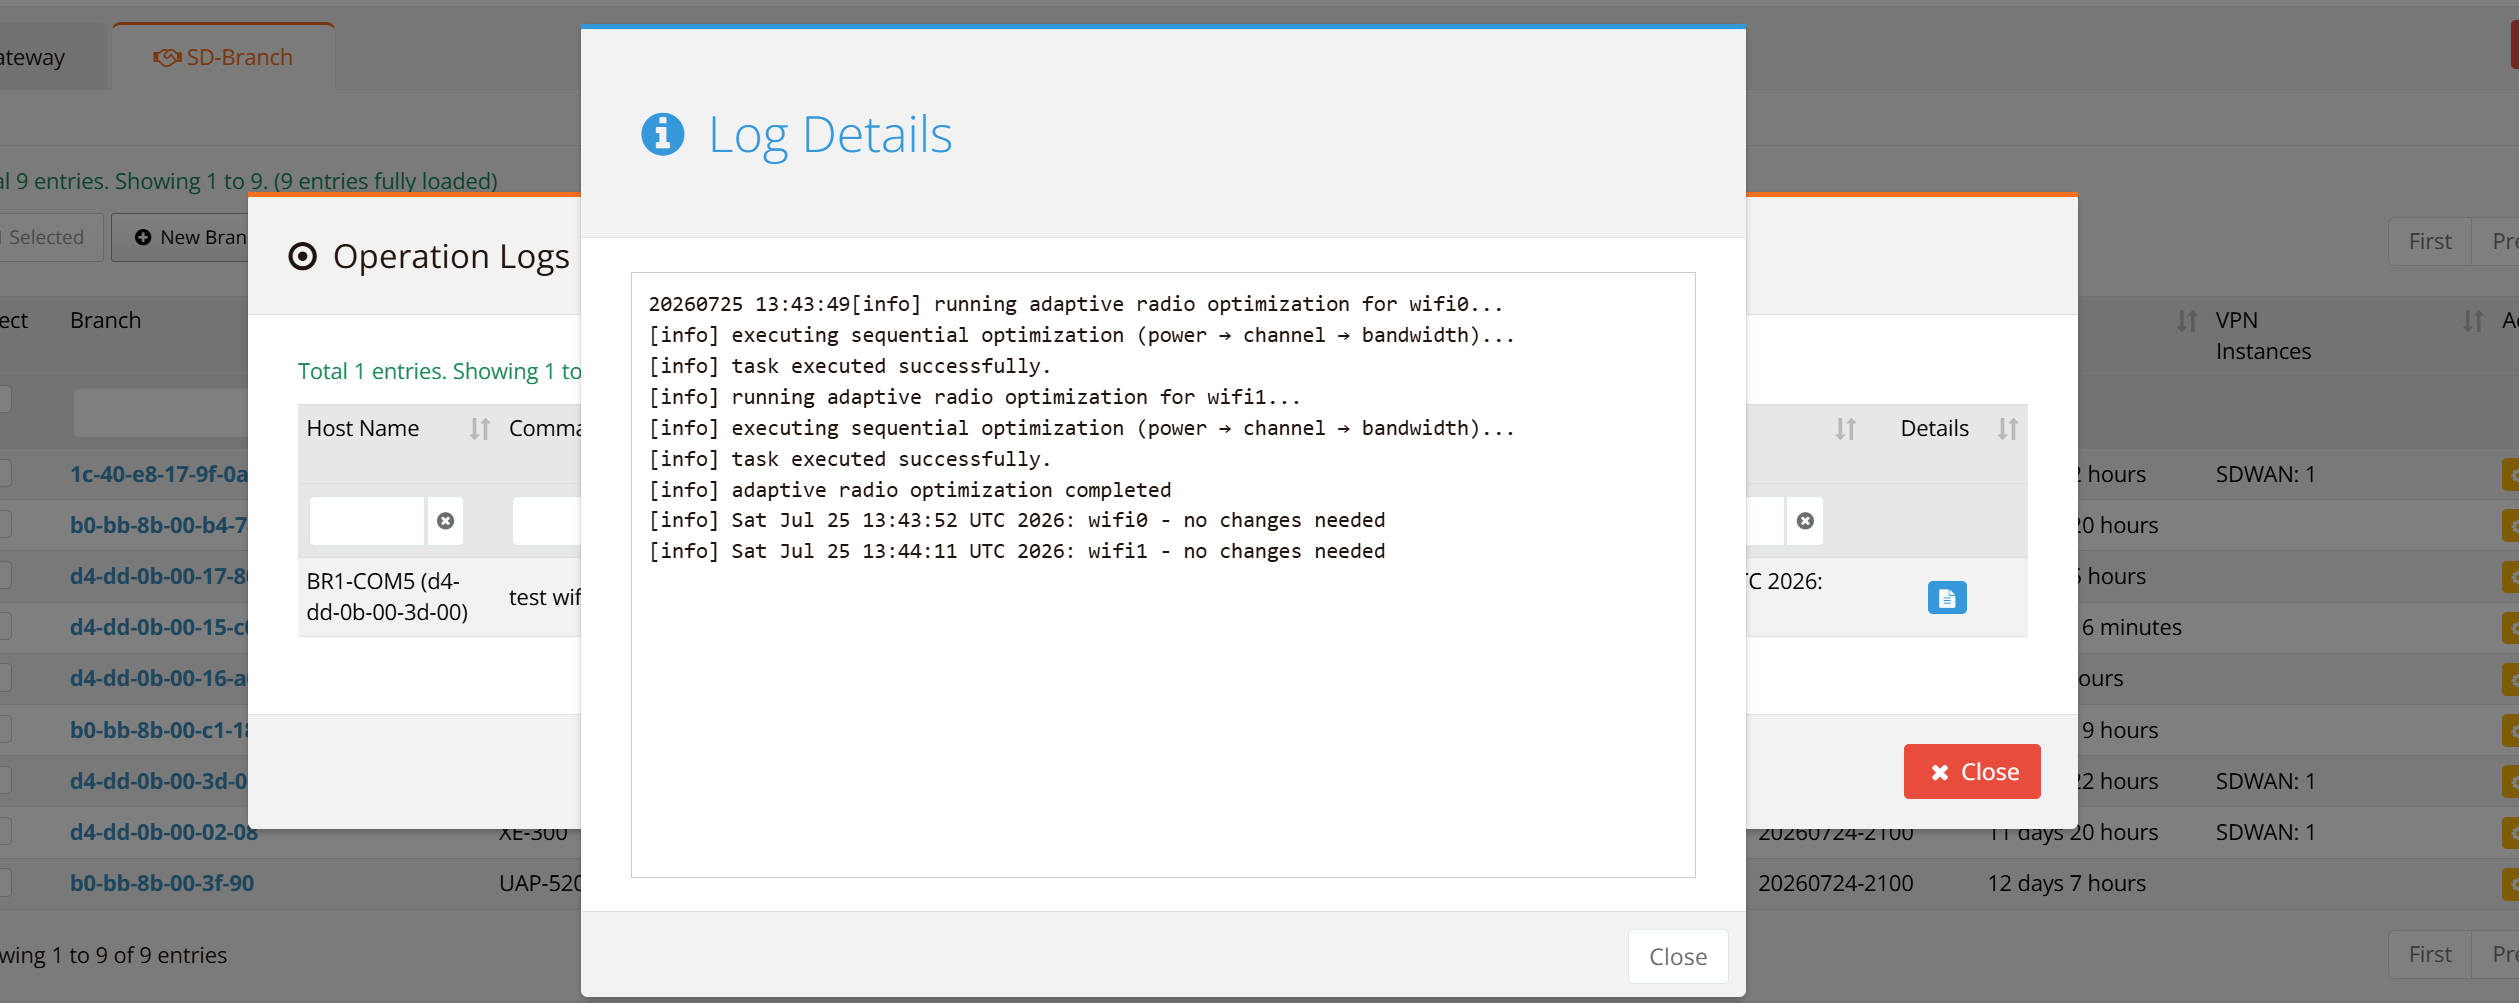
After running on-demand optimization, you can check the optimization result from mfusion push log (operation log)
Best Practices
Deployment Configuration:
- Enable all three optimizations (power, channel, bandwidth) for maximum benefit in dense RF environments
- Verify 802.11k (Neighbor Reports) is enabled — this is the default and requires no configuration
- Enable Fast Roaming (802.11r) on all APs to complement adaptive optimization — provides seamless handoff during roaming
- Leave nightly optimization enabled (3 AM default) for continuous RF adaptation during off-hours with minimal client impact
- Schedule on-demand
test wifiduring maintenance windows — not during peak business hours (clients will briefly disconnect) - For mass deployments, use orchestrator mass update to ensure staggered, non-overlapping optimization runs (built-in 2 min spacing between APs)
Enterprise Wireless Checklist (for optimal client experience):
- ✅ Adaptive Radio Optimization — Reduces interference and optimizes power/bandwidth
- ✅ 802.11k (Neighbor Reports) — Enabled by default; helps clients discover better APs
- ✅ 802.11r (Fast Roaming) — Enable on all SSIDs for fast handoff (<50 ms)
With all three features enabled, clients experience seamless roaming with zero dropped calls in dense deployments.
Tuning & Troubleshooting:
- If clients still experience poor roaming, verify: (1) adaptive optimization enabled, (2) 802.11k enabled (default), (3) fast roaming (802.11r) enabled
- If channel keeps switching, verify neighbor AP SSIDs are broadcasting (not hidden); passive scanning detects only active beacons; 802.11k helps with neighbor discovery
- Check client RSSI on monitoring reports — if worst-case RSSI is poor, power adjustment may not be sufficient (consider AP placement)
- Use
test wifito run optimization on-demand and verify it completes without errors
Limitations & Considerations
- 2.4 GHz bandwidth stays at HT40 — 802.11n standard does not support HT80 on 2.4 GHz; HT40 is maximum effective bandwidth
- Passive neighbor detection — Optimization detects only neighboring APs that actively broadcast their SSIDs; hidden SSIDs are not detected
- No central coordination — Each AP optimizes independently; no mesh signaling or controller communication; suitable for standalone and distributed deployments only
Wireless Templates
For multi-site and multi-AP deployments, wireless templates allow a single SSID configuration to be defined once and pushed to a group of devices — eliminating repetitive per-device configuration. Templates are essential for enterprise deployments, especially when combined with Comprehensive Enterprise Wireless Features (adaptive optimization, 802.11k, and 802.11r).
Use Cases
Single-Site, Multi-AP Deployments - 10+ APs in a single office building or campus - All APs should broadcast identical SSIDs with the same security and roaming settings - Templates ensure consistency: define once, apply to all APs simultaneously
Multi-Site Deployments - Multiple locations (branches, stores, offices) with similar wireless requirements - Different sites may need different templates (e.g., retail vs. corporate) - Templates reduce configuration time and minimize human error
Enterprise Wireless with Adaptive Optimization - Deploying Comprehensive Enterprise Wireless Features across many APs - Templates configure adaptive optimization settings (power adaptive, channel adaptive, bandwidth adaptive) and fast roaming (802.11r) uniformly across all linked APs - See Deploying Enterprise Wireless Across Multiple APs below for guidance
GUI Configuration
Navigate to ORCHESTRATOR → Configuration → Templates, then select the Wireless tab. Click New WiFi and enter a template name.

The SSID settings within a template are identical to the per-device options described in Standalone AP.
Tip
Define multiple templates to serve different groups of devices — for example, a retail template with a guest SSID and fast roaming enabled, or a corporate template with 802.1X authentication and adaptive optimization.
Once the template is saved, open it and go to the Linked Hosts tab. Click Add Linked Host to select the target devices.

Select the devices to apply the template to, then click Select and save. The orchestrator will push the wireless configuration to all linked devices on the next sync.
Deploying Enterprise Wireless Across Multiple APs
For large deployments (10+ APs) in dense RF environments, use templates to deploy Comprehensive Enterprise Wireless Features uniformly:
Template Configuration Example:
Create a template with all three enterprise wireless features enabled:
interface wifi 0
 power adaptive
 channel adaptive
 bandwidth adaptive
 ssid corpnet
  encryption WPA2-PSK key pskpassword
  fast-roaming enable
  enable

interface wifi 1
 power adaptive
 channel adaptive
 bandwidth adaptive
 ssid corpnet
  encryption WPA2-PSK key pskpassword
  fast-roaming enable
  enable
Deployment Workflow:
- Create template with adaptive optimization and fast roaming enabled (as shown above)
- Link template to all APs in the deployment (via Linked Hosts tab)
- Verify deployment — After sync, all APs will have:
- Adaptive power, channel, and bandwidth optimization enabled
- 802.11k enabled (default, automatic)
- 802.11r fast roaming enabled
- Nightly optimization scheduled at 3 AM
- Monitor results — Track optimization across all APs:
- Use mfusion Mass Update to run on-demand optimization across APs (staggered 2 minutes apart)
- Check operation log on each AP to verify optimization is running
Verification
Once the template is linked and devices sync with the orchestrator, verify the wireless configuration was applied:
- Navigate to Device Settings → Network → Wi-Fi on a linked device
- Confirm the SSID configuration matches the template (SSID name, security settings, VLAN assignment, adaptive settings, fast roaming enabled)
- Use the CLI to verify:
EzMesh (Wi-Fi Multi-AP)
Overview
RansNet EzMesh implements the Wi-Fi Alliance Multi-AP (MAP) specification, built on top of the IEEE 1905.1 abstraction layer. This is the same standard behind Wi-Fi EasyMesh — a vendor-interoperable protocol for coordinated multi-AP wireless networks.
In an EzMesh deployment:
- Controller — one router manages the entire mesh network. It holds the SSID configuration (fronthaul and backhaul) and distributes it automatically to all agents using the MAP M1/M2 credential exchange (WPS-based provisioning).
- Agent — each additional router connects to the controller over a backhaul link (wireless or wired) and serves client devices over fronthaul SSIDs received from the controller.
- Backhaul — the inter-AP wireless link used for mesh communication and configuration exchange. Not visible to end users.
- Fronthaul — the SSIDs broadcast to end-user client devices. Agents inherit these from the controller automatically — no manual per-agent SSID configuration is needed.
This architecture supports multiple fronthaul SSIDs, each mapped to a different VLAN, enabling traffic segmentation across the mesh (e.g. corporate, guest, IoT on separate networks).
GUI Configuration
Navigate to Device Settings → Network → Wi-Fi, then scroll to the Wi-Fi EzMesh Settings section.

Configure the backhaul and fronthaul SSIDs on the controller device:
| Field | Description |
|---|---|
| SSID Name | Wireless network name — one backhaul SSID and one or more fronthaul SSIDs |
| Pre-shared Key | WPA2-PSK passphrase for the SSID |
| Network | VLAN interface this SSID bridges into (e.g. vlan1 for backhaul, vlan11/vlan12 for fronthaul segments) |
| Remark | Role label — Backhaul for the inter-AP link, Fronthaul for client-facing SSIDs |
Click + Add Fronthaul SSID to add additional client-facing networks. Each fronthaul SSID can be mapped to a different VLAN for traffic isolation.
Agent Provisioning
Configuration only needs to be applied on the controller. Agents pull their entire SSID configuration from the controller automatically during the onboarding process:
- Apply and save the EzMesh configuration on the controller router.
- On the agent router, navigate to Device Settings and click EzMesh Agent to put it into agent mode.
- Within 2 minutes, on the controller router, click EzMesh Controller to trigger the WPS push-button exchange. The controller and agent must be within 10 metres of each other during this step to ensure a reliable wireless handshake.
- The agent will automatically discover the controller, complete the MAP M1/M2 credential exchange, and apply the fronthaul SSID configuration. This process typically completes within 2 minutes.
Note
The 10-metre proximity requirement and 2-minute window apply to the initial WPS-based onboarding only. Once an agent is provisioned, it can operate at normal deployment distances over the mesh backhaul.
CLI Configuration
interface wifi mesh
 backhaul backhaulssid key pskpassword net vlan1
 ssid mbox-1
  vlan access 11
  encryption WPA2-PSK key pskpassword
 ssid mbox-2
  vlan access 12
  encryption WPA2-PSK key pskpassword
 enable
Key points:
backhaul— defines the inter-AP backhaul SSID and maps it to a network interface (vlan1). This link is used for both mesh traffic and controller-to-agent configuration distribution.ssidentries underinterface wifi meshare fronthaul SSIDs pushed to agents automatically. Each can be mapped to a different VLAN for traffic separation.wifi 0andwifi 1(the individual 2.4/5 GHz radios) are managed by the mesh engine in controller mode and do not require separate SSID configuration.
Verification
Verify the mesh topology and confirm agents are connected to the controller:
This displays the backhaul status, controller/agent role, and agent discovery state. Verify agents have completed provisioning and are connected to the controller.
Verify backhaul and fronthaul SSIDs are broadcasting on both radios:
The output shows all active SSIDs (backhaul and fronthaul) on both 2.4 GHz and 5 GHz radios. Verify: - Backhaul SSID is operational (typically on a dedicated VLAN like vlan1) - All fronthaul SSIDs are broadcasting (one per VLAN for traffic segmentation) - Both radios are enabled with the correct channels and bandwidth - Transmit power is appropriate for your deployment
View connected clients across all fronthaul SSIDs:
This lists all connected wireless clients showing their IP address, VLAN, SSID, band, signal strength (RSSI/SNR), data rates, and connection duration. Verify: - Clients are distributed across both 2.4 GHz and 5 GHz bands - Clients on guest networks are tagged with the correct guest VLAN - Signal strength (RSSI) is acceptable (typically -30 to -80 dBm for good coverage) - Data rates reflect the expected standard (11NG for 2.4G, 11AC/11AXA for 5G)