Captive Portal Configuration
The captive portal is the login page that guests see immediately after connecting to the hotspot network (step 4 in the User Access Flow). It handles user onboarding, authentication method selection, and branding/customization.
This guide covers portal creation, login method configuration, and visual customization to match your venue’s brand.
Portal Overview
RansNet HSG provides a fully customizable captive portal with:
- Multiple pre-built templates — Professional designs for hotels, retail, F&B, and corporate venues
- Flexible login methods — Username/password, OTP (email/SMS), direct access, payment gateway, and more
- Full branding control — Custom logo, colors, background images, terms of service, and promotional content
- Multi-instance support — Each hotspot instance can have a different portal, allowing different branding and login methods per VLAN/venue
Creating a Portal
Step 1: Select a Template
Navigate to HOTSPOT SETTINGS → Portal Templates. HSG provides standard templates designed for common use cases.
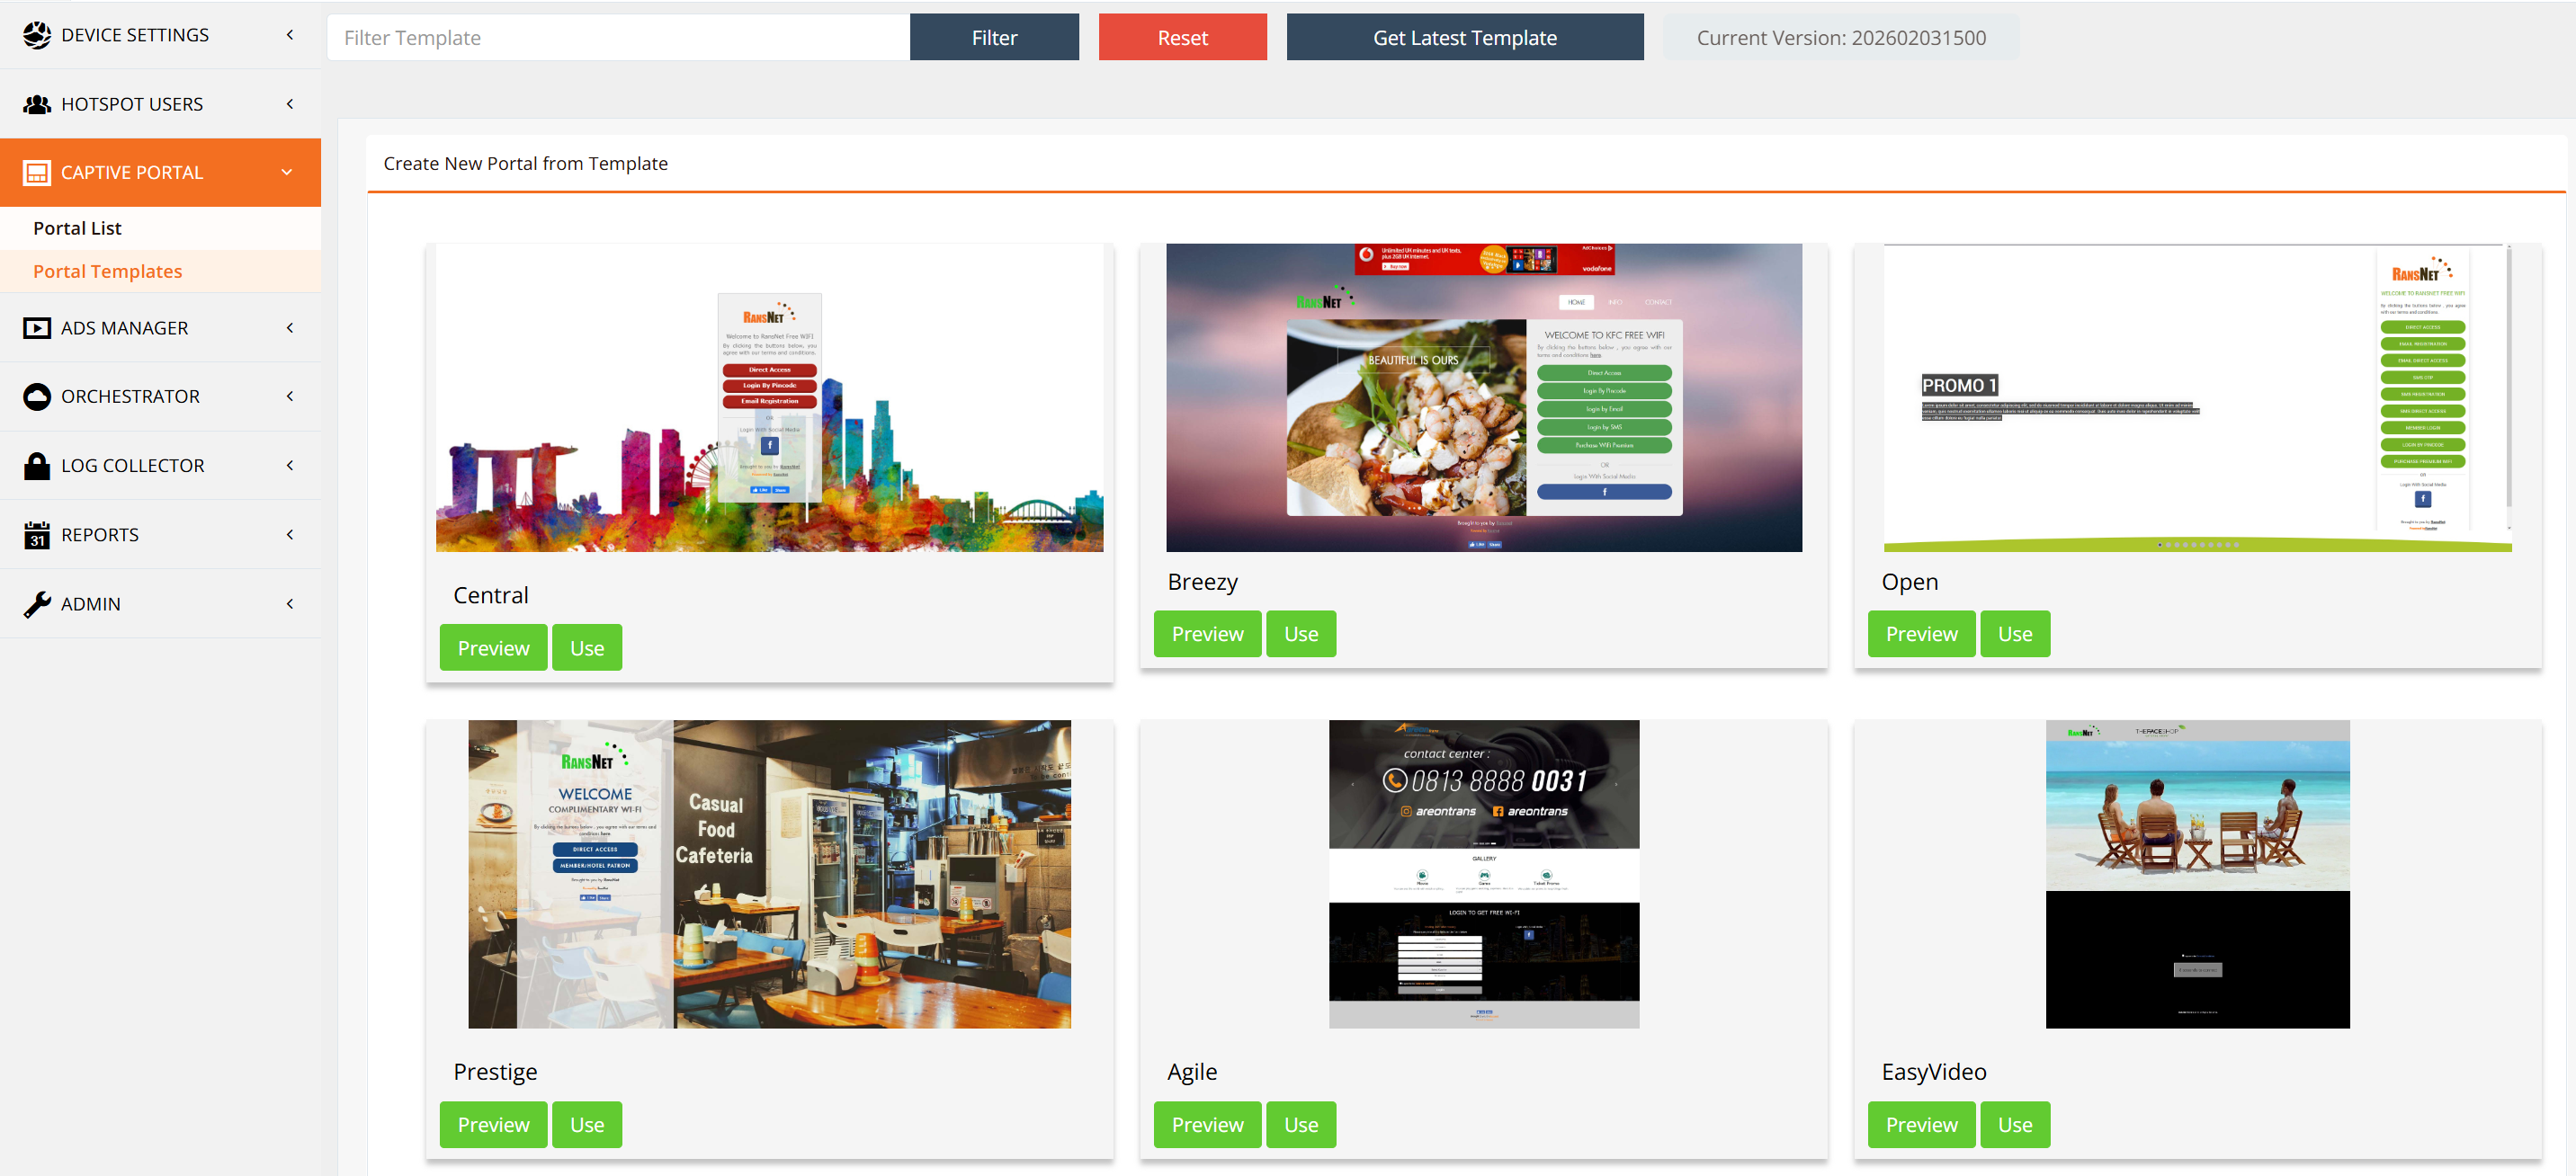
Click Use to start a new portal from the selected template.
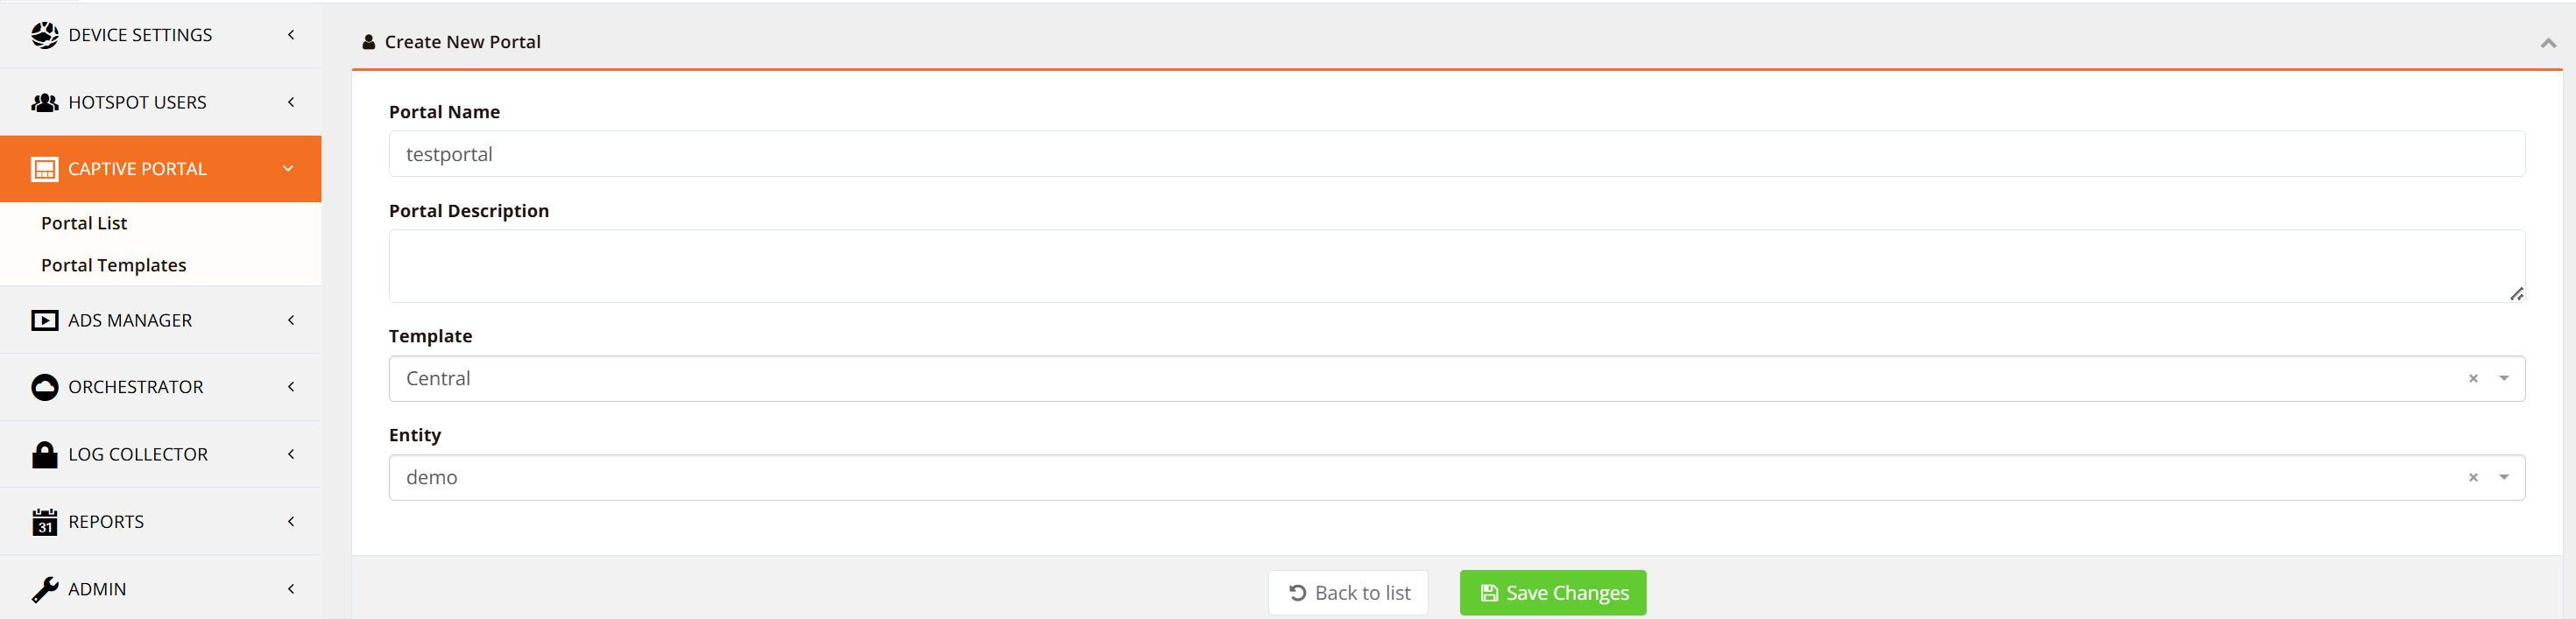
Step 2: Name the Portal
Give the portal a unique name (no spaces, no special characters). This name is used in hotspot instance configuration and portal management.
Step 3: Access the Portal List
All created portals are listed in HOTSPOT SETTINGS → Portal List.
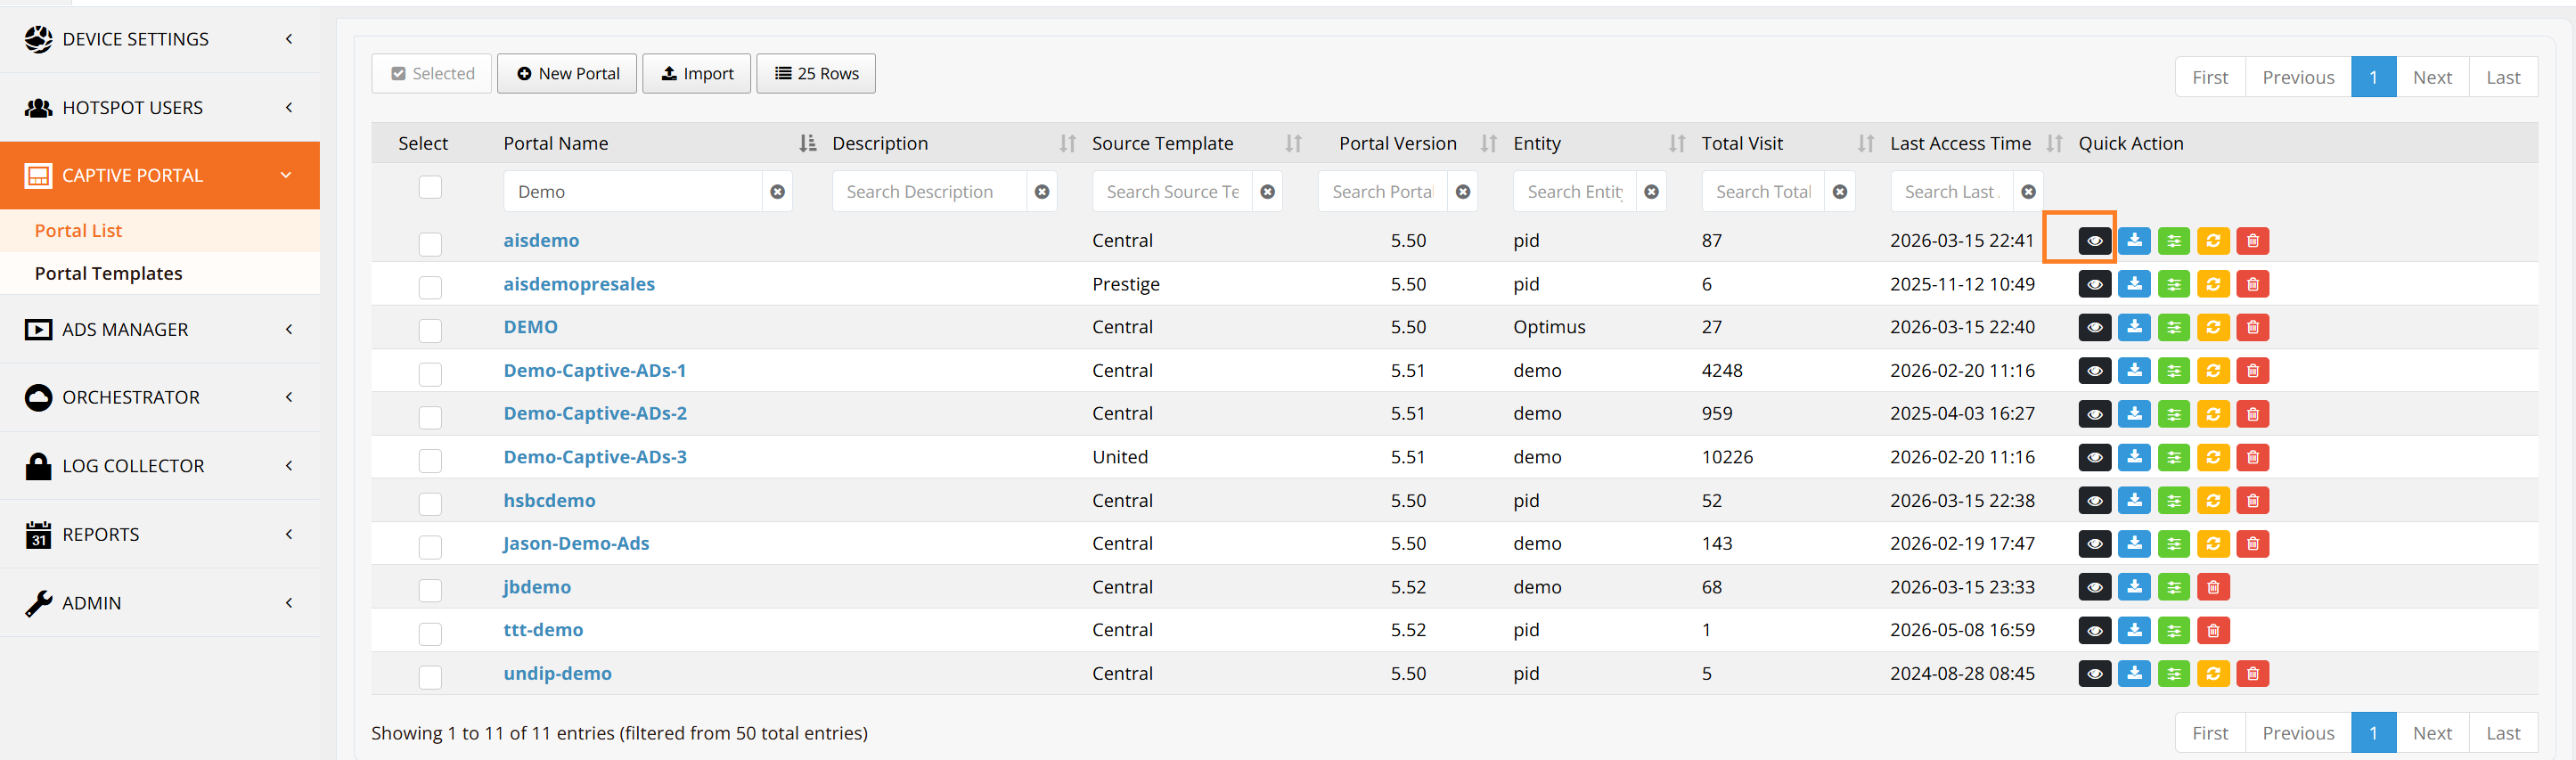
Click View to preview the portal and copy its URL. Use this URL when configuring the hotspot instance. Refer to Hotspot Instance Configuration — hotspot-portal.
General Settings
Navigate to HOTSPOT SETTINGS → Portal List, select your portal, and click Edit to configure general settings.
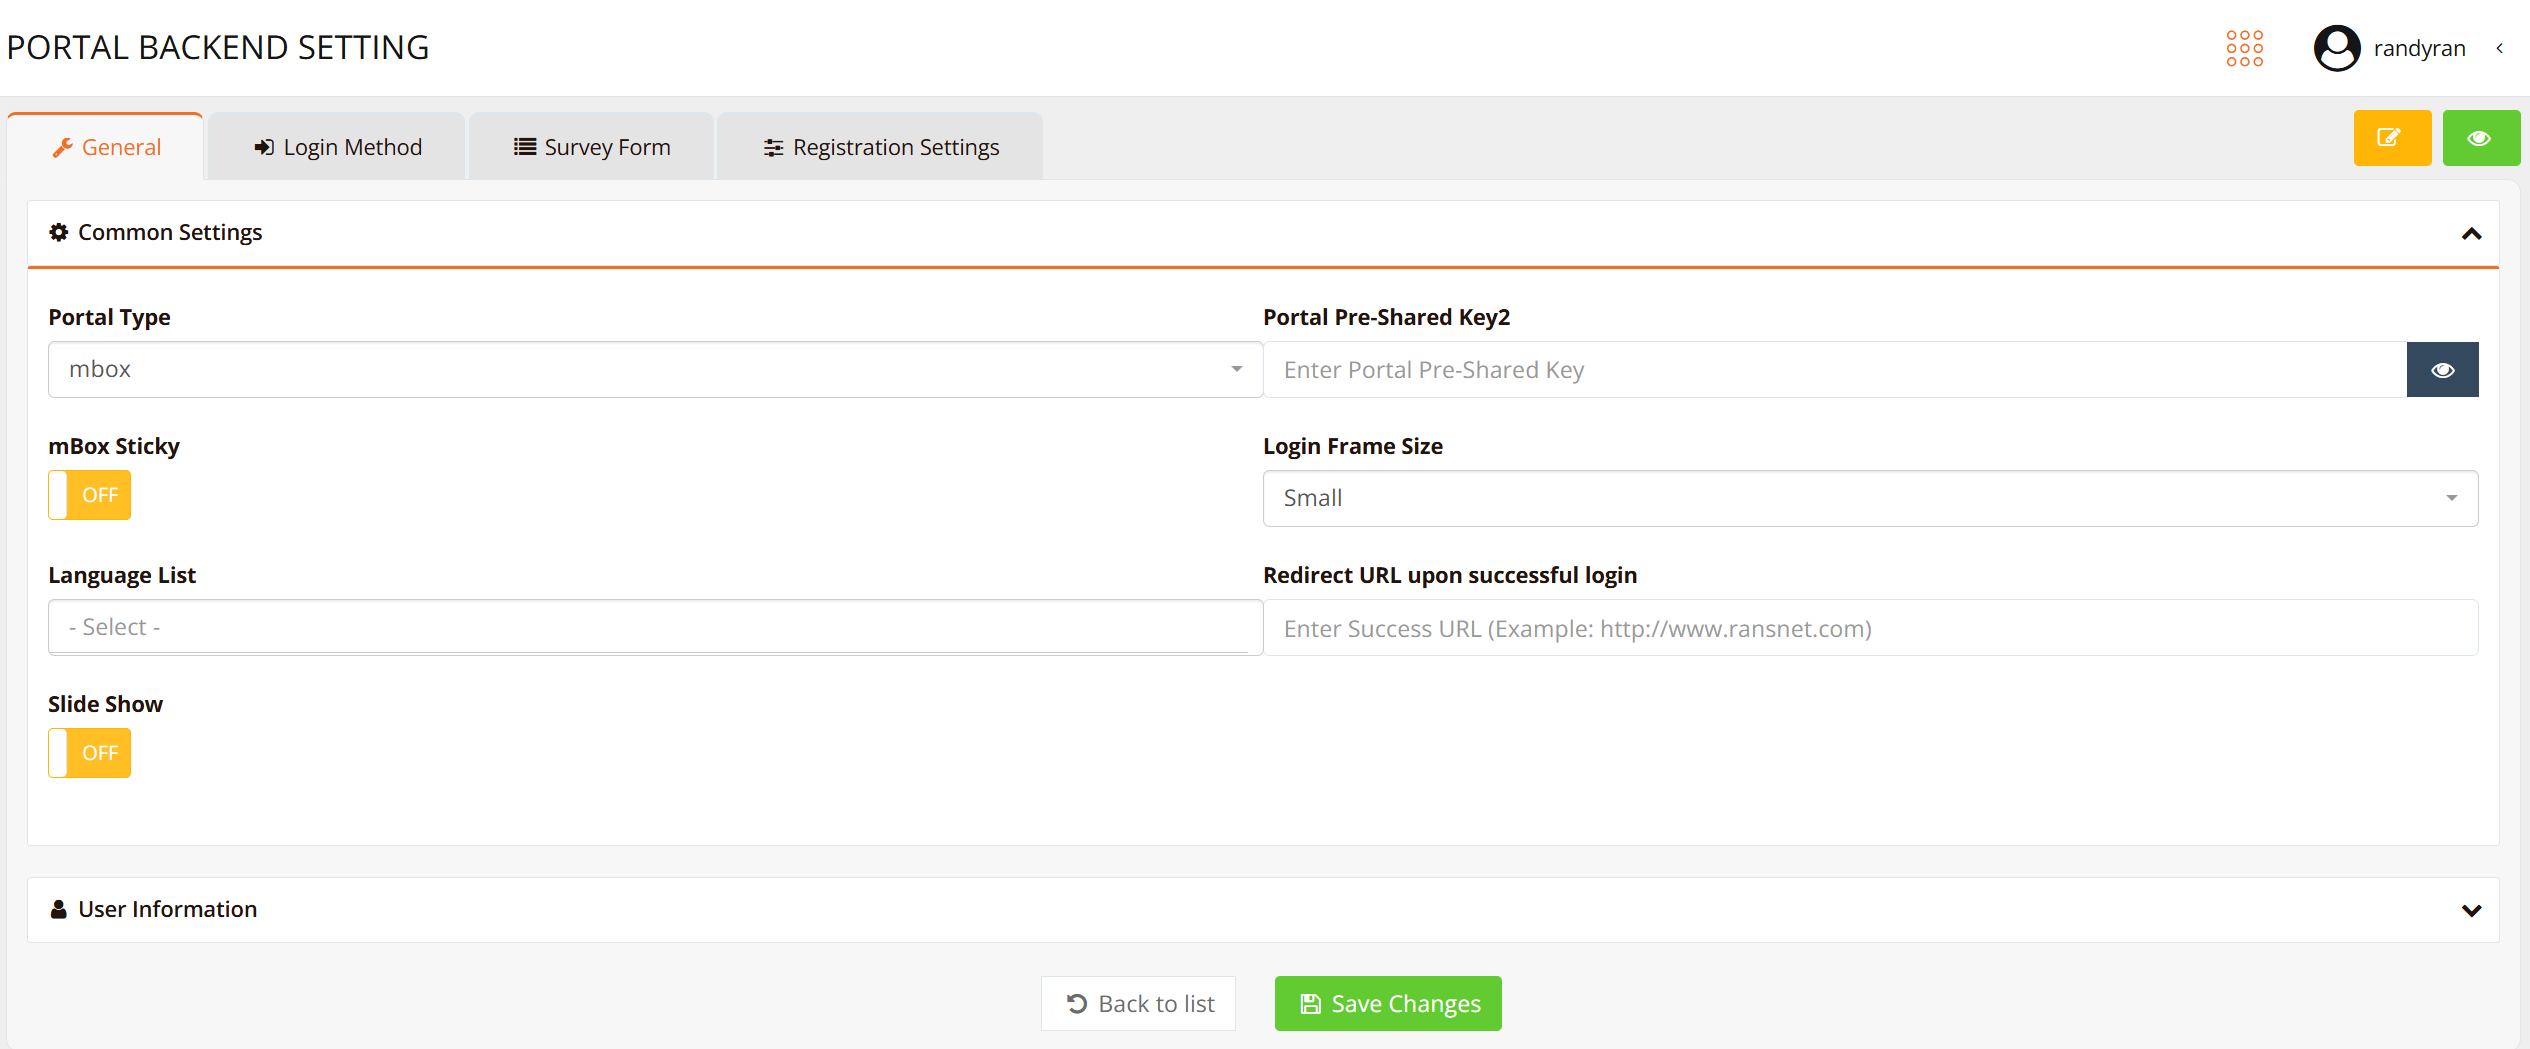
Common Settings
| Setting | Description | Options |
|---|---|---|
| Portal Type | Protocol used for portal communication | mbox (default) or WifiDog (for third-party AP integration) |
| Portal Pre-Shared Key | Shared secret between HSG and portal; used for secure communication | Auto-generated or custom value |
| mBox Sticky | Enable the seamless re-login Portal-sticky feature for returning users on the same device during the account validity period. User is automatically logged in without re-entering credentials. | Enable / Disable |
| Login Frame Size | Portal login form dimensions on screen | Small, Medium, Large |
| Language List | Supported languages on portal. Users can switch language during login. | Select multiple from 10+ languages |
| Redirect URL | Custom URL where users are redirected after successful authentication | e.g., https://www.hotel.com/welcome |
| Slideshow | Auto-rotate background images on portal splash page. Images are managed in portal customization settings. | Enable / Disable |
Portal-sticky
Portal-sticky is one of two methods for enabling seamless re-login (the other being client-sticky). After a user's first successful authentication, when the same user returns on the same device during the account validity period, the captive portal auto-logs them in — without requiring them to re-enter their username and password.
Enable portal-sticky on a per-portal basis using the mBox Sticky setting in Common Settings above.
Portal-sticky vs. Client-sticky
Both features deliver seamless re-login, but they work differently and suit different deployments. Choose based on your gateway design and whether you need Wi-Fi marketing features.
| Aspect | Portal-sticky | Client-sticky |
|---|---|---|
| Auto-login performed by | Captive portal | HSG hotspot engine |
| Triggered by | A browsing session (web connection only); most mobile devices trigger this automatically via CNA | Any connection — web or non-web |
| Deployment support | On-premise and cloud (local gateway can be HSG, HSA, or UAP) | On-premise only (local HSG gateway) |
| Marketing redirect after re-login | Yes — can redirect to a marketing URL or banner/ads page | No — user gets full access immediately, no redirect |
| Session validity | Follows RADIUS data-lifetime (set via CLI) |
Configurable via start or last days (set via CLI) |
| Best for | Venues needing Wi-Fi marketing while keeping seamless access | Large venues (airports, hotels) where marketing is not required and maximum seamlessness matters |
Note
Portal-sticky is disabled by default and is enabled per portal. For deployments where the auto-login must work for any connection type (not just web), or for fully transparent roaming across VLANs, use client-sticky instead — or combine both for large venues prone to mass-reconnection events.
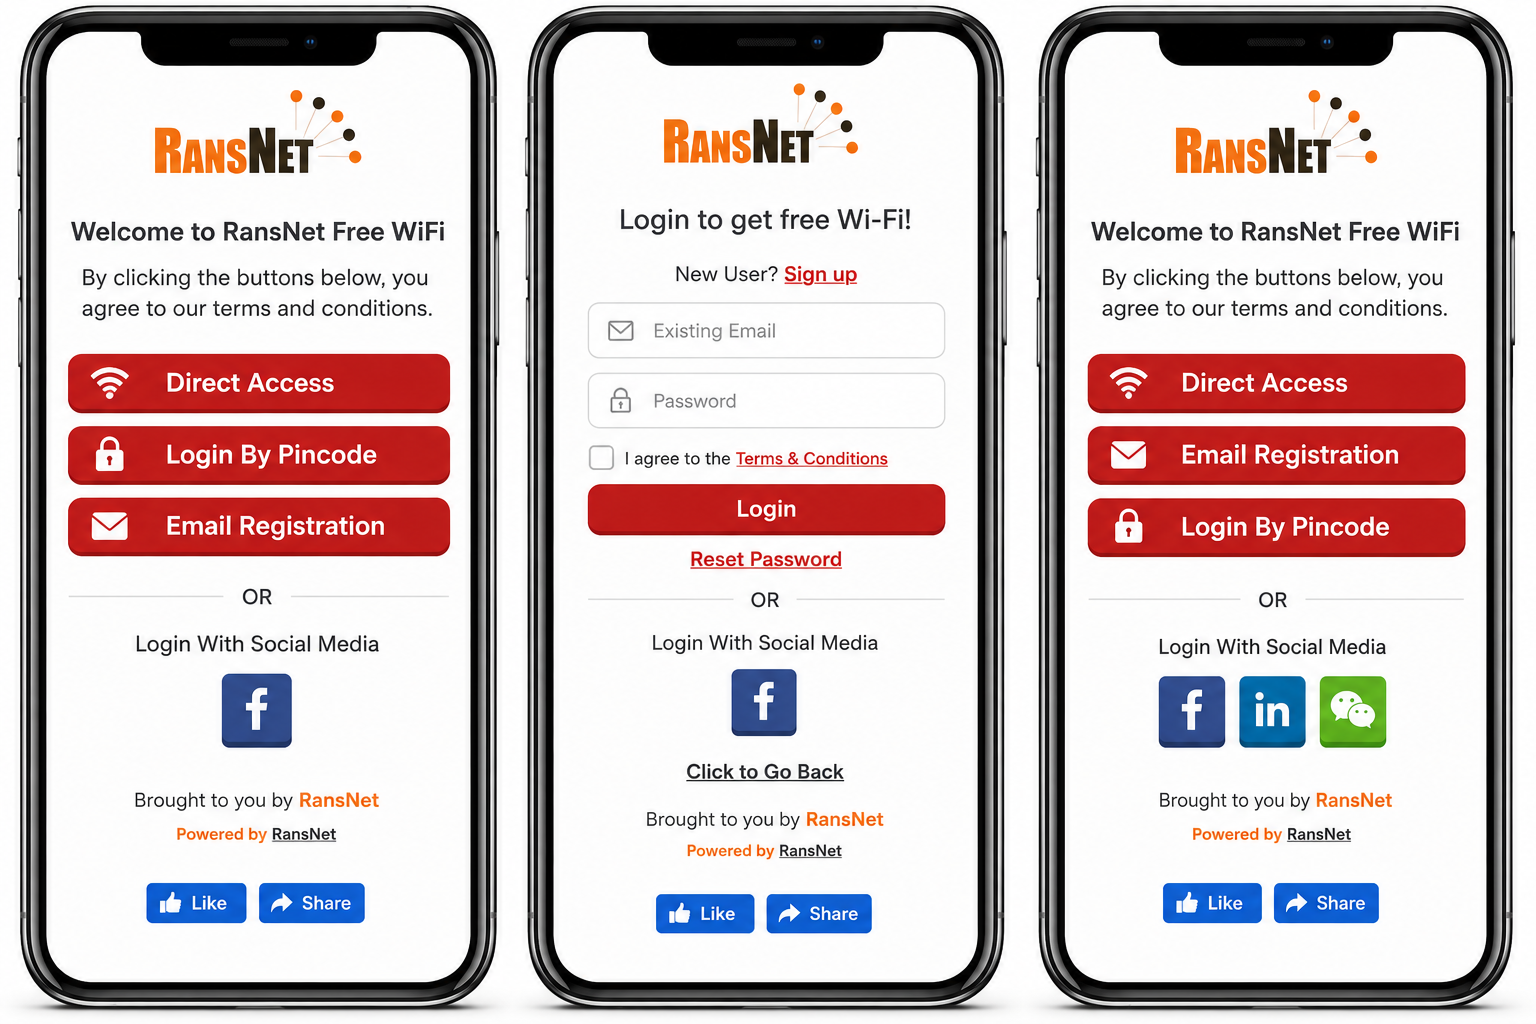
Login Methods
The Login Method tab defines how users authenticate. HSG supports multiple methods simultaneously on the same portal, allowing different user types to choose their preferred login flow.
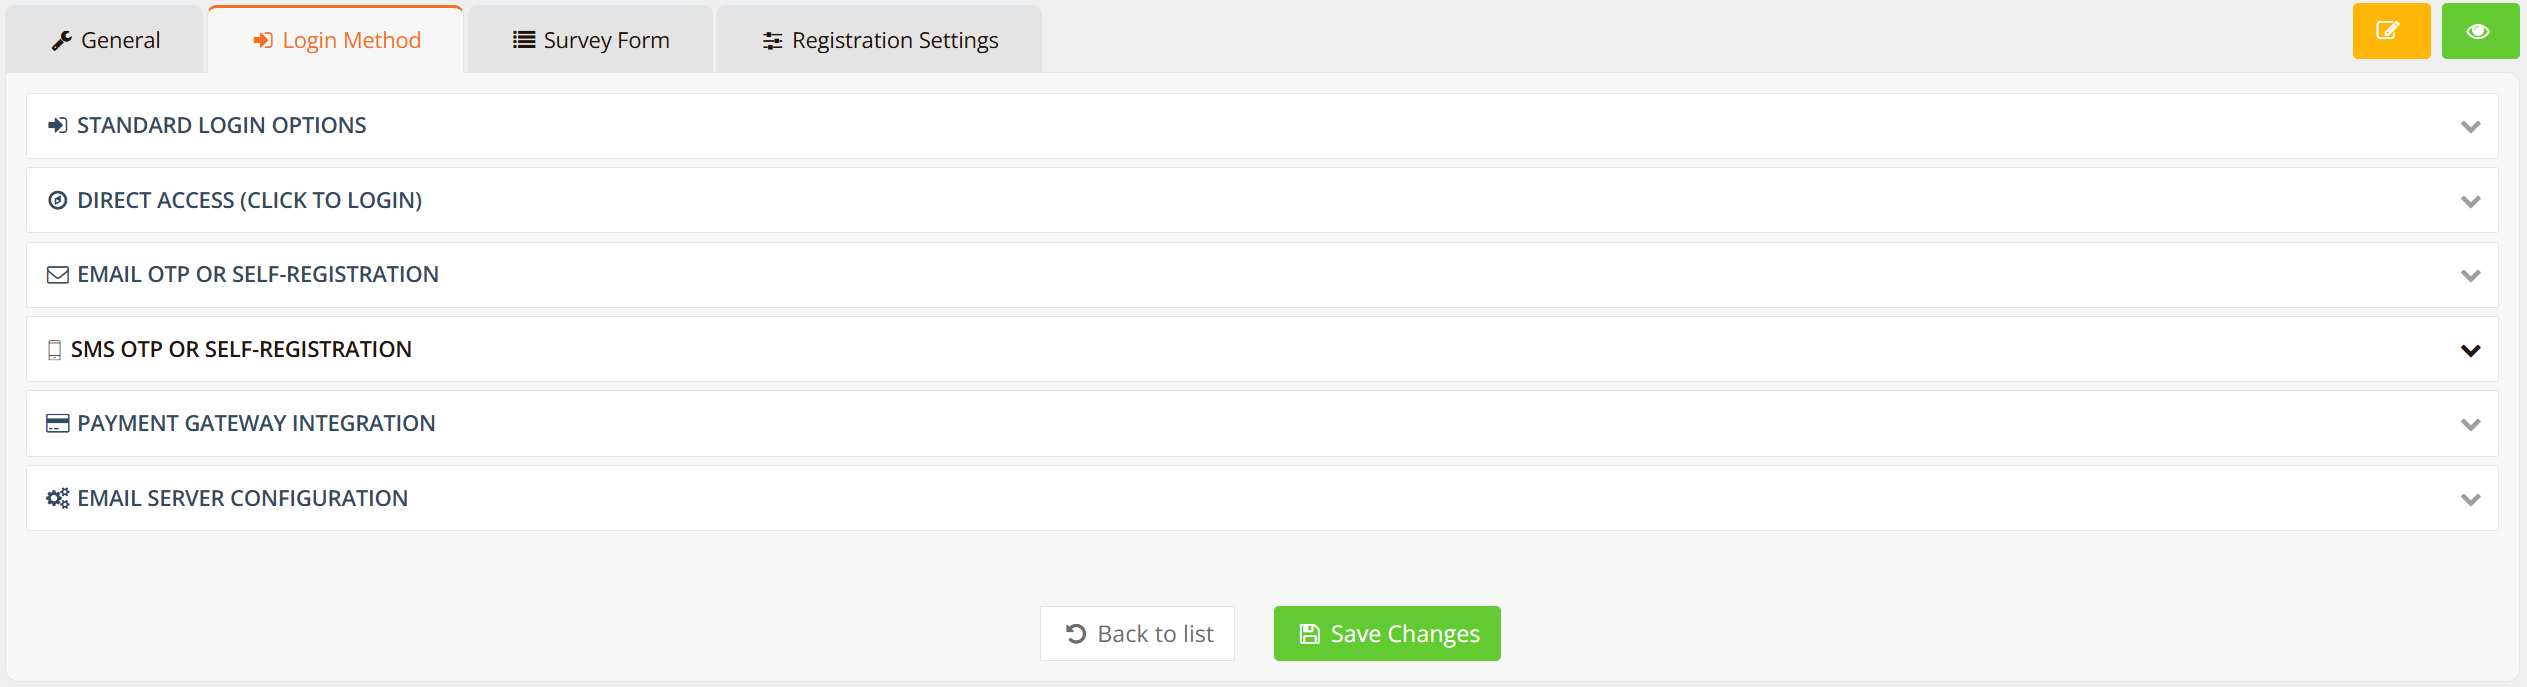
Tip
Combine multiple login methods on the same page to accommodate different user preferences. For example, offer both "username/password" for returning guests and "Email OTP" for new visitors.
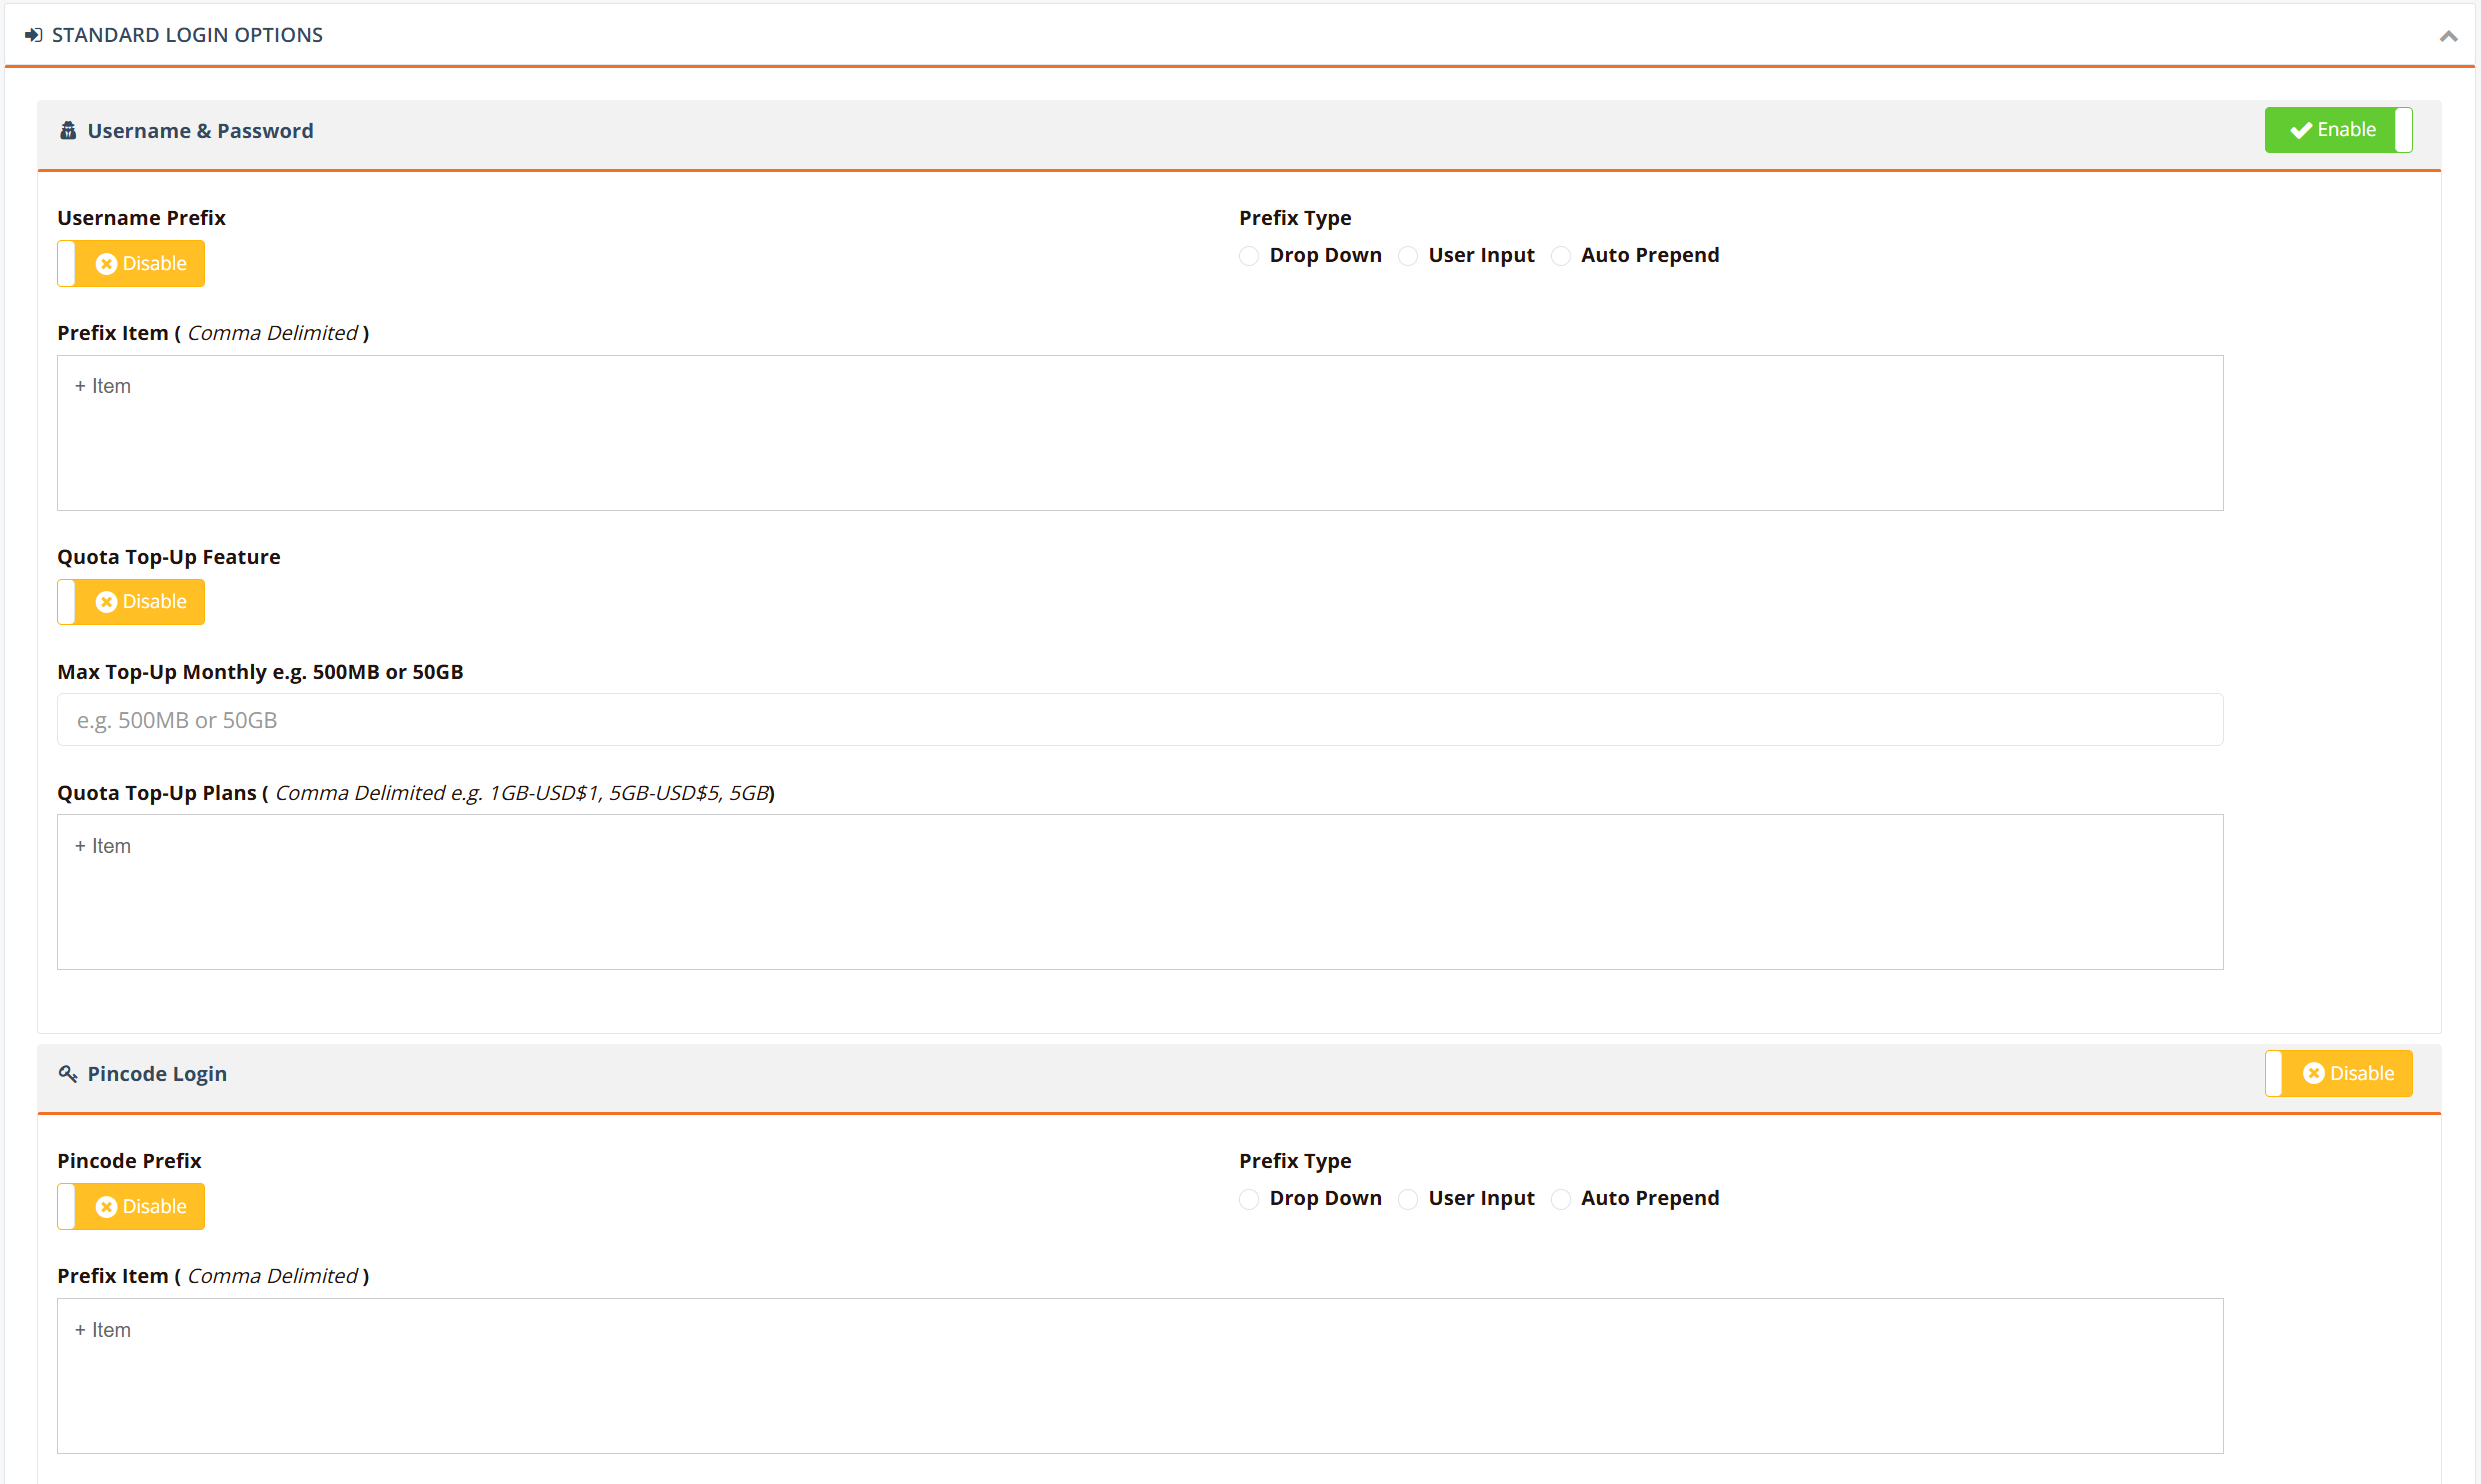
Standard Login (Username & Password)
Users log in with pre-configured username and password, or PIN code.
| Feature | Description |
|---|---|
| Use Case | Pre-registered users (hotel guests via PMS, loyalty members, staff) |
| User Experience | User enters username/password or PIN on login form and clicks "Connect" |
| Backend Setup | Create user accounts via User Management or import from CSV/PMS |
| Customization | Option to enforce username prefix/format (e.g., "room-" prefix for hotel guests) |
When to use:
- Hotel guest Wi-Fi (room number + last name via PMS sync)
- Staff/corporate Wi-Fi (pre-created accounts)
- Members-only venues (loyalty program members)
- Any scenario where users have pre-defined accounts
Direct Access
Users click a button to connect without entering any credentials. No authentication required.
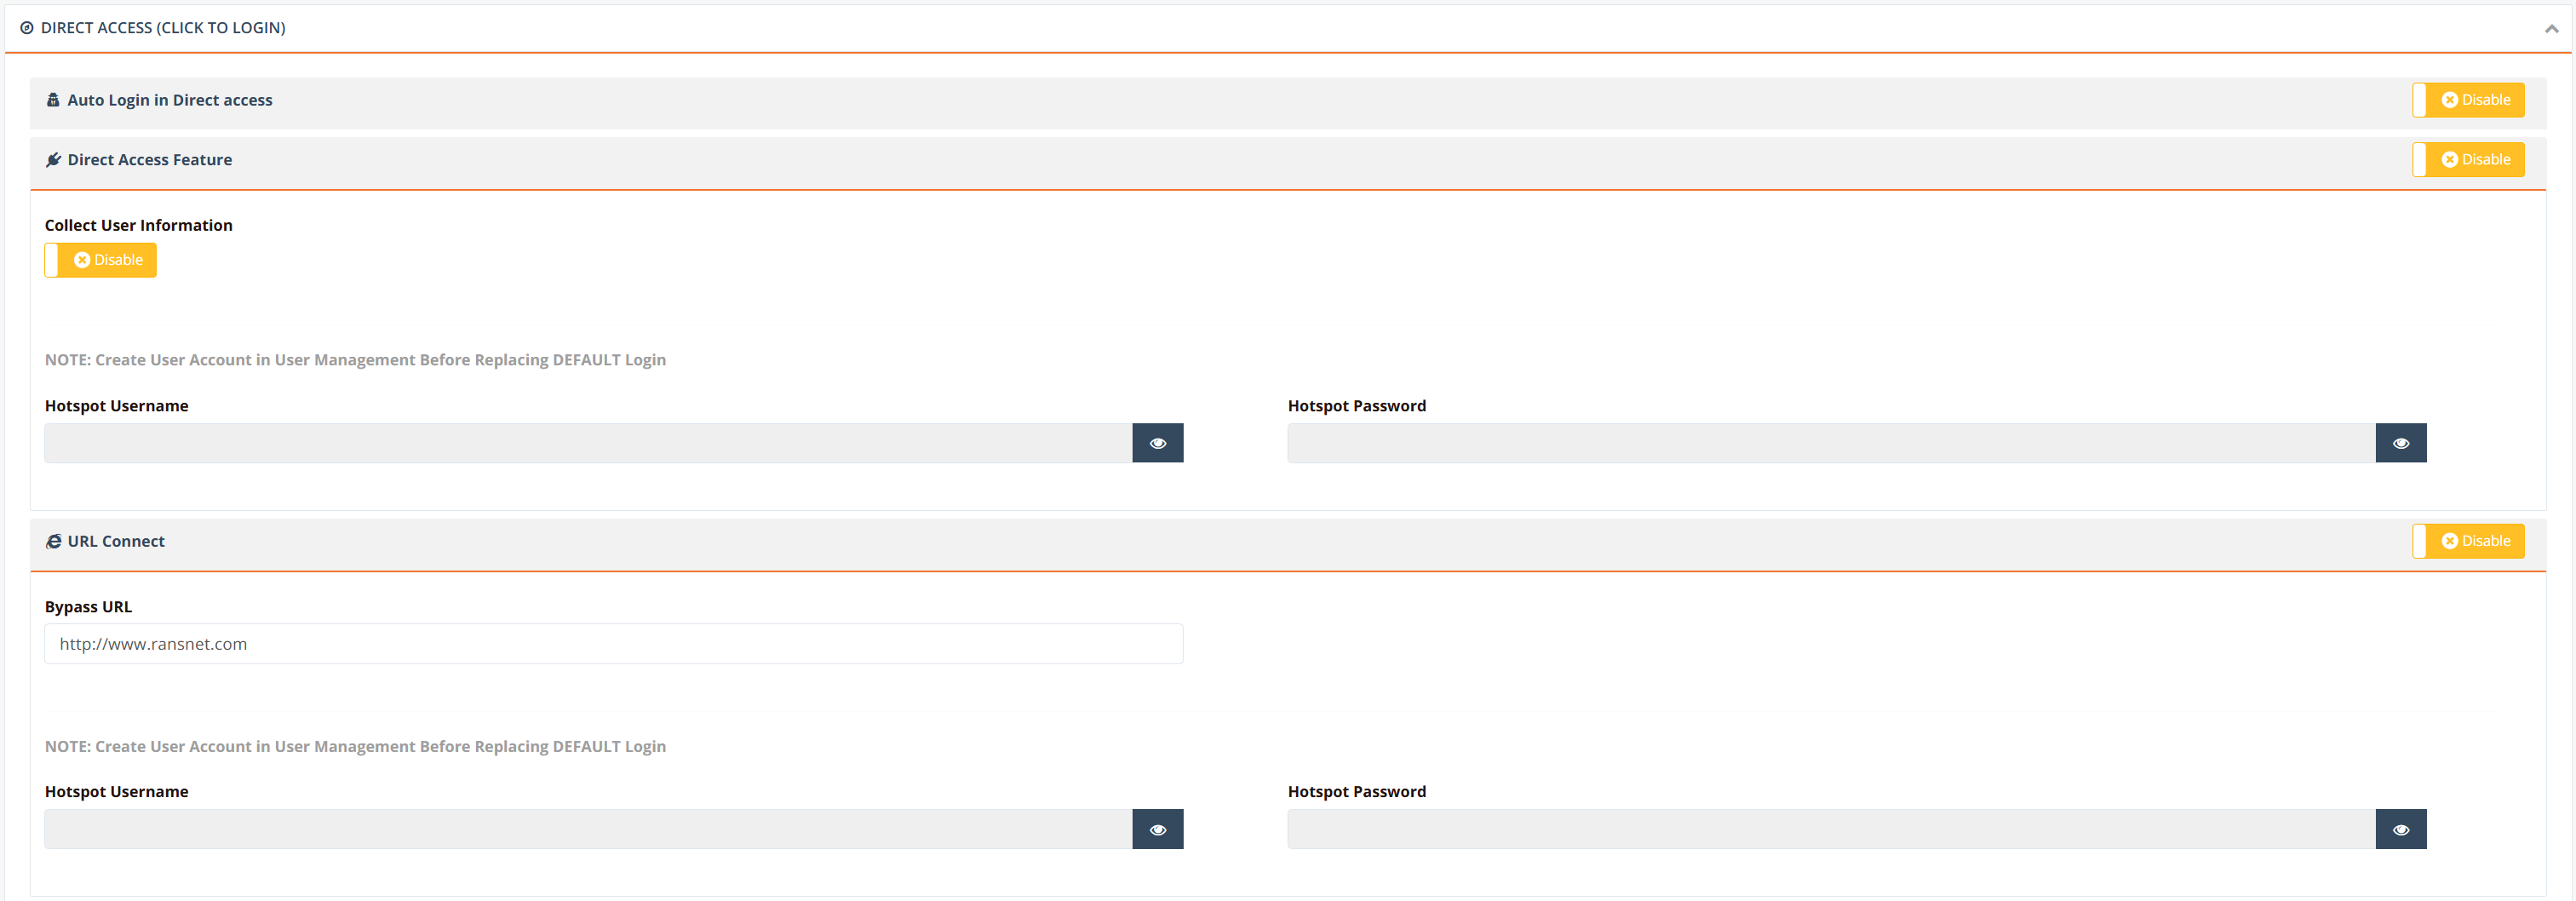
Options:
| Option | How It Works | Use Case |
|---|---|---|
| Auto Login | Portal shows "Connect" button. Clicking grants instant access. Backend uses default demouser account. |
Free/public Wi-Fi in lobbies, waiting areas |
| Collect User Information | Portal asks for optional demographics (name, email, phone) before granting access. Information is stored for analytics and marketing. | Build guest database for F&B, retail venues |
| URL Connect | User browses to a preset URL (e.g., via QR code scan) and HSG automatically grants device access. No portal login required. | QR code-based access in retail, restaurants, events |
| Custom Username/Password | Instead of default demouser, specify a custom credential pair to differentiate this portal from others. |
Multiple portals on same gateway with different branding |
When to use: - Free public Wi-Fi (low friction) - Event venues (temporary access without login) - QR code-based Wi-Fi (scan → instant access)
Video Demo: Direct Access & QR Code Configuration
Email OTP (Self-Registration)
Users enter their email and receive a one-time password (OTP) to authenticate. Validates email accuracy before granting full access.
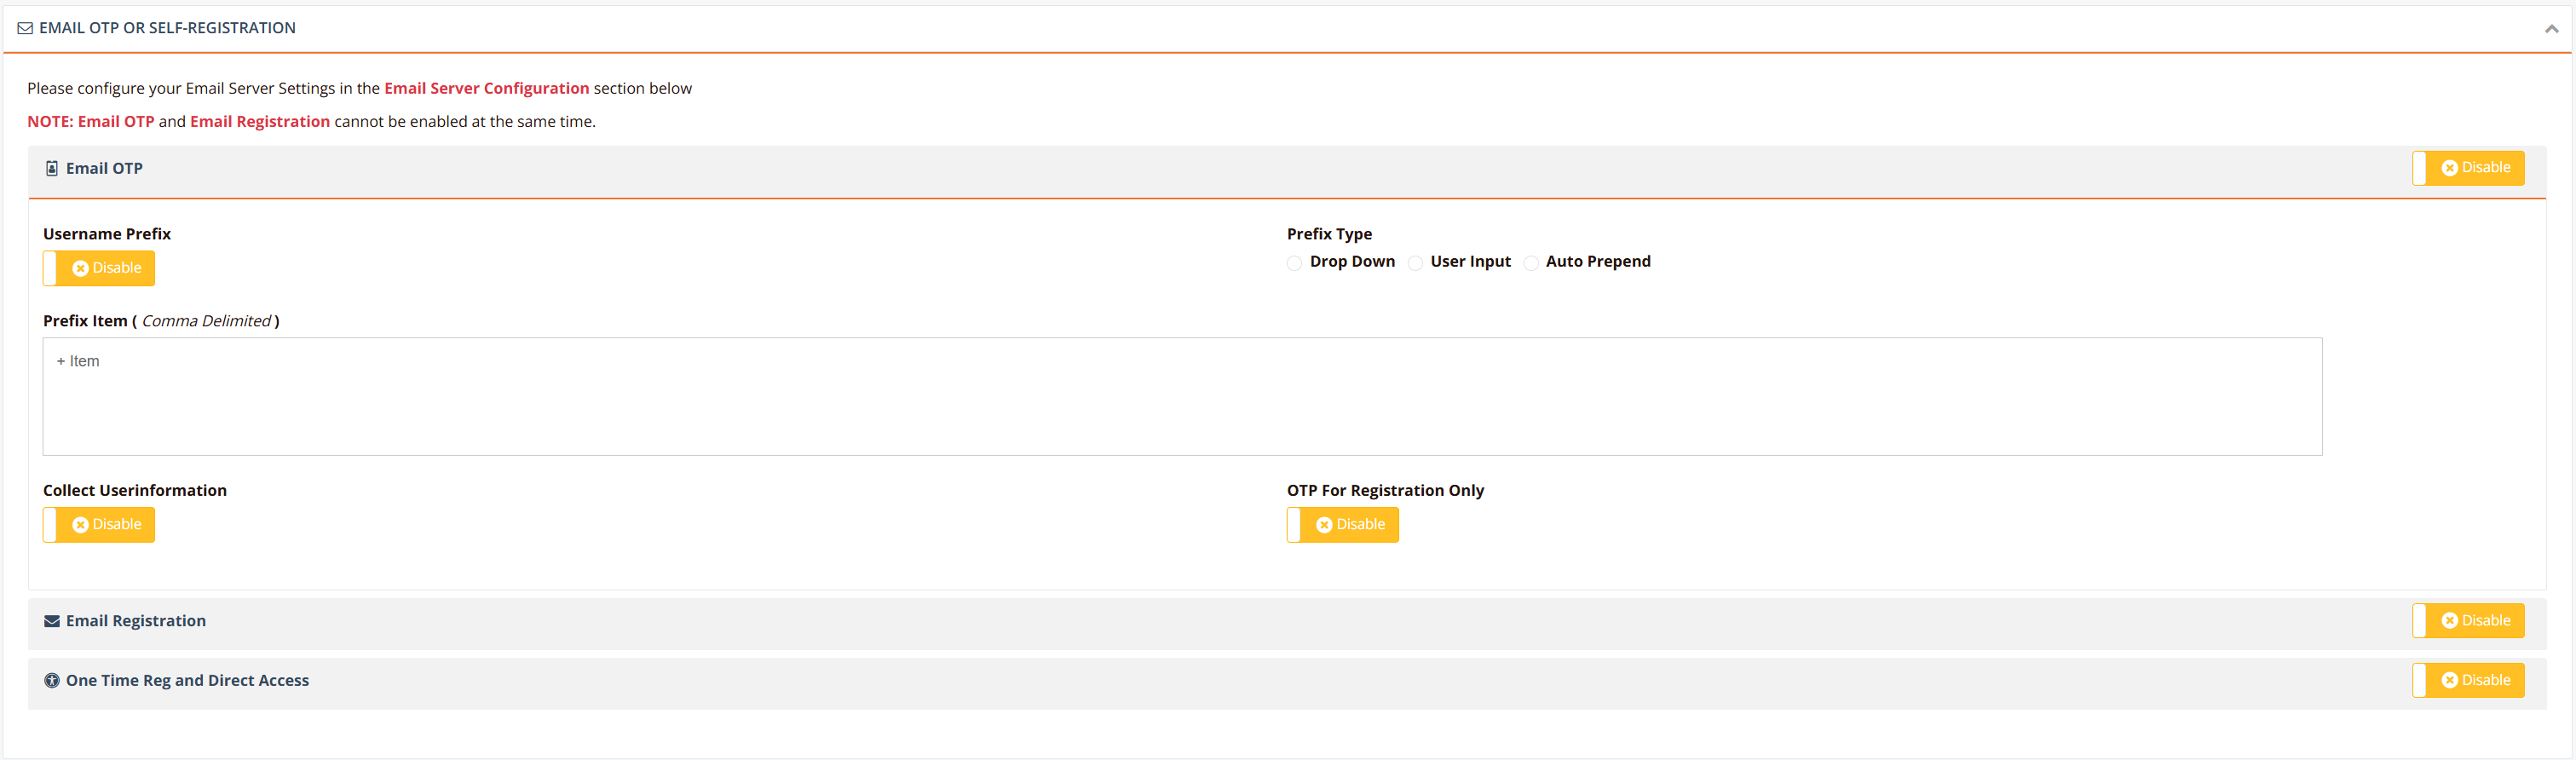
Three flavors:
| Option | User Journey | Access Duration | Use Case |
|---|---|---|---|
| Email OTP only | User enters email → receives OTP → enters OTP to connect. Each subsequent login requires new OTP. | Per login | Casual visitors, no registration required |
| Email Registration | First login: user registers with name/email → validates email via OTP → granted access. Subsequent logins: email + password (self-defined or generated). | Persistent account | Build customer database; repeat visitors |
| One-time registration + direct access | First login: register and validate email. Subsequent logins: email only (no password, auto-login). | Persistent account | Frictionless repeat access for known customers |
Prerequisites:
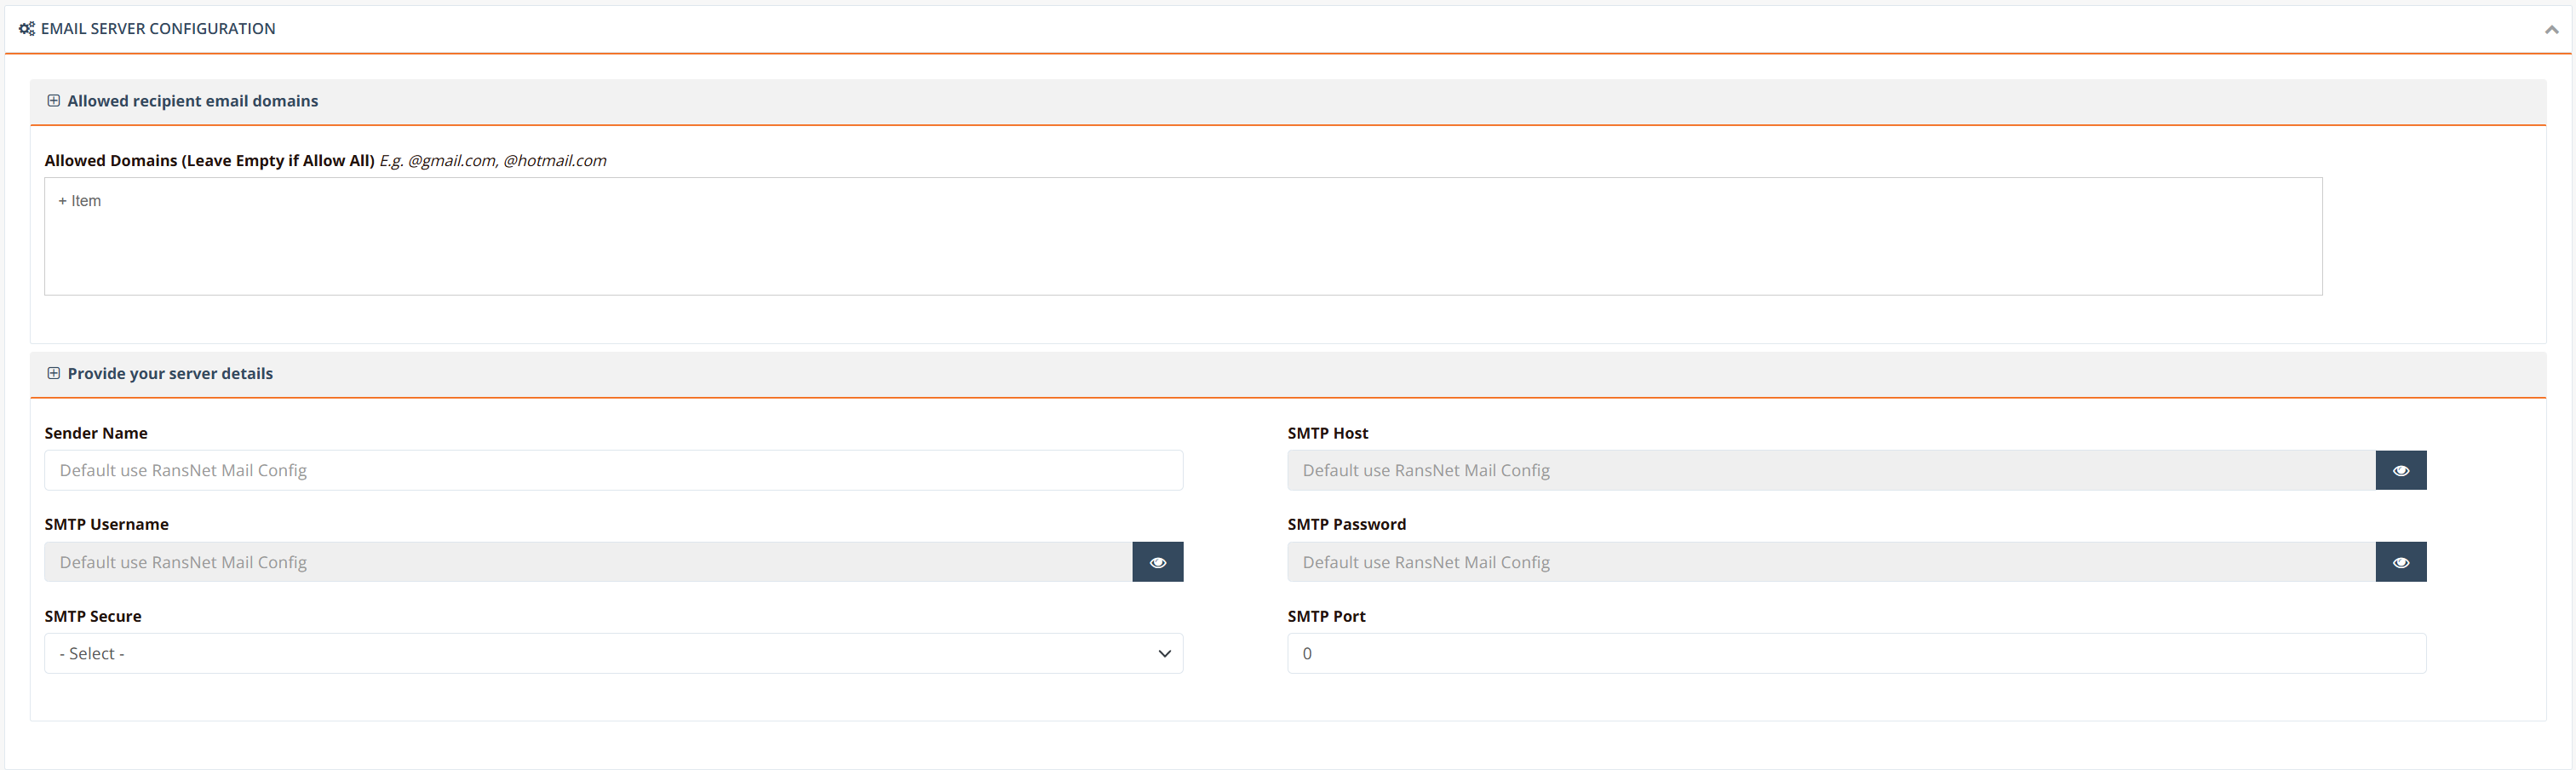
- SMTP email server configured to send OTP emails
- Optional: restrict to specific email domains (e.g., corporate domain only)
When to use:
- Retail/F&B outlets building customer databases
- Hotels with external guest management (not PMS-integrated)
- B2B venues wanting corporate email verification
Video Demo: Email OTP Self-Registration Setup
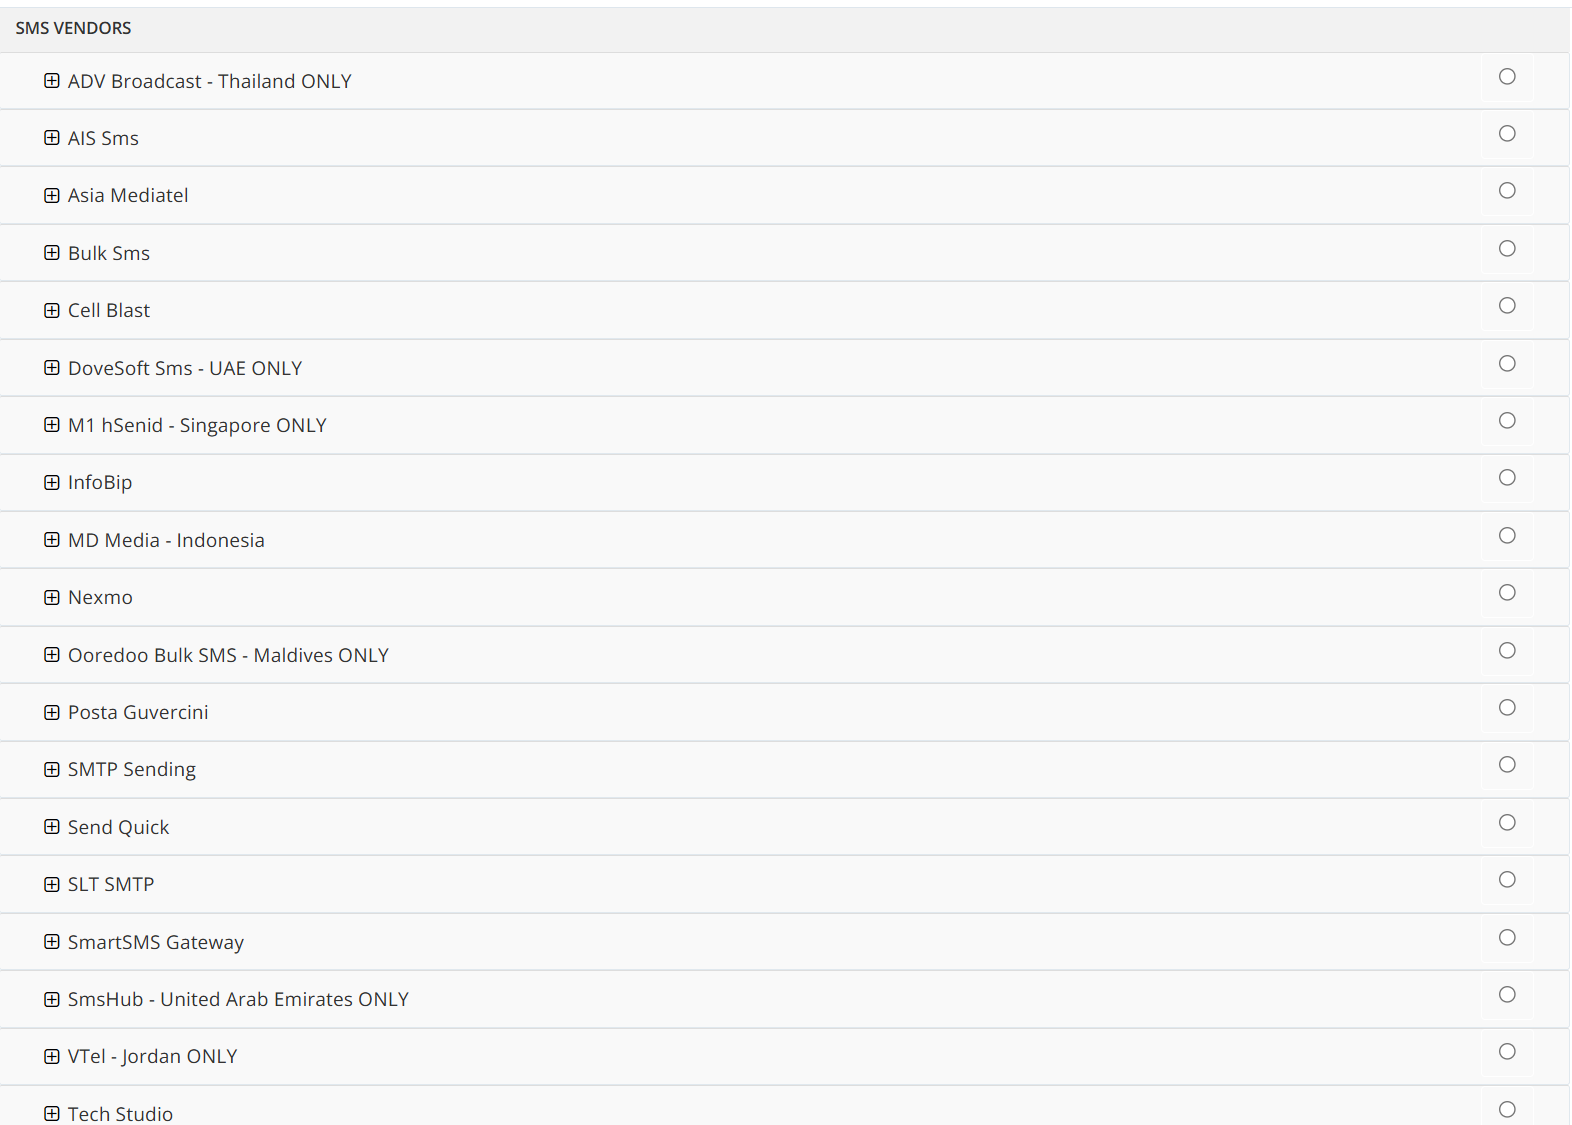
SMS OTP (Self-Registration)
Users enter their mobile number and receive a one-time password via SMS. Simpler than email OTP (no email validation step).
Three flavors:
| Option | User Journey | Access Duration | Use Case |
|---|---|---|---|
| SMS OTP only | User enters mobile → receives OTP → enters OTP to connect. Each login requires new OTP. | Per login | Casual visitors, maximum simplicity |
| SMS with registration | First login: register with name/mobile, validate via OTP. Subsequent logins: mobile + password. | Persistent account | Build customer database; repeat visitors |
| One-time registration + direct access | First login: register and validate mobile. Subsequent logins: mobile only (auto-login). | Persistent account | Frictionless repeat access for known customers |
Prerequisites:
- SMS gateway service subscription (HSG integrates with major providers: Twilio, Nexmo, local operators, etc.)
- Enter SMS gateway credentials in portal settings
When to use:
- Venues targeting mobile-first users (no email access)
- International travelers (SMS more universal than email)
- Events, stadiums, F&B venues
Video Demo: SMS OTP Self-Registration Configuration
Payment Gateway Integration
Users purchase Wi-Fi access via credit card or e-wallet. Enables "pay-per-use" or subscription-based Wi-Fi monetization.
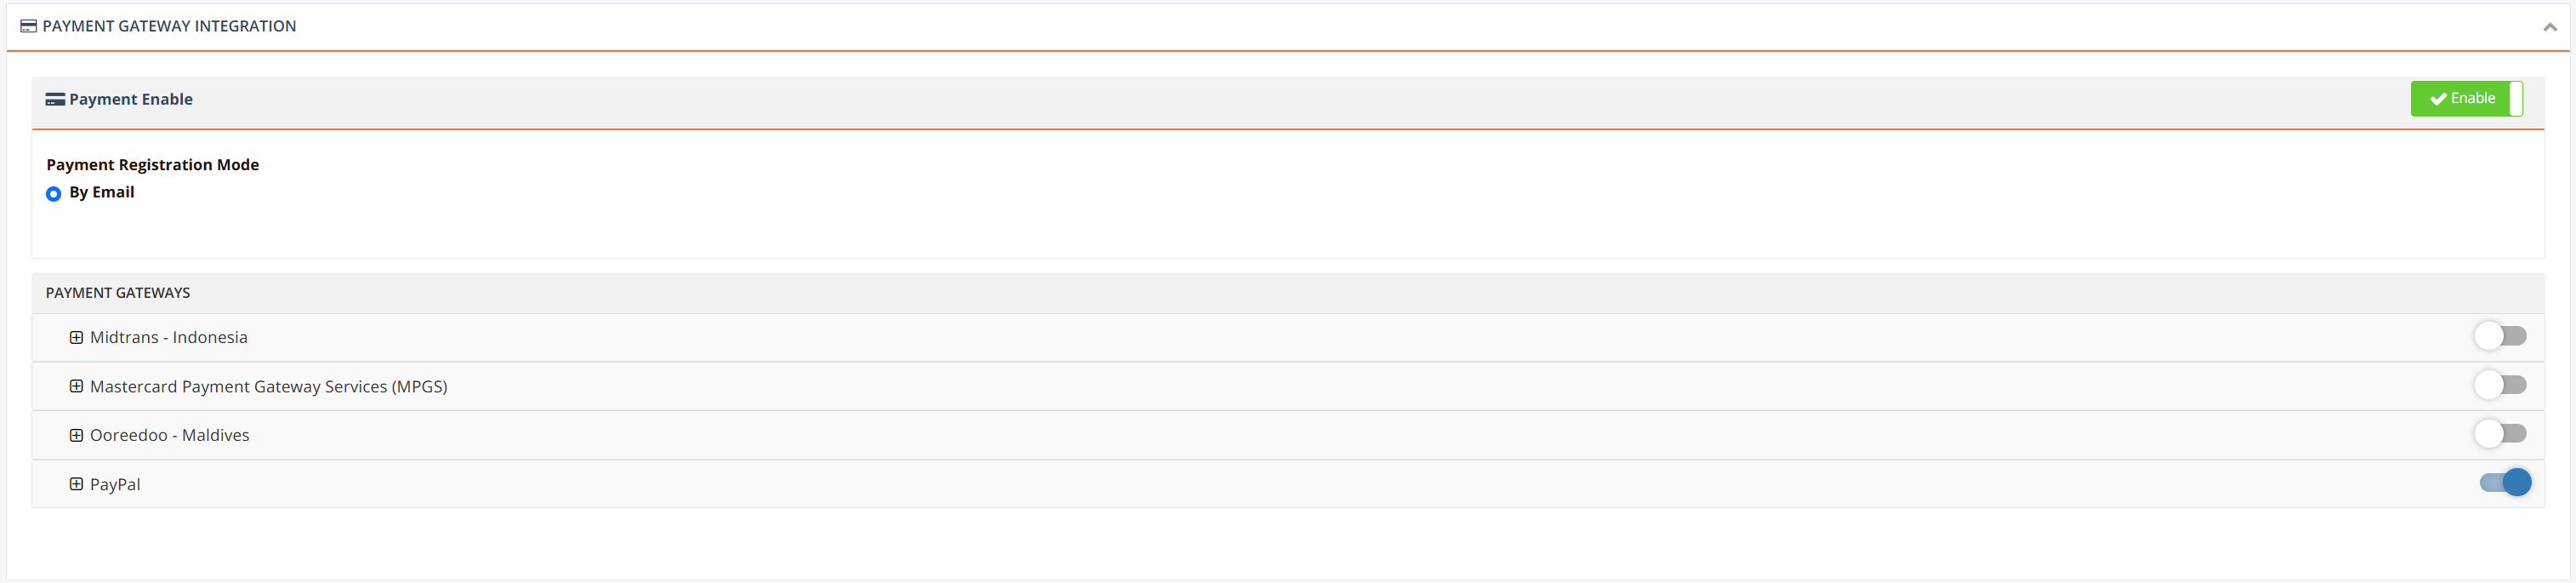
Supported Providers:
- Midtrans
- PayPal
- Ooreedoo
- MasterCard
- Other major payment processors (support custom development)
Payment Flow:
- User selects access plan (1-hour, 24-hour, monthly, etc.) and price
- User enters payment details in secure payment form
- Payment processor validates transaction
- On successful payment, HSG grants access with configured duration
- Payments are automatically transferred to venue’s bank account by provider
Prerequisites:
- Subscription with supported payment gateway provider
- Provider account credentials configured in portal settings
- Define access plans (duration, price) in portal configuration
When to use:
- Hotels and resorts (premium/upsell Wi-Fi)
- Airports and transportation hubs
- Commercial venues wanting to monetize connectivity
- Paid premium access (fast lane vs free tier)
Refer to Payment Gateway Integration for more details.
Branding & Customization
Customize the portal appearance to match your venue’s brand without requiring a web designer.
Navigate to HOTSPOT SETTINGS → Portal List, select your portal, and click the Portal Name to enter customization mode.
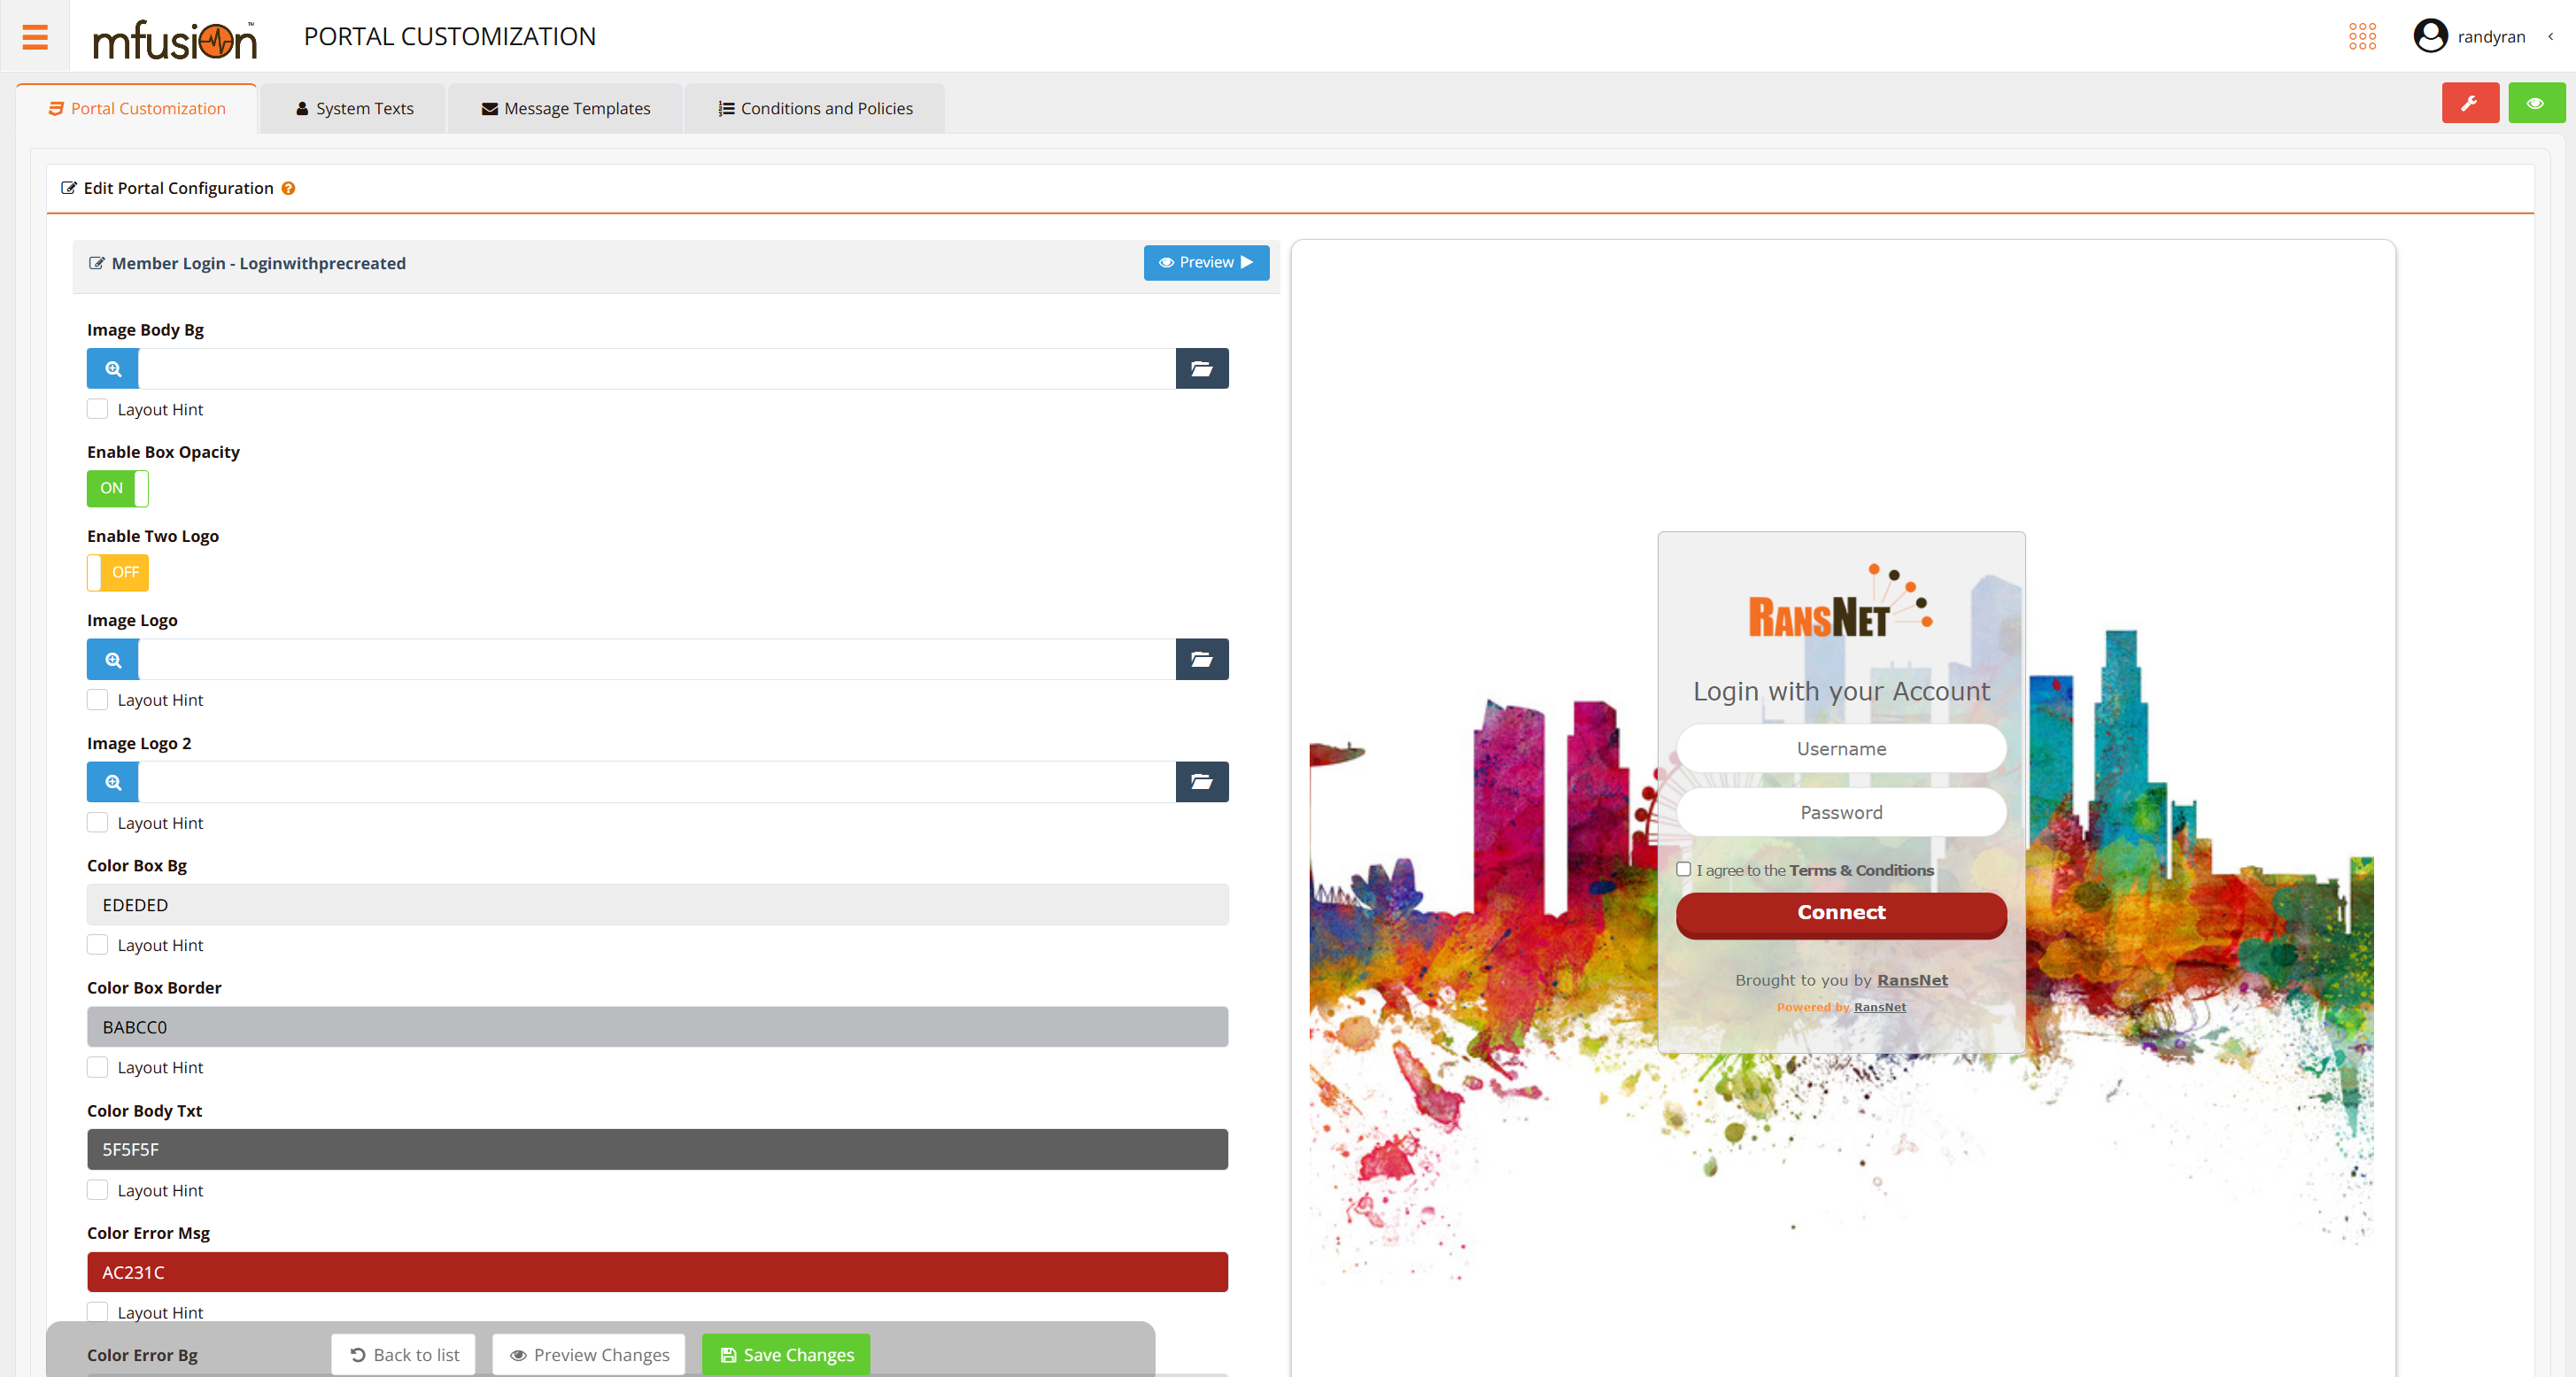
Customizable Elements:
- Logo — Upload your venue’s logo (displayed on login page)
- Colors — Brand colors for buttons, text, backgrounds
- Background Image — Splash page or login page wallpaper
- Terms of Service — Custom ToS text that users must accept
- Welcome Text — Custom greeting message on login page
- Promotional Content — Advertisements or promotional banners
- Footer Links — Custom links (privacy policy, support, etc.)
- Slideshow — Auto-rotate multiple background images
Preview & Test: Use the Preview button frequently to see changes in real-time across different screen sizes (mobile, tablet, desktop).
Video Demo: Customizing Captive Portal
Best Practices
Login Method Selection
- High-traffic venues (malls, airports) — Use direct access or OTP for frictionless guest experience
- Hotels — Use PMS integration (auto-created accounts) for seamless room-based login
- Retail/F&B — Use email/SMS OTP to build customer database for repeat visits and marketing
- Corporate Wi-Fi — Use standard login with pre-created staff accounts
- Mixed audience — Combine methods (standard + direct access) to serve different user types
Branding & UX
- Keep it simple — Minimize fields; only ask for essential information
- Mobile-first design — Test portal on phones; ensure buttons and text are large and tappable
- Fast load time — Optimize logo and background image sizes; avoid large multimedia
- Clear ToS — Display privacy policy and data usage terms upfront
- Support contact — Always provide help/support information on portal or redirect after login
Security
- Use HTTPS — Portal redirects should use secure HTTPS, not HTTP
- Validate inputs — Email/SMS fields require valid format before OTP is sent
- Rate limit OTP — Prevent brute force; limit OTP attempts per user per time window
- Secure credentials — Payment gateway credentials and pre-shared keys should be rotated periodically
- Logout links — Provide explicit logout option on portal welcome page to clear sessions
Verification
After configuring your portal, test the complete login flow:
- Preview Portal — Click Preview in portal customization to see the live login page
- Verify Branding — Confirm logo, colors, and text display correctly
- Test Login Method — Test your chosen login method end-to-end:
- Standard login: enter test credentials
- OTP: verify email/SMS is received
- Direct access: verify "Connect" button grants access
- Payment: complete a test transaction (if applicable)
- Test Redirect — Verify successful login redirects to configured post-login URL
- Test on Mobile — Open portal on phone; verify layout and buttons are mobile-friendly
Related Features
- Hotspot Instance Configuration — Link portal to a hotspot instance (VLAN)
- User Management — Create and manage user accounts for standard login method
- Hotspot Authentication Methods — Detailed authentication mechanism and RADIUS integration
- Hotel Wi-Fi Integration — End-to-end guide for PMS-based guest Wi-Fi with automated portal