Payment Gateway Integration for Premium Wi-Fi
Guest Wi-Fi monetization can drive revenue while improving network service quality through premium pricing tiers. This guide explains how to enable online payment on a hotspot portal, allowing users to purchase Wi-Fi access plans using credit card before connecting to the internet.
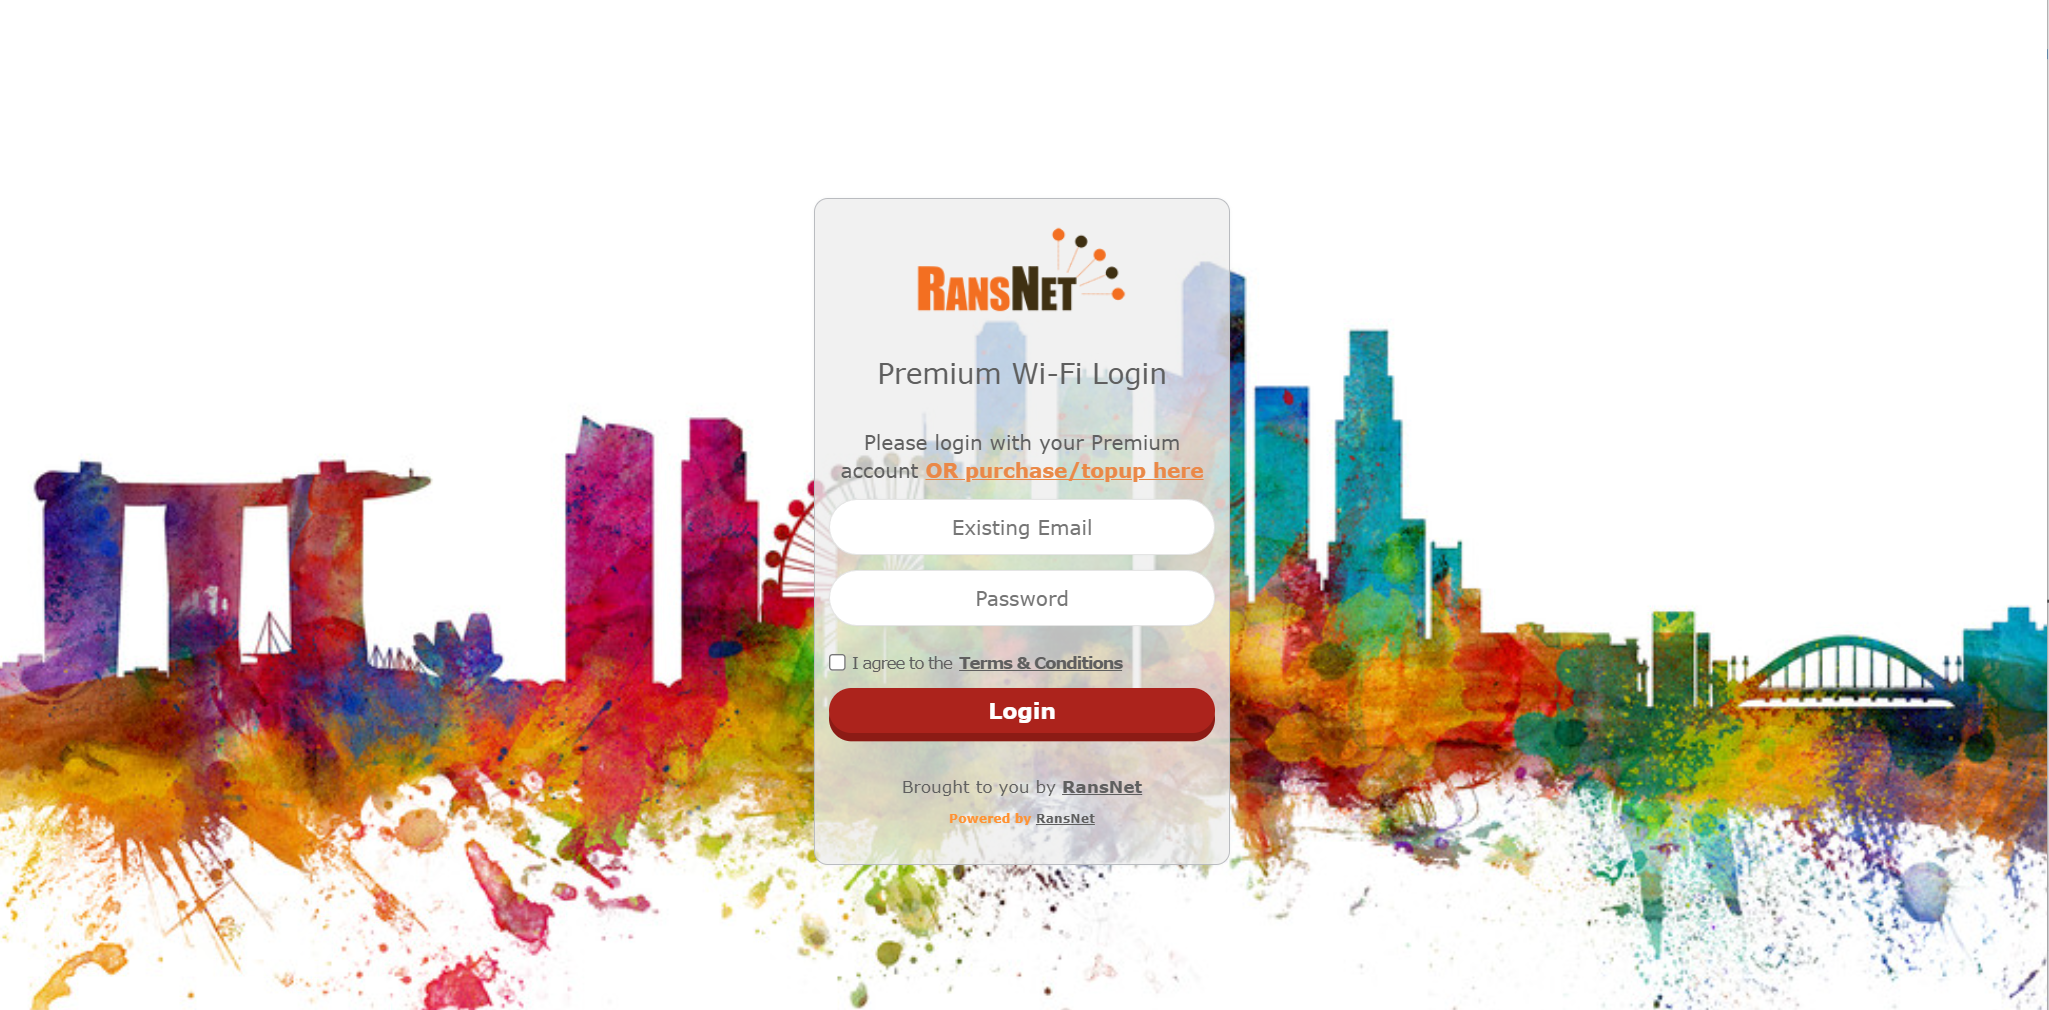
When payment is enabled, unauthenticated users are redirected to a login page with a link for user to purchase/topup usage plans, where they enter their email, select a plan, choose a payment method, and complete checkout. Upon successful payment, they receive email confirmation and automatic internet access.
Video Demo: Payment Gateway Integration Setup
Supported Payment Gateways
RansNet HSG includes native API integration with major payment processors across global and regional markets. Any combination can be enabled simultaneously, allowing users to choose their preferred payment method.
| Gateway | Coverage | Best For |
|---|---|---|
| PayPal | Global | International customers, instant setup |
| Mastercard (MPGS) | Global | Enterprise, high-volume transactions |
| Midtrans | Southeast Asia | Indonesia, Malaysia, Singapore, Philippines |
| Ooredoo | Middle East / North Africa | Telecom-integrated payments, regional markets |
| Custom / Other Providers | Any region | Provider-specific development, white-label integration |
Select the gateways that match your customer base and business requirements. Detailed setup instructions are provided below for PayPal and Mastercard MPGS; for other providers, contact RansNet support for custom integration assistance.
Prerequisites
Gather Payment Gateway Credentials
Before configuring payment on HSG, retrieve credentials from your selected payment providers. The steps below detail PayPal and Mastercard; for Midtrans, Ooredoo, or custom integrations, contact your provider's business team or RansNet support.
PayPal Setup:
- Log into PayPal Developer Dashboard
- Navigate to My Apps & Credentials
- Retrieve:
- Client ID — Application identifier
- Client Secret — Secure authorization token
- Merchant Name — Your business name (displayed to users during checkout)
Mastercard MPGS Setup:
Contact your acquiring bank or MPGS support team to obtain:
- Merchant ID — Your unique merchant identifier
- API Password — Secure authentication credential
- Merchant Name — Your business name (displayed to users during checkout)
Warning
Protect your credentials. Client IDs, secrets, and API passwords are sensitive. Never share them or store them in plain text. HSG encrypts them at rest and transmits them over HTTPS only.
Deployment Steps
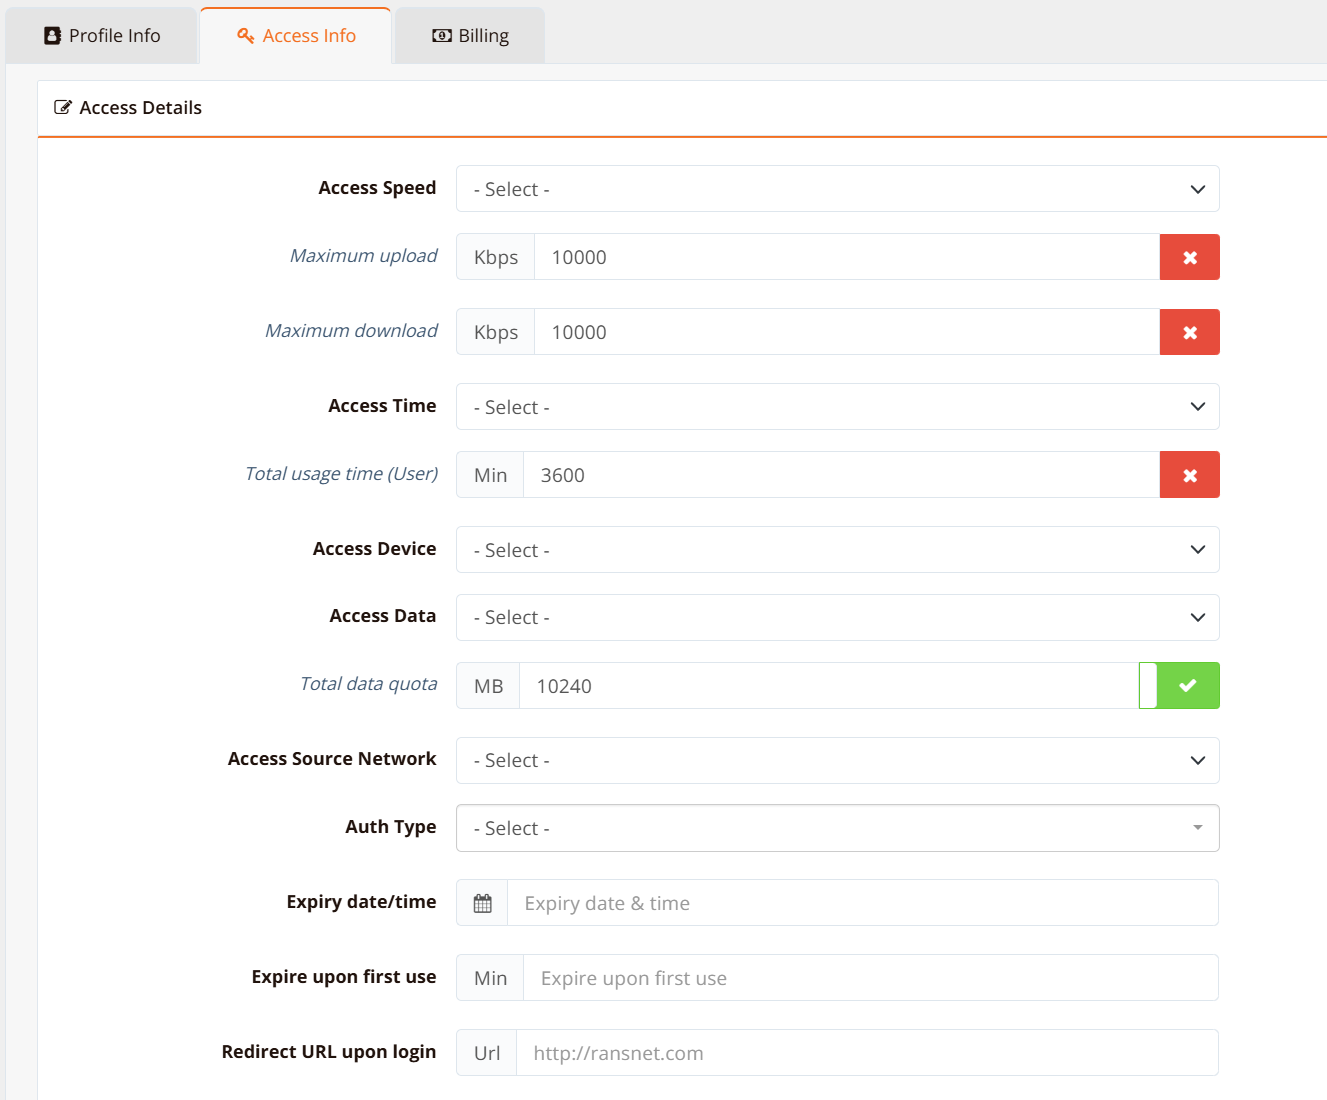
Step 1: Create Purchase Plans
Purchase plans define what users can buy. Each plan is tied to a hotspot access profile with specific bandwidth, session duration, and access restrictions.
Via GUI:
Step 1a: Navigate to HOTSPOT USERS → Access Profile (or create a new profile).
Step 1b: Click the Access info tab, configure speed and quota (time and/or data volume) for each plan.
Step 1c: Click the Billing tab and configure the plan pricing:
| Field | Description | Example |
|---|---|---|
| Currency | Currency code (ISO 4217) | SGD, USD, MYR, IDR |
| Billing Price | Cost of this plan | 5.00 |
| Plan Enable | Toggle ON to make plan available to users | ON |
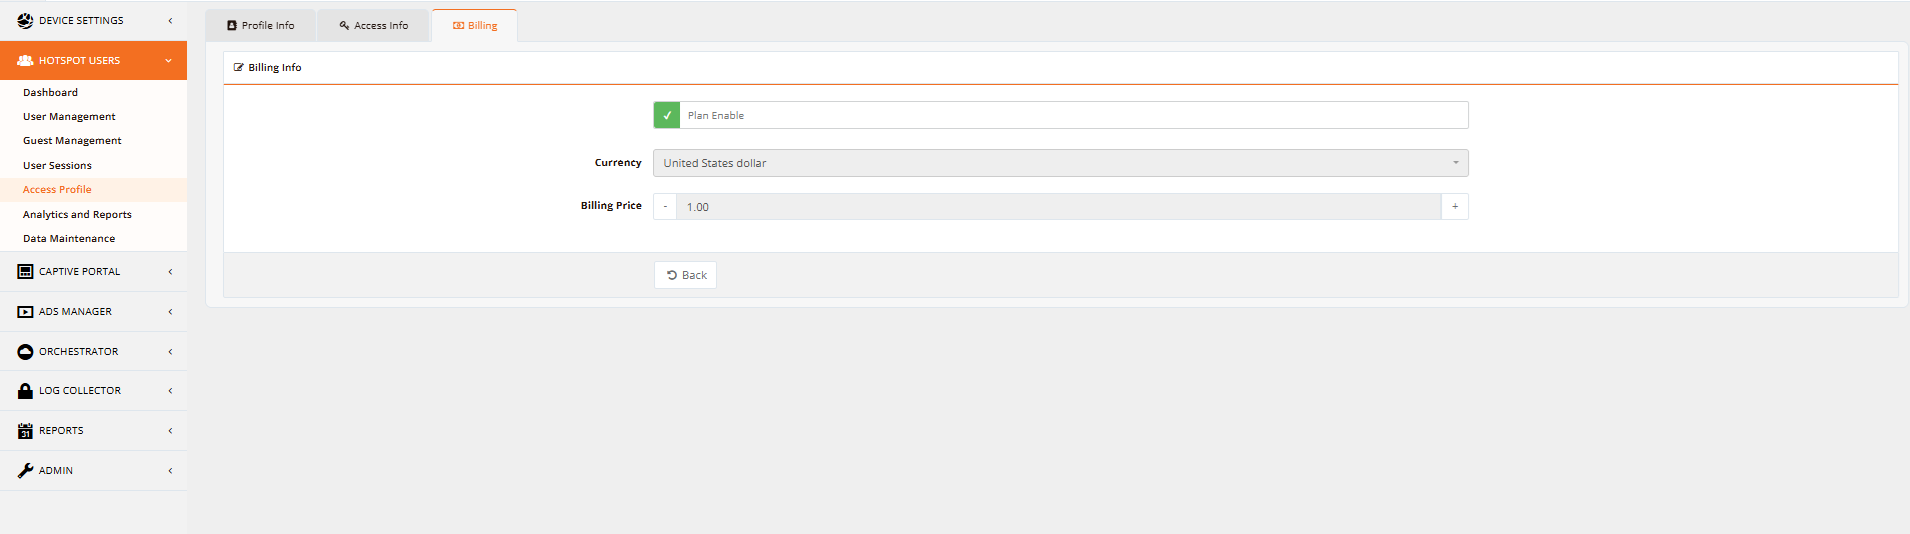
Repeat for each plan. Only plans with Plan Enable toggled ON will appear on the payment page.
Note
Create at least one enabled plan before enabling payment. Users cannot proceed without a plan to select. Common examples: 1-hour, 24-hour, 7-day, and 30-day plans at tiered pricing.
Step 2: Open Portal Backend Settings
Configure the captive portal to accept payments.
Via GUI:
- Navigate to CAPTIVE PORTAL → Portal List.
-
Click Edit on the portal where you want to enable payment (e.g.,
Payment-Portal).
-
Click Backend Setting.
-
Click the Login Method tab.
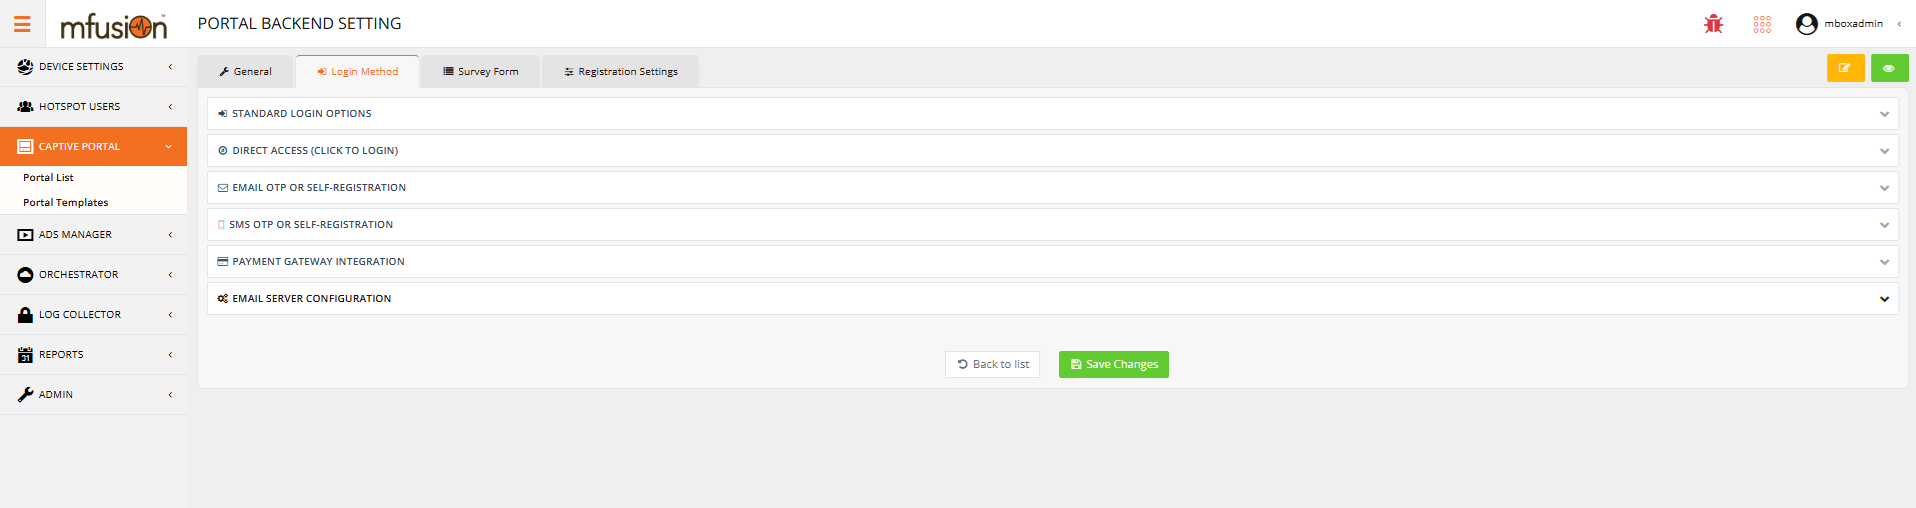
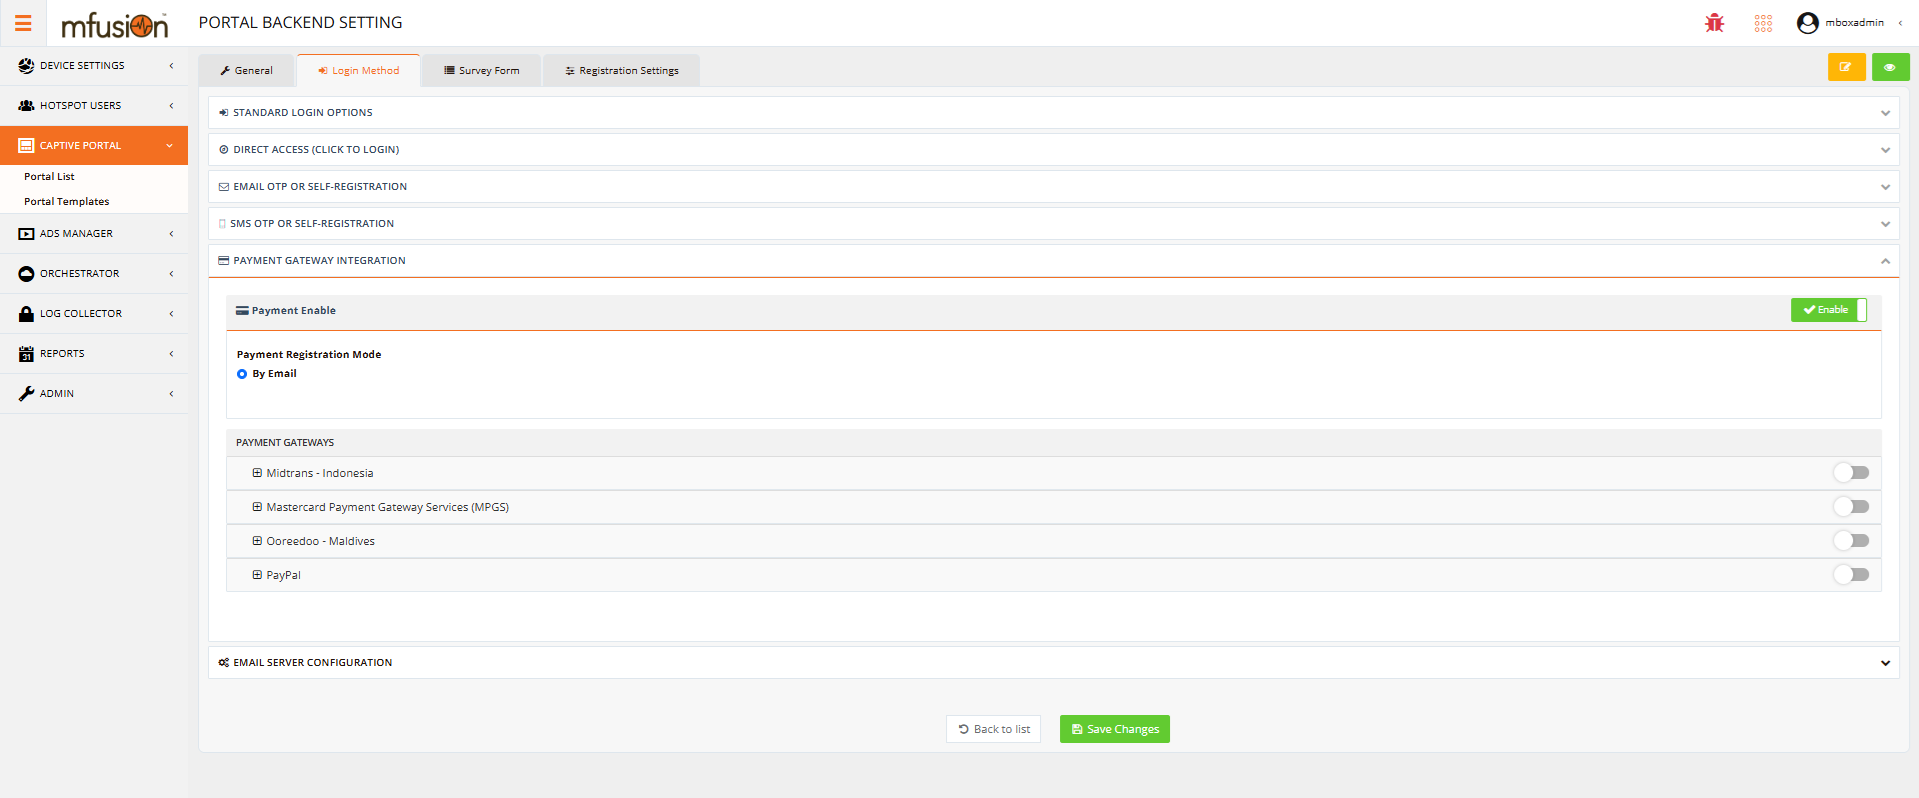
Step 3: Enable Payment Feature
Activate payment on the portal.
Via GUI:
- Find Payment Enable toggle and turn it ON.
- Under Payment Registration Mode, select By Email.
-
Save the changes.
Tip
By Email registration means users must enter a valid email before payment. This enables receipt delivery and customer tracking.
Step 4: Configure Payment Gateways
Under Payment Gateways, toggle on each provider you have credentials for and enter their configuration. The available gateways in the HSG UI depend on your firmware version and enabled integrations.
Note
Additional payment providers (Midtrans, Ooredoo, custom integrations) may appear under different menu sections or may require support team enablement. Contact RansNet support if you need to configure a provider not listed below.
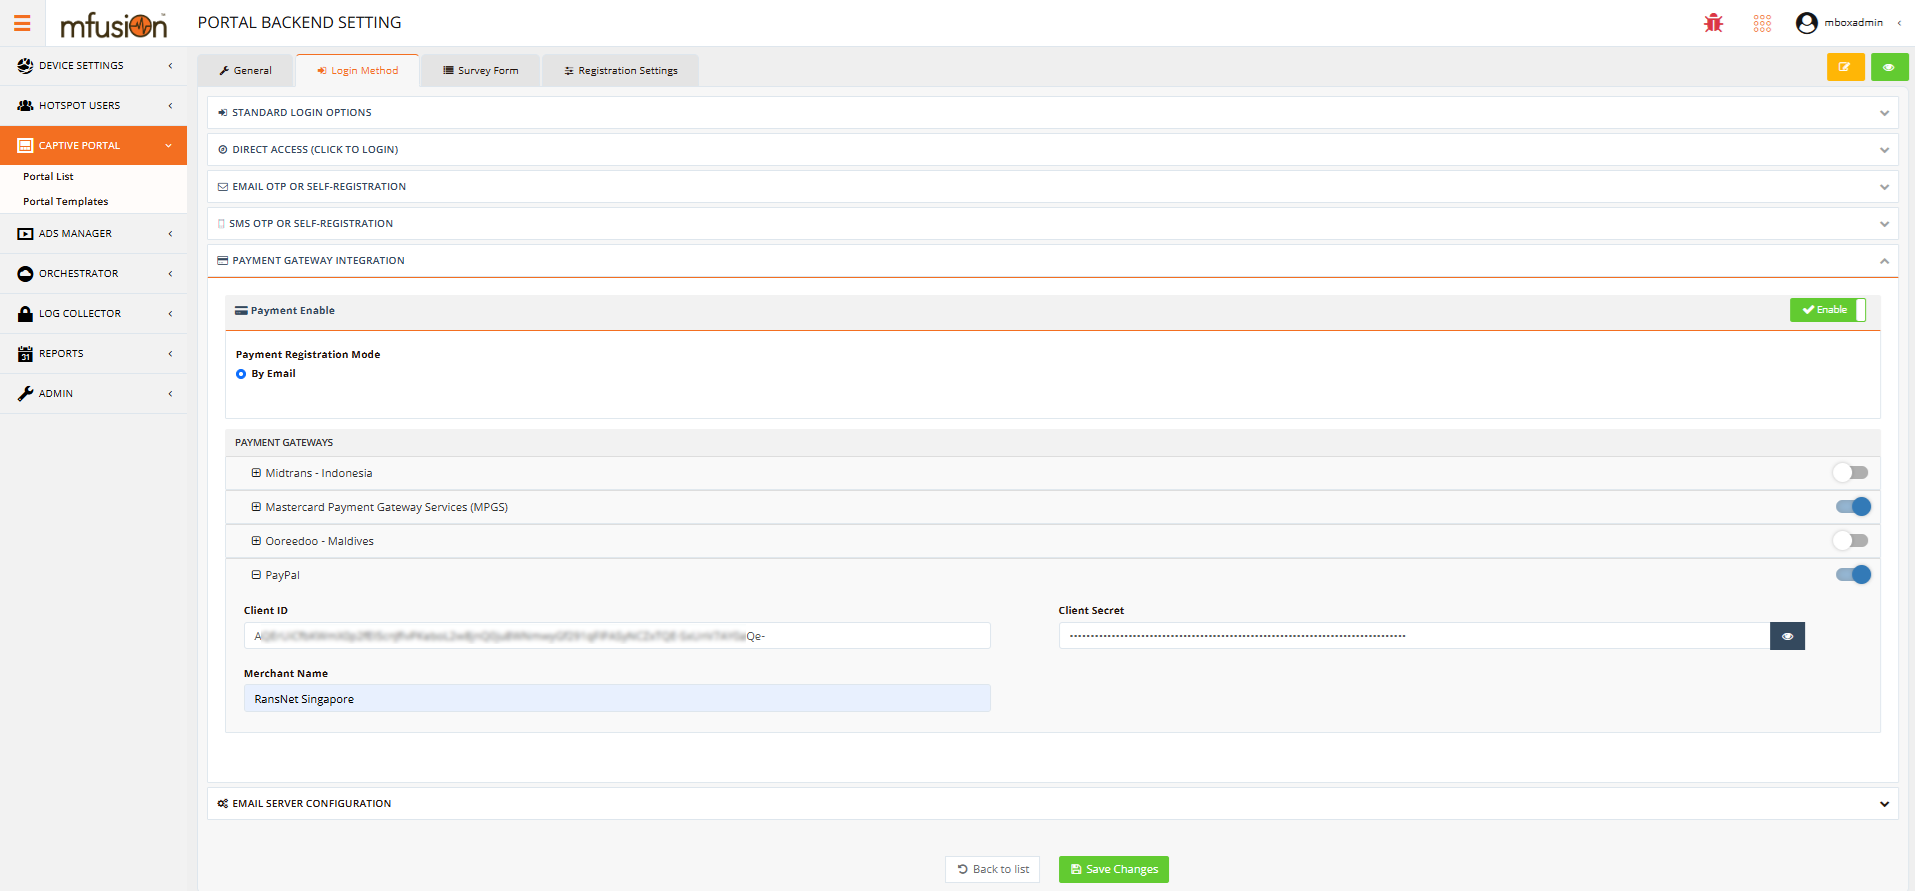
Enable PayPal
- Under Payment Gateways, toggle PayPal ON.
- Enter your PayPal credentials:
| Field | Description |
|---|---|
| Client ID | From PayPal Developer Dashboard |
| Client Secret | From PayPal Developer Dashboard |
| Merchant Name | Your business name shown during checkout |
-
Click Save.
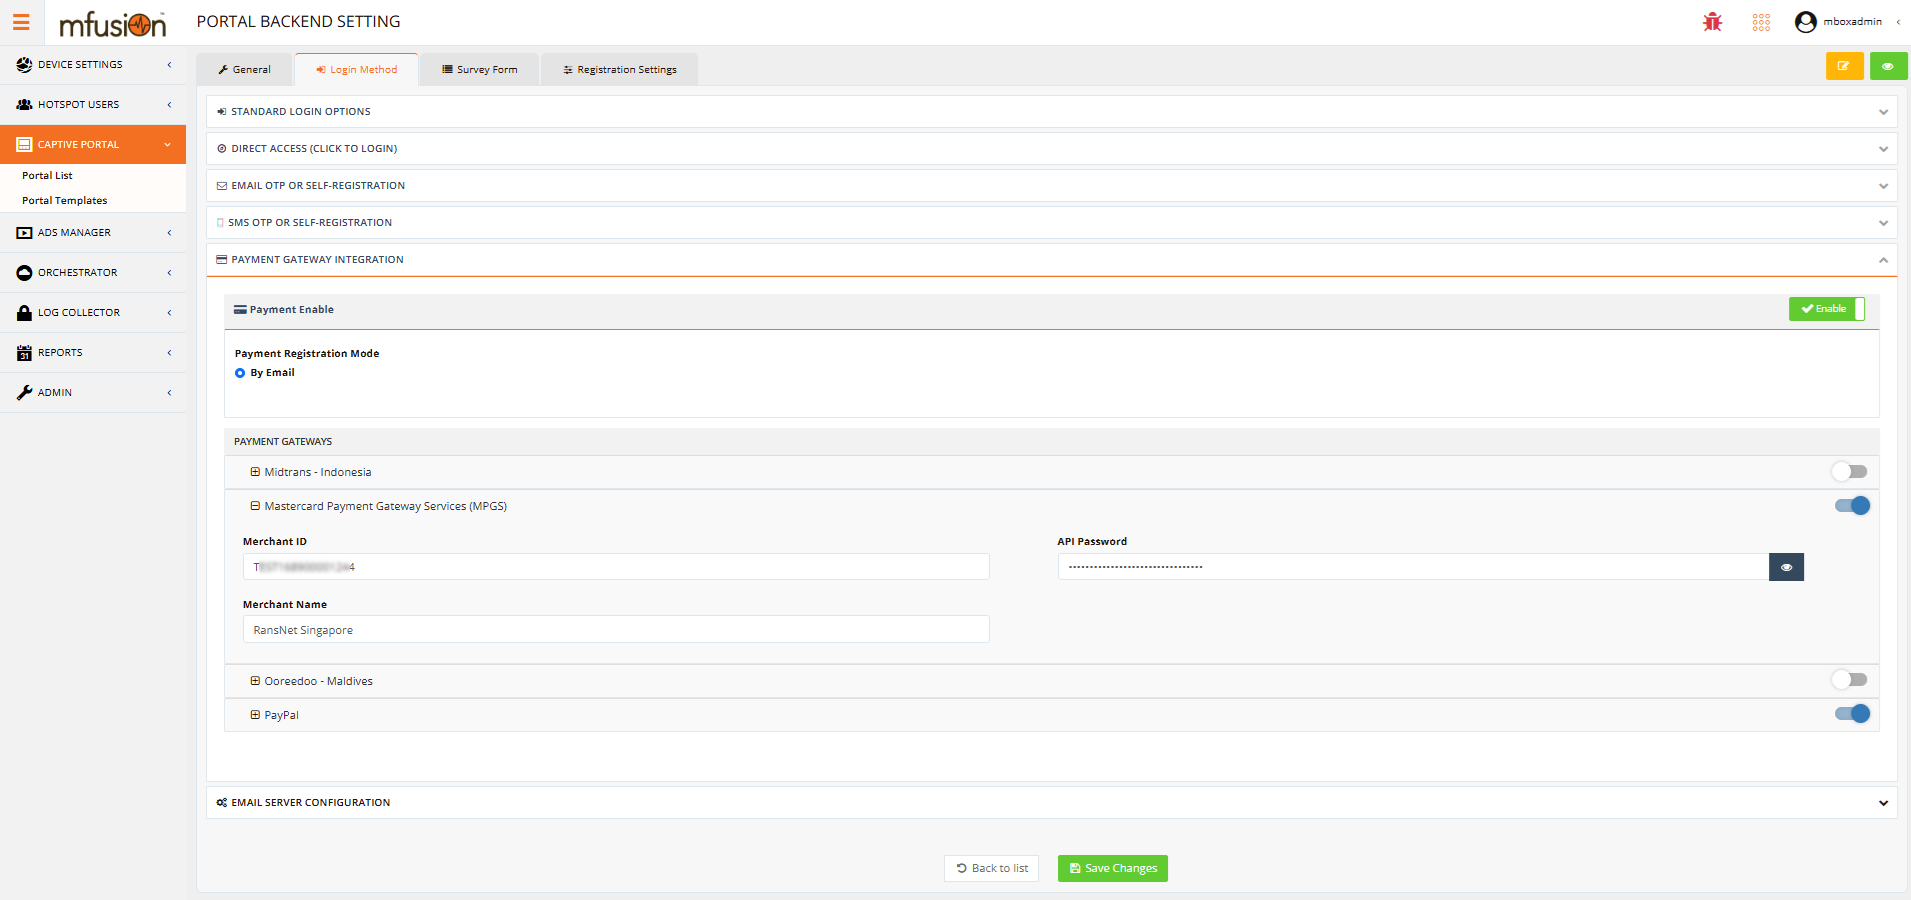
Enable MPGS (Mastercard)
- Under Payment Gateways, toggle MPGS ON.
- Enter your Mastercard credentials:
| Field | Description |
|---|---|
| Merchant ID | From your acquiring bank |
| API Password | From your acquiring bank |
| Merchant Name | Your business name shown during checkout |
-
Click Save.
Warning
If enabling both gateways, ensure your acquiring bank relationships support parallel merchant IDs and API credentials. Conflicts between providers may cause payment failures.
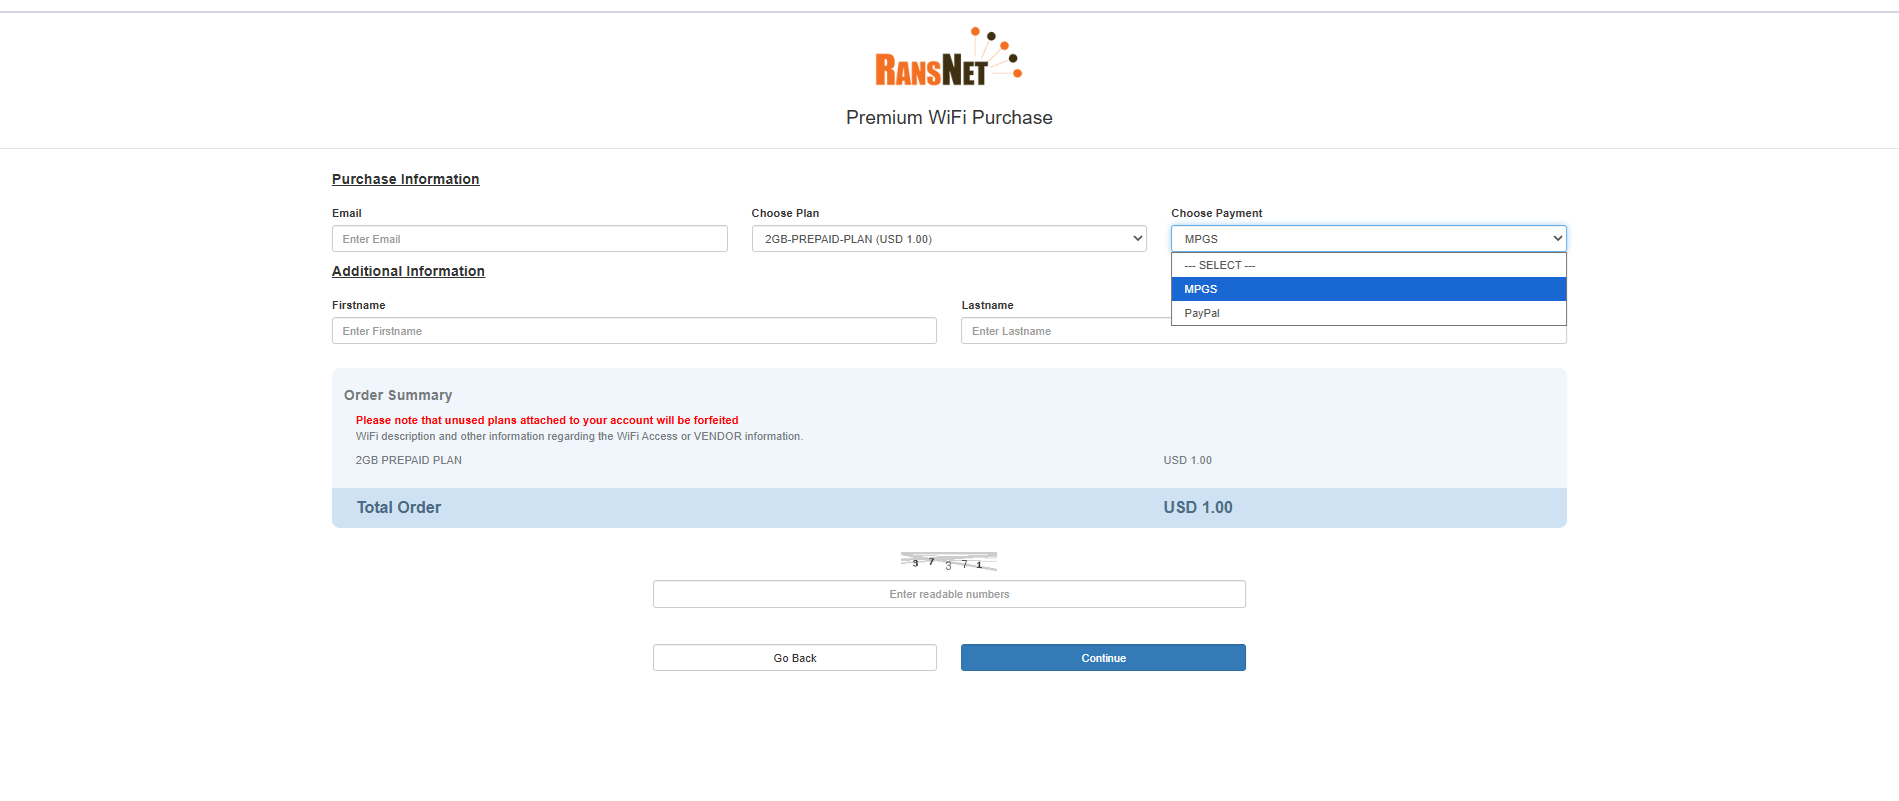
Guest Payment Flow
Once enabled, the guest experience is streamlined:
- Connect to Wi-Fi — Guest connects to the hotspot SSID (e.g.,
Venue-WiFi) - Redirect to Payment Portal — Browser is automatically redirected to the payment page
- Enter Email — Guest enters their email address (required for receipt and future logins)
- Select Plan — Guest chooses a plan: 1-hour, 24-hour, 7-day, etc.
- Choose Payment Method — Guest selects PayPal or Mastercard
- Complete Checkout — Guest enters payment details on the secure payment provider page (PayPal or Mastercard)
- Automatic Access — Upon successful payment, guest is redirected back and connected automatically
- Email Confirmation — Receipt is sent to guest's email with plan details and expiry
Verification
After configuring payment, test the flow end-to-end:
| Test | Expected Outcome |
|---|---|
| Portal loads correctly | Navigate to the portal URL and verify the login page displays the payment option |
| Payment button visible | "Select Plan and Pay" button or similar is prominently displayed |
| Plan selection works | Click to select a plan and verify available options match what you configured |
| Gateway selection works | Both PayPal and Mastercard buttons appear if enabled |
| Test payment (PayPal) | Complete a test transaction using PayPal sandbox (if available) or a small amount |
| Test payment (Mastercard) | Complete a test transaction using test card numbers from your acquiring bank |
| Receipt delivery | Verify email receipt arrives with plan details and expiry time |
| Access granted | Verify guest can browse the internet after successful payment |
| Plan expiry enforced | Wait until plan expiry time and verify guest is redirected back to payment page |
Troubleshooting
| Symptom | Likely Cause | Solution |
|---|---|---|
| Payment button doesn't appear | Payment not enabled in portal settings | Verify "Payment Enable" toggle is ON in Backend Settings |
| No plans available | Access profiles missing or disabled | Create at least one plan with "Plan Enable" ON |
| Payment gateway returns error | Credentials incorrect or gateway down | Verify Client ID/Client Secret (PayPal) or Merchant ID/API Password (Mastercard) in settings |
| Guests unable to complete payment | Firewall blocking payment provider domain | Whitelist PayPal.com (PayPal) or MPGS domain (Mastercard) in firewall rules |
| Receipt not received | SMTP not configured | Verify SMTP settings in Application Settings |
| Plan expiry not enforced | Session timeout not configured | Set appropriate session timeout in the access profile |
Best Practices
Pricing Strategy
- Tiered plans — Offer multiple durations (1-hour, 24-hour, 7-day, monthly) to accommodate different user types
- Competitive rates — Research local Wi-Fi pricing; set rates 10-20% below premium venues, 5-10% above free Wi-Fi
- Off-peak discounts — Consider lower prices during low-traffic hours to drive usage
- Bundle offers — E.g., "3 days for the price of 2" to encourage longer commitments
Guest Experience
- Clear branding — Customize the payment page with your venue logo and color scheme
- Fast checkout — Keep registration to email-only; avoid unnecessary fields
- Multiple payment methods — Offering both PayPal and Mastercard captures 95%+ of guests
- Instant access — Minimize delay between payment confirmation and internet access
- Reminder emails — Send expiry reminders (24 hours before, 1 hour before) to repeat customers
Security & Compliance
- Never handle card data — HSG payment integration is gateway-native; cards are never transmitted through HSG
- PCI compliance — PayPal and Mastercard handle PCI-DSS compliance; HSG remains out of scope
- HTTPS only — Ensure portal URL uses HTTPS with a valid SSL certificate
- Secure credentials — Change API passwords quarterly; rotate Client Secrets annually
- Monitor transactions — Review payment logs regularly for suspicious patterns or failed charges
Related Features
- Captive Portal Configuration — Customize login page branding and authentication methods
- Access Profiles — Define bandwidth limits, session timeouts, and per-plan restrictions
- User Management — View payment history and paid user accounts
- Hotspot Instance Configuration — Configure VLAN, DHCP, and instance-level policies
- Application Settings — Configure SMTP for receipt delivery