Administration
This section applies to on-premise / private mfusion deployments where you manage your own mfusion server. The Administration panel provides the critical backend configuration needed for mfusion to operate — covering outbound communications, authentication security, API access control, data backup, and operational audit trails.
Identity Management
Navigate to ADMIN → General → Identity Management.
Identity Management controls how users authenticate to this mfusion instance — local password and lockout policies, two-factor authentication, integration with corporate identity providers, and login page notices. Settings here apply globally — configure them according to your organisation's security policy before onboarding users.
Note
This tab was previously named Account Security. Each sub-section is collapsible and has its own Save / Cancel buttons — save each sub-section independently after making changes.
Account Policy
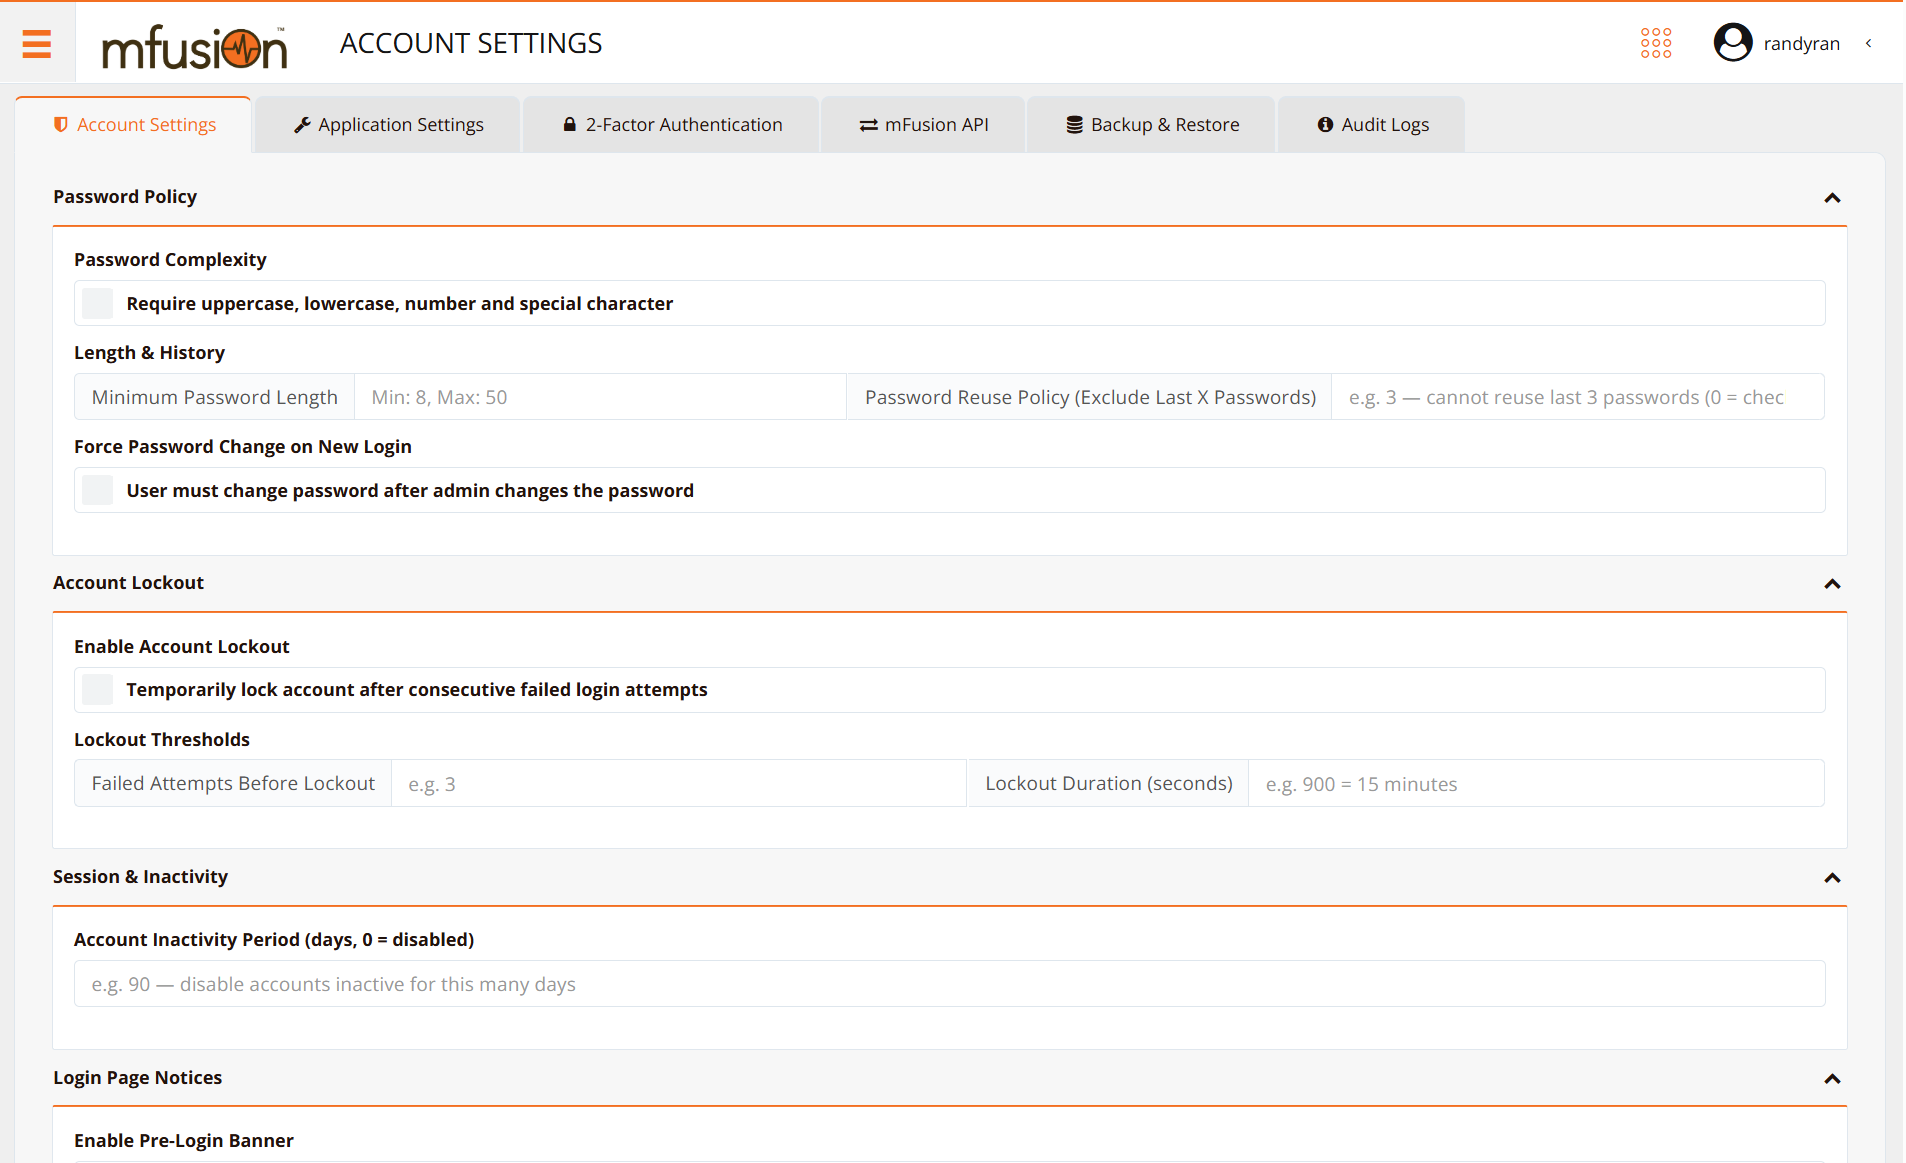
Account Policy enforces password and account lifecycle rules across all local user accounts. Each rule can be enabled or disabled independently.
| Setting | Description |
|---|---|
| User must change password after admin changes the password | Force a password change on the user's next login after an administrator resets their password — the user cannot access the dashboard until the change is completed |
| Require uppercase, lowercase, number and special character | Enforce password complexity |
| Minimum password length | Minimum number of characters required for all passwords |
| Password reuse policy (Exclude last X passwords) | Number of previous passwords that cannot be reused |
| Require local users to change password after X days | Password expiry — local users must set a new password once their current one is older than the specified number of days. Applies to local accounts only; LDAP and SAML users authenticate against their directory/IdP, which owns their password policy |
| Lockout account after X failed attempts | Number of consecutive login failures before the account is locked; Lockout duration (seconds) controls how long the account remains locked before it auto-unlocks |
| Disable account after inactive for X days | Automatically disable the account when no login activity is detected for the specified number of days |
| Allow username recovery through email | Let users retrieve their username via a registered recovery email |
Locked and inactivity-disabled accounts are listed in the user management table (shown as disabled) and can be manually re-enabled by a super-administrator at any time. Re-enabling an account resets the failed-attempt counter and the inactivity timer.
2-Factor Authentication

This sub-section controls the 2FA policy for dashboard login. mfusion supports OTP delivery via email or SMS (or both). Administrators can also customize the OTP message template sent to users.
| Setting | Description |
|---|---|
| Force 2FA OTP on all users | Enforce OTP login for every user, regardless of their individual profile settings |
| Enable Email OTP authentication | Enable OTP delivery via email (requires SMTP to be configured) |
| Email OTP Template | Customizable message body — use #OTP# and #TIMEOUT# as placeholders |
| Enable SMS OTP authentication | Enable OTP delivery via SMS (requires the SMS Gateway to be configured) |
Info
Once 2FA is enabled at the system level, individual administrators can activate it for their own account under My Profile.

Each user selects their preferred OTP delivery method (email or SMS) and registers the corresponding contact details. Their current password is required to save the change.
Enterprise Identity Integration

mfusion can delegate dashboard authentication to your corporate identity infrastructure. Two integrations are available and can be enabled independently:
| Integration | Use When | Setup Guide |
|---|---|---|
| Use external LDAP server | Users should log in with their LDAP / Active Directory username and password | LDAP Authentication |
| Use SAML SSO | Users should sign in through a SAML 2.0 identity provider (e.g. Azure AD / Entra ID) | SAML SSO Authentication |
Both integrations share the same account model: directory users are auto-provisioned on first login with a configured default Profile and Entity, their details are re-synced on every login, and their accounts are directory-managed — only Enabled and Delete remain editable under Admin → Users.
Login Page Notices
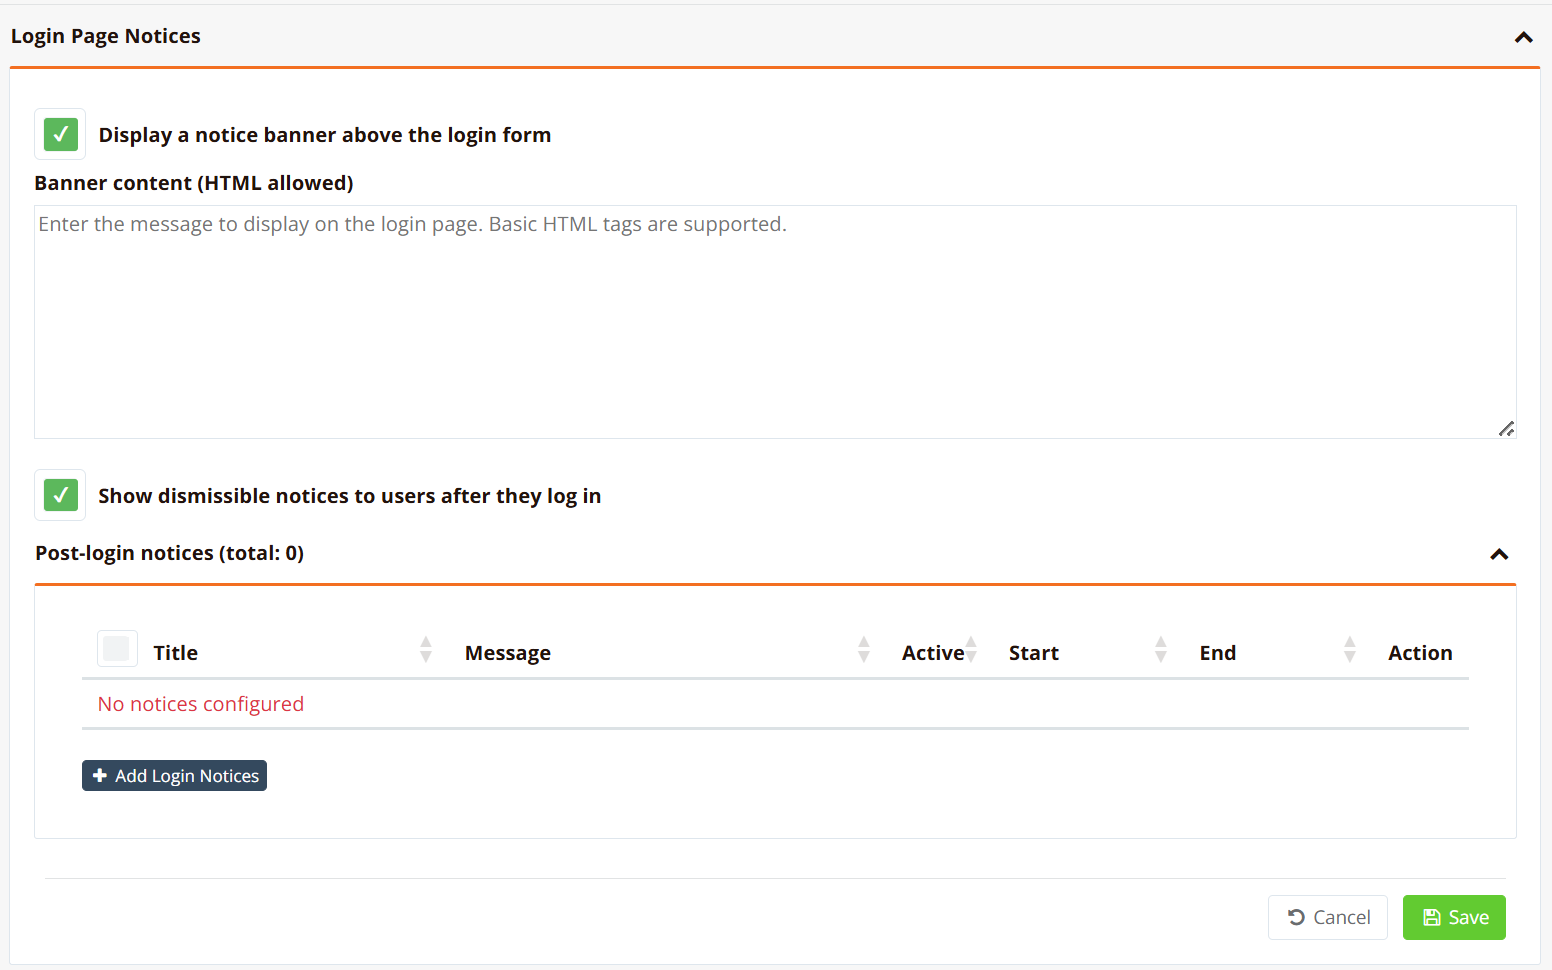
Two types of notices can be shown to users:
| Setting | Description |
|---|---|
| Display a notice banner above the login form | Show a pre-login banner on the mfusion login page — for example, an acceptable-use policy or maintenance notice. Basic HTML tags are supported in the banner content. |
| Show dismissible notices to users after they log in | Post-login notices displayed after successful login. Each notice has a title, message, active toggle, and an optional start/end schedule; users can dismiss each notice independently. Click + Add Login Notices to create a new entry. |
Note
All account security events — login attempts, lockouts, password changes, and forced resets — are recorded in the Audit Logs with timestamp, source IP, and the acting user.
Application Settings
Navigate to ADMIN → General → Application Settings.

This tab configures the backend communication services that mfusion relies on for outbound notifications, OTP delivery, and data archival.
SMTP
SMTP is used for two purposes: delivering automated reports (hotspot usage, network monitoring) to recipients on a schedule, and sending email OTP codes for two-factor authentication (2FA) during dashboard login. mfusion relays all outbound mail through the external SMTP server configured here — for example, your corporate mail server, Gmail, or SendGrid.
| Field | Description |
|---|---|
| Enable SMTP | Master toggle to activate outbound email |
| SMTP Server | SMTP server hostname or IP address, and port — commonly 25 (unencrypted), 587 (STARTTLS), or 465 (SSL/TLS) |
| Connection Security | None, SSL/TLS (encrypted from the start), or STARTTLS (upgrades a plain connection before credentials are sent) |
| Authentication | None or Username and Password — when authentication is enabled, enter the SMTP account credentials |
| Other Options | Optional fields, toggled on demand — Sender Name (display name in the From field), SMTP Helo (override the HELO hostname), Sender Address (envelope From address), Reply-To Address, and Timeout |
Note
When Authentication is set to None, the Sender Address option is required — with no authenticated account to derive it from, mfusion needs an explicit From address for outbound mail.
After saving, click Test SMTP Connection to verify the configuration. On failure, check the Audit Logs for the detailed reason.
SMS Gateway
The SMS Gateway integrates with supported SMS providers via API to send OTP codes for 2FA dashboard login. mfusion supports a broad list of regional and global SMS providers, including Asia Webhost, Asia Broadcast, Vist Broadcast, Built SMS, and others.
Under Send Quick SMS Settings, enter your SMS provider API credentials (username, password, and sender ID), then click Send Quick SMS to send a test message and confirm the gateway is working.
FTP / SFTP
FTP and SFTP connections allow mfusion to push data to external NAS or file servers automatically. Typical use cases include:
- Scheduled report archival
- Syslog file exports
- Encrypted mfusion configuration and monitoring data backups
Multiple connections can be configured and scoped to different entities (e.g., the root organization or a specific tenant). Click + Add FTP Connection to add a new entry.
| Field | Description |
|---|---|
| Name | A label identifying this connection |
| Entity | The organizational entity this connection is associated with |
| Type | Protocol — ftp or sftp |
| Host / IP Address | Address of the remote server |
| Port | Port number (21 for FTP, 22 for SFTP by default) |
| Username | Login credential for the remote server |
| Path | Remote directory where files will be written |
mfusion API
Navigate to ADMIN → General → mfusion API.

mfusion exposes a secure REST API for integration with third-party and external systems, enabling seamless automation of provisioning, monitoring, and hotspot workflows. API access is controlled at the entity level — each entity can have independent API keys scoped specifically to Monitoring API, Hotspot API, or both.
The API control table lists all entities with their current API enablement status. Access can be granted or revoked per entity without affecting others, providing fine-grained control suitable for multi-tenant environments.
Note
Full API reference documentation will be available at a dedicated URL (to be published).
Backup and Restore
Navigate to ADMIN → General → Backup and Restore.
Auto Backup

The auto backup feature allows mfusion to create scheduled, encrypted backups and store them either locally or on a remote FTP/SFTP server. Administrators can configure:
| Setting | Description |
|---|---|
| Enable Auto Backup | Master toggle to activate scheduled backups |
| Storage Location | Destination — External FTP/SFTP server or Local Drive |
| FTP Connection | The pre-configured FTP/SFTP connection to use for remote storage |
| Schedule Type | Backup frequency — Daily, Weekly, or Monthly |
| Schedule Time | Time of day the backup job runs |
| Backup Data Range | Rolling data window included in each backup (e.g., 1 day, 7 days) |
| Optional Backup Categories | Selectively include data sets — Mboxadmin, Hotspot RADIUS, mFusion Monitoring, Logviewer, Hotspot Portals, CLI Config |
Note
It is highly recommended to use external SFTP backup. Backup to Local Drive allows up to last 3 backups only to prevent overwelming mfusion server local storage space.
Restore

The backup list shows all available backup files stored locally, including both automatic and manual backups. Each entry displays the file name, timestamp, and size. From this view, administrators can:
- Download a backup file for off-site archival
- Restore mfusion from a selected backup
- Upload Config — upload an encrypted backup file (e.g., retrieved from an SFTP server) to restore from
Backup files use the .menc (encrypted) format to ensure data security at rest and in transit.
Audit Logs
Navigate to ADMIN → General → Audit Logs.

The Audit Logs provide a complete, tamper-evident record of all operational activity within mfusion. Every significant action is logged with a timestamp, the user who performed it, the module affected, severity level, source IP address, and a detailed message describing the change.
Logged events include:
- Administrator login sessions and OTP validation
- Device provisioning and configuration changes
- SD-WAN topology updates
- System-level configuration modifications
Logs can be filtered by time range, username, module, severity level, IP address, or message content, making it straightforward to audit specific incidents or track changes made by a particular user. This data is essential for security audits, compliance reporting, and operational troubleshooting.
Firmware Releases
Navigate to ADMIN → Releases.
mfusion acts as an on-premise firmware repository, allowing managed devices to perform over-the-air upgrades by downloading firmware directly from the mfusion server — without requiring each device to reach the internet. Only super-administrators can upload firmware packages to this repository; firmware files are provided by the RansNet support team.
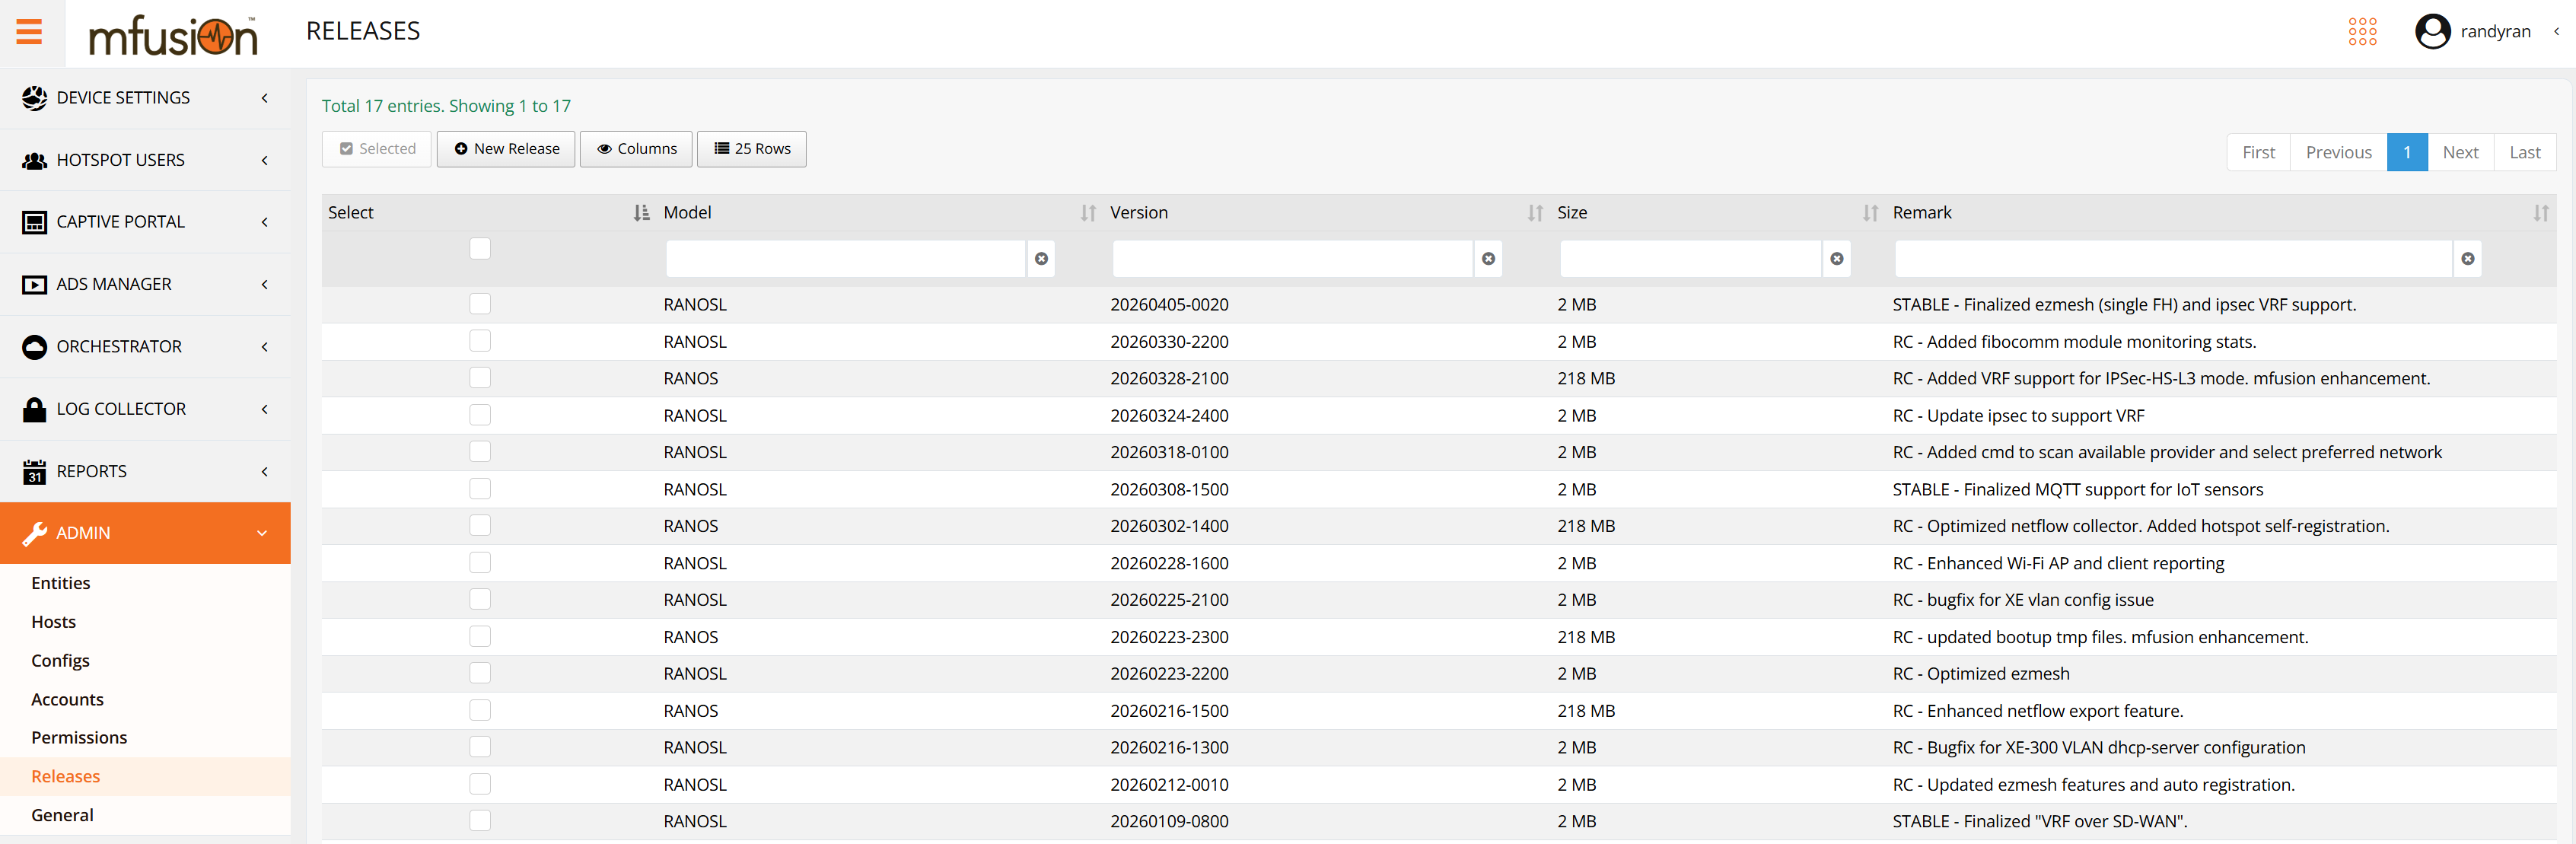
Firmware releases are organised by device family:
| Category | Description |
|---|---|
| RANOSL | Firmware for branch-series devices (e.g. HSA, UA, XE, UAP) |
| RANOL | Firmware for gateway-series devices (e.g. CMG, HSG) |
Once uploaded, the release becomes available for selection when triggering a firmware upgrade from the device management interface.
For a summary of what is included in each firmware release, see the release notes:
- Release Notes — Branch Series (HSA, UA, XE, UAP)
- Release Notes — Gateway Series (CMG, HSG)
Note
Only active devices with a valid activation code and an active support contract are permitted to download firmware from mfusion.
Firmware Upgrades
After devices are successfully onboarded (see Device Onboarding), you can perform firmware upgrades directly from mfusion. Devices will automatically download the firmware from the mfusion server and reboot to apply the update.
Upgrade via GUI
To upgrade a device using the mfusion web interface:
- Navigate to ORCHESTRATOR → Configuration and locate the device you want to upgrade.
-
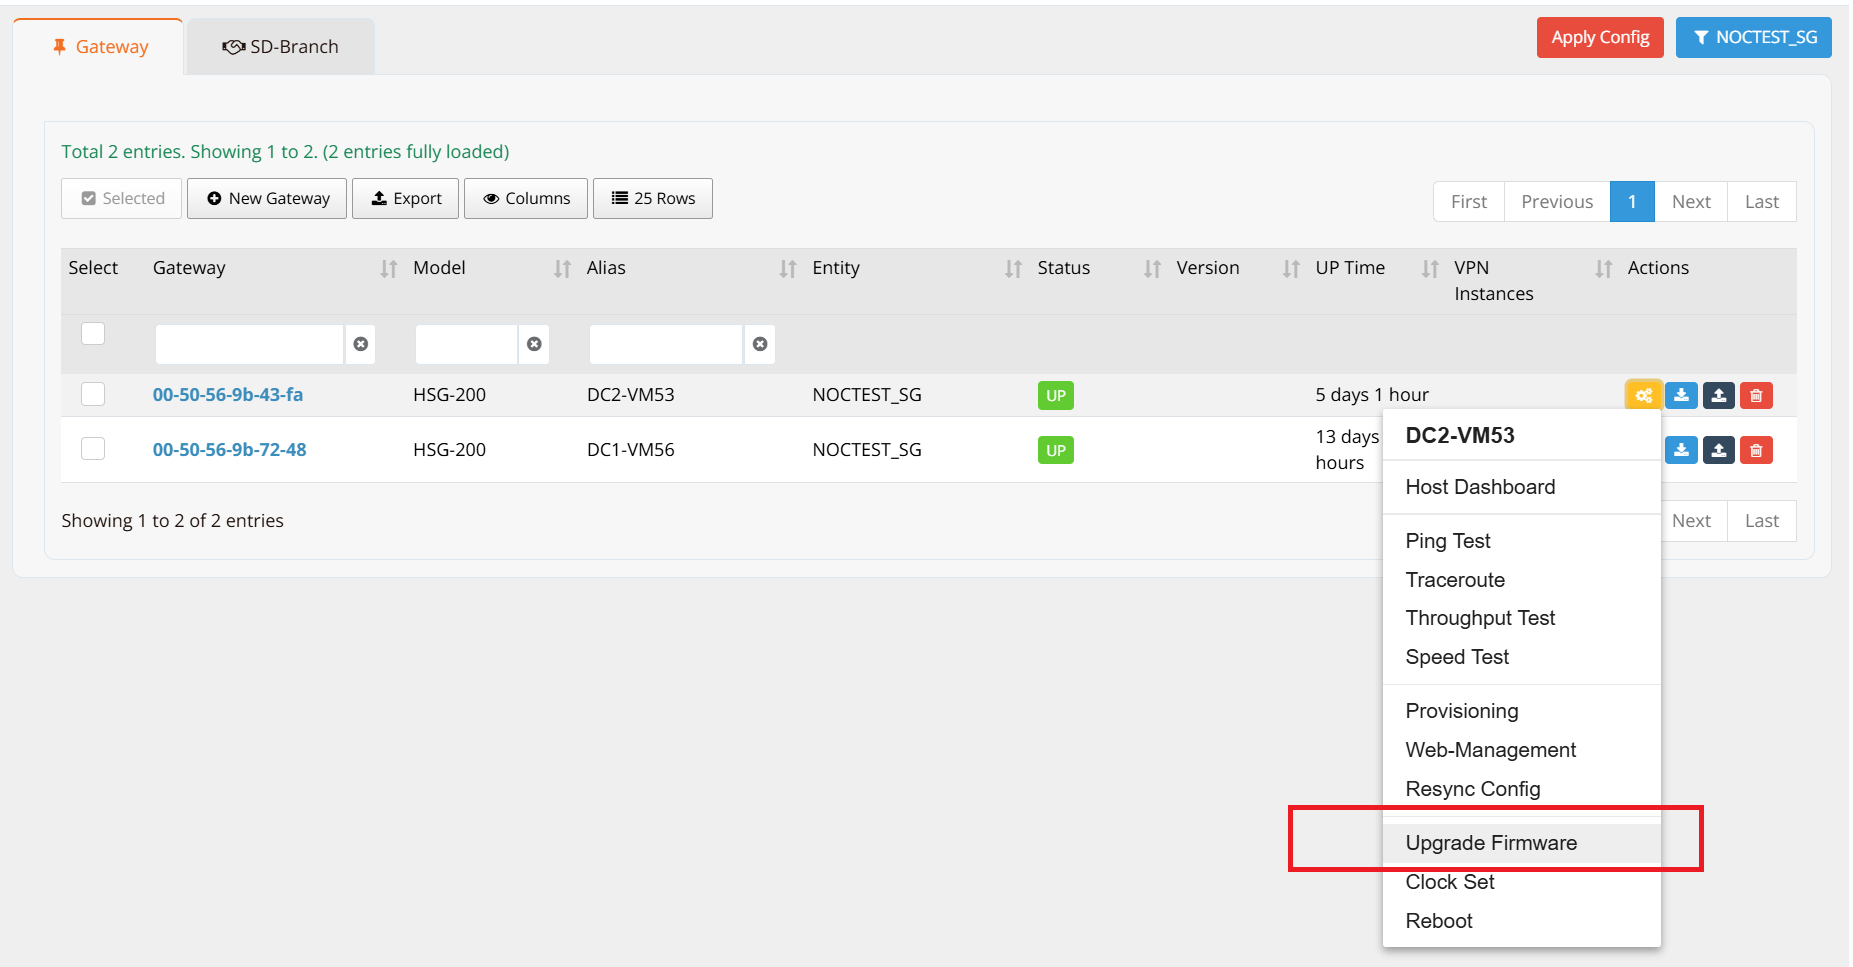
Click the Settings icon (gear icon) next to the device and select Upgrade Firmware.
-
Select the desired firmware version from the dropdown menu.
-
Click OK to initiate the upgrade.
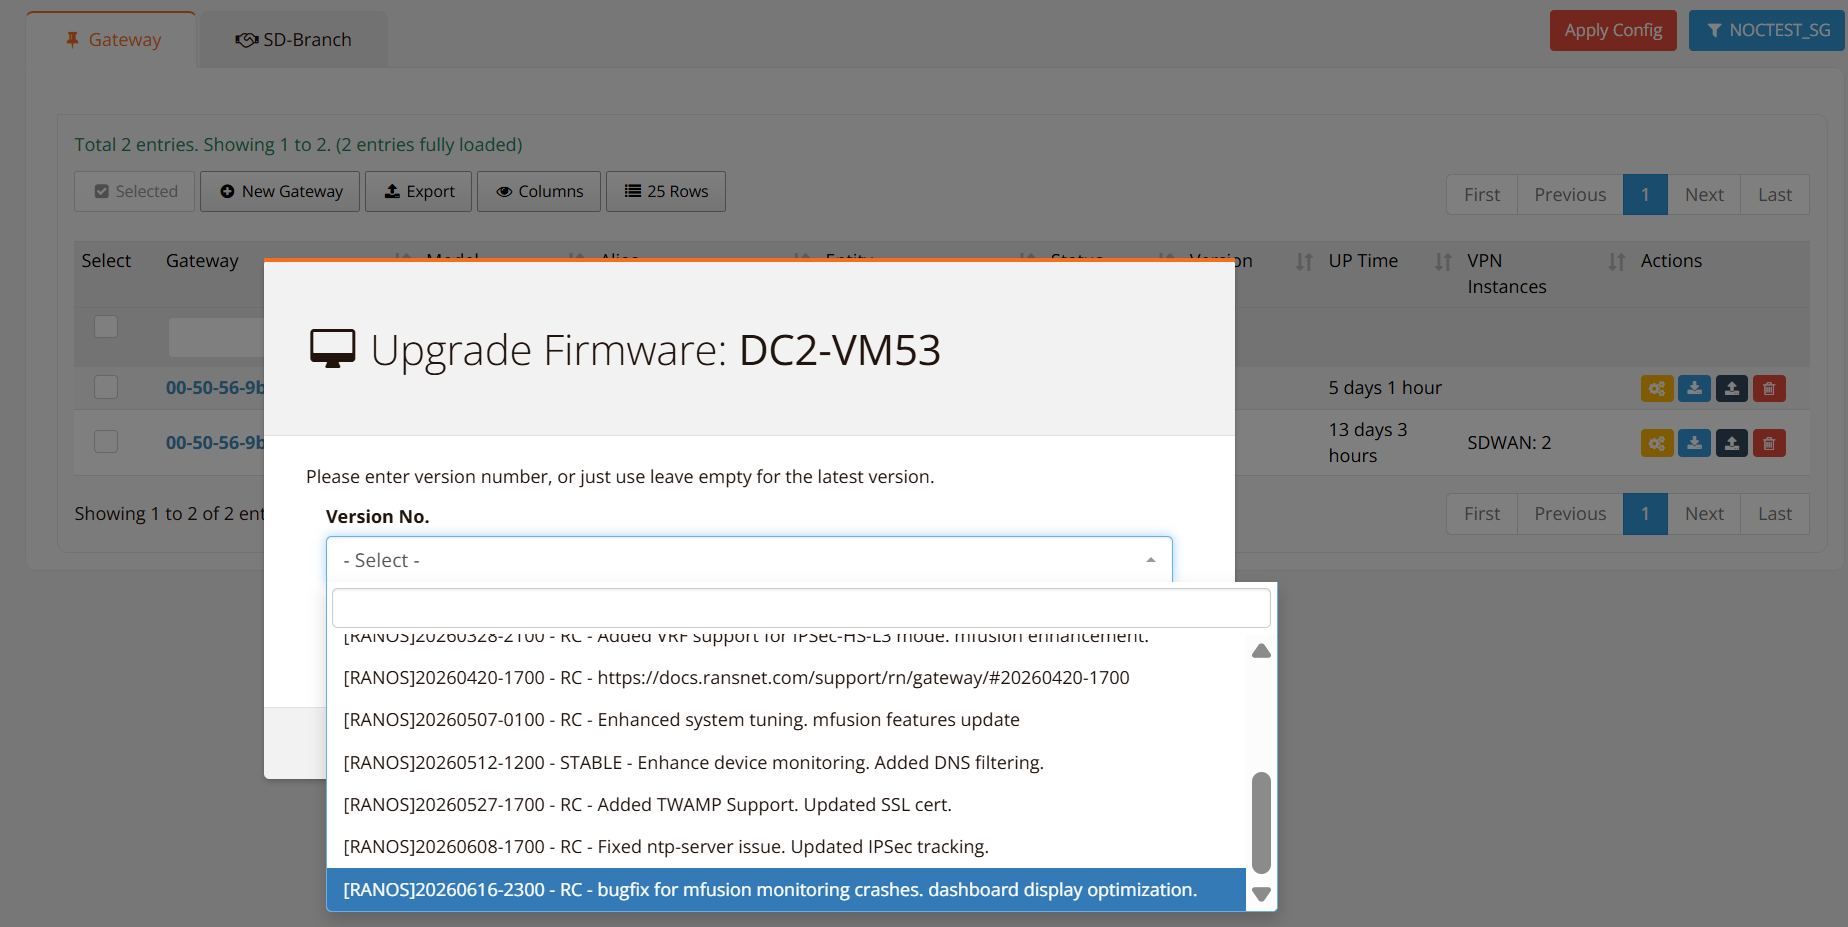
The device will automatically download the firmware and begin the upgrade process. Status updates can be monitored from the device list.
Mass Upgrade via GUI
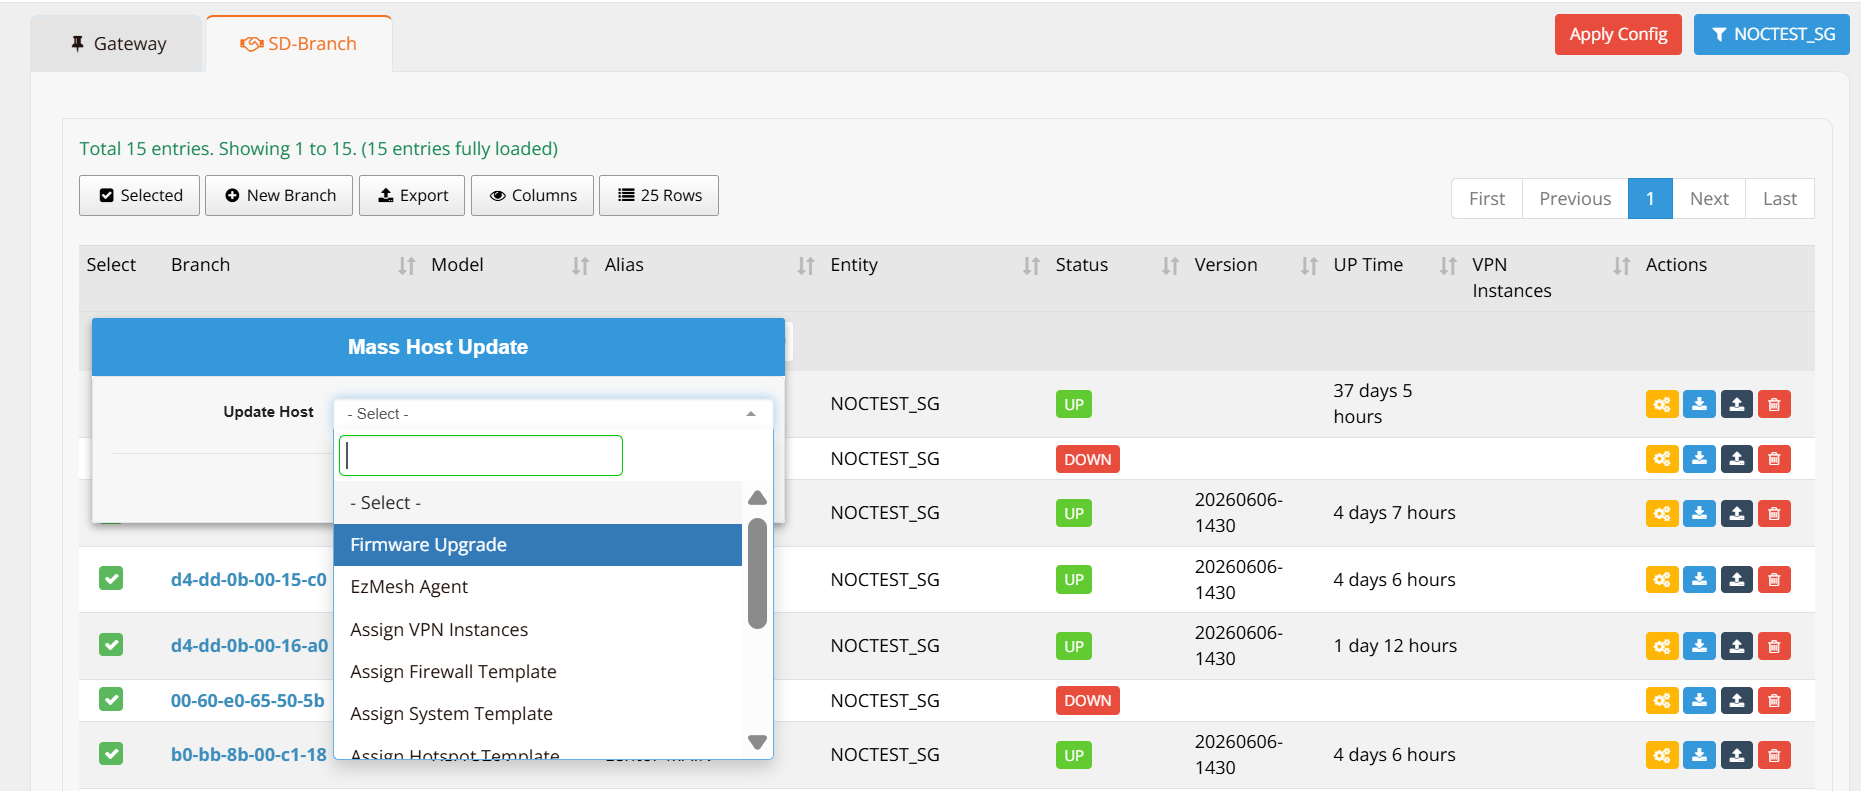
Use "Mass Host Update" feature to perform firmware upgrade for multiple devices concurrently.
Upgrade via CLI
To upgrade a device from the CLI (via SSH or console):
List Available Firmware:
This displays all stable firmware versions available on the mfusion server.
Upgrade to a Specific Version:
Replace <firmware-version> with the version number displayed in the list (e.g., mbox# upgrade 20260620-1430).
The device will download and apply the firmware.
Note
- Firmware upgrades are only available for active devices with a valid activation code and active support contract.
- If an upgrade fails, the device will revert to the previous firmware version automatically.
- Some upgraded features may require reboot to take effect. If you are not sure, always schedule to reboot after upgrade.