Device Provisioning
Before a device can be monitored or managed by mfusion, it needs to be provisioned on mfusion as an authorized host.
Preparation
Before you begin, ensure that:
- The device has a valid support status (e.g. within warranty support)
- The device has an activation code
- You have collected the device MAC address and Serial Number
These details are usually provided in spreadsheet format by the RansNet distributor to partners and customers.
Create Customer Entity
If you are adding a device for a new customer, you need to create a customer entity first. If you are adding new devices to an existing customer, skip to the next section.
Note
- For partners sharing the RansNet cloud mfusion, you will be provided a partner account to access https://portal.ransnet.com.
- For partners/customers using on-premise/private mfusion, you will be given the default super-admin access to your own mfusion.
- If you have problems accessing mfusion for the first time, contact RansNet support.
To create a customer entity:
- Navigate to ADMIN → Entities and click New Entity.
-
Fill in the required fields:
Field Value Entity Name <CompanyFullName_CountryCode>Remarks Optional Partner Entity Root— select this to make the entity a top-level (parent) entityAdd Child Entity Leave blank -
Click Save Changes.

Tip
Entity names should be as specific as possible while remaining short enough for easy searching. Include a country code to identify the location (e.g. YourCompanyCode_CustomerCode_SG). Avoid spaces — use - or _ instead.
Add Device to Entity
To add a device to a customer entity:
Manual Entry
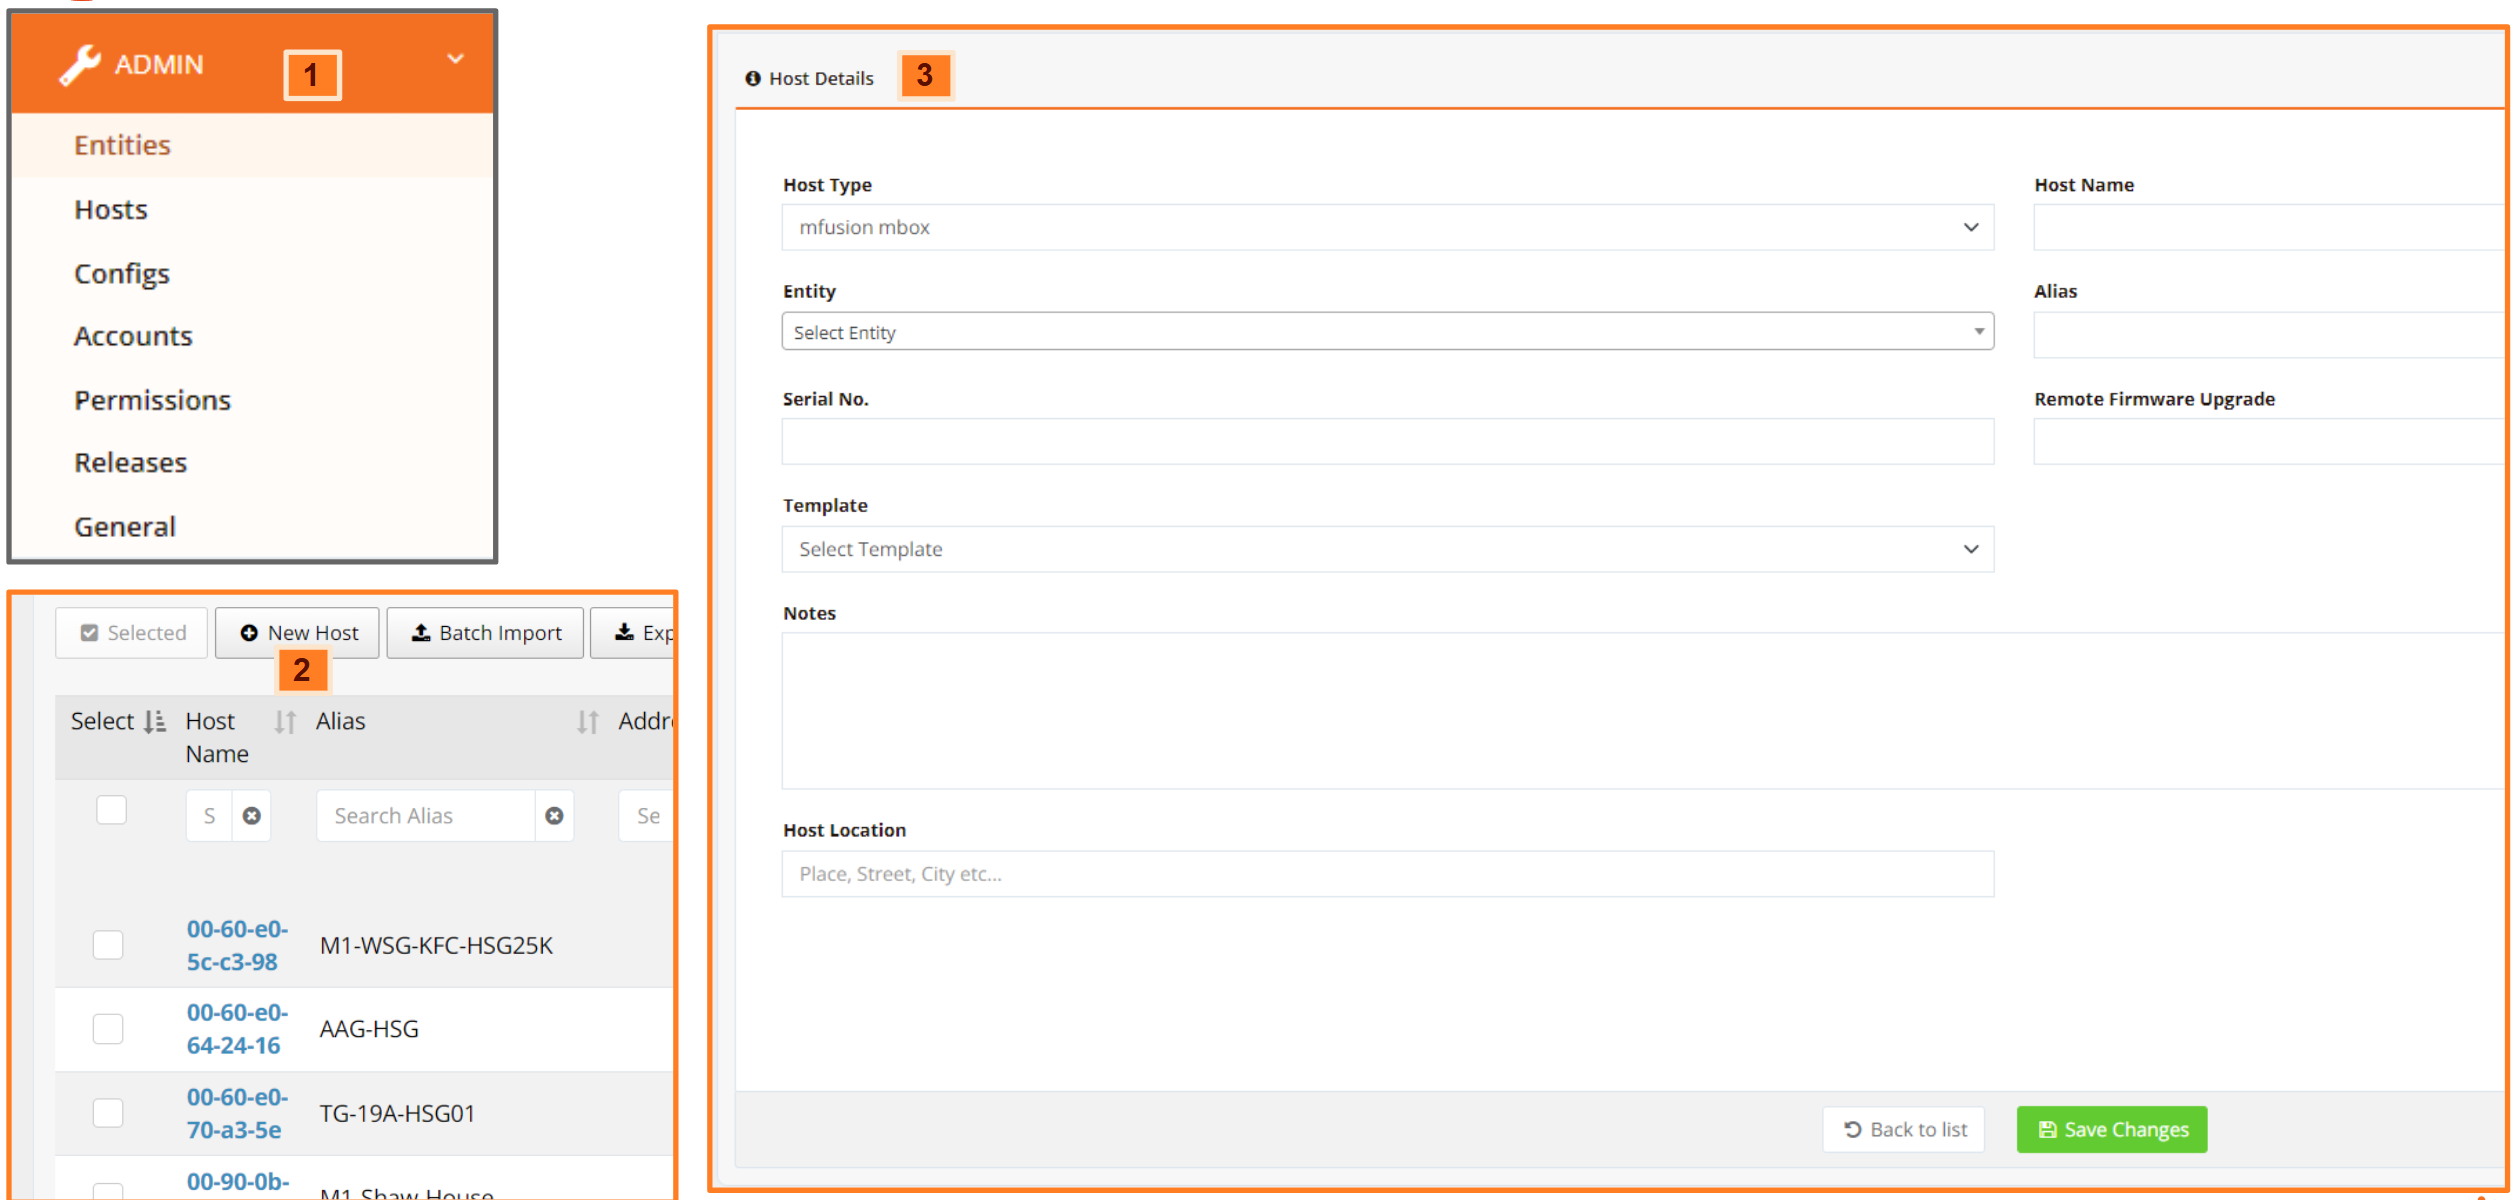
- Go to ADMIN → Hosts and click New Host.
-
Fill in the required fields:
Field Value Host Type mfusion mboxHost Name Device MAC address (eth0 MAC) — printed on the product label Serial No. Printed on the product label Alias A readable name for the device. Use a meaningful name for easy identification. Avoid spaces — use -or_instead.Template Template_Branchfor branch series (UA/HSA/XE/UAP) ·Template_Gatewayfor gateway series (CMG/HSG) -
Click Save Changes. You will then be prompted to enter an activation code.

-
Click Manual Input, paste the activation code, and click Activate Device.

Warning
Make sure there are no gaps or line breaks in the activation code.
Batch Import
For large numbers of devices, use the Batch Import function:
- Go to ADMIN → Hosts and click Batch Import.
-
Browse to your CSV file containing the device list.

Tip
Ensure your spreadsheet follows the correct format. You can download a sample CSV format from the Batch Import interface. RansNet distributors typically provide this CSV file to partners or customers.
Verifying Device Status
Once a device is successfully activated, monitoring starts automatically.
- Go to ORCHESTRATOR → Monitoring → Hosts.
- Filter to the target customer entity (top-right corner).
-
If the device is properly bootstrapped and online, you should see UP status within 3 minutes.

Repeat the steps above to add more devices to the same entity.
Create Permission Profile
Optional
Skip if using RansNet cloud mfusion, which already includes pre-defined permission profiles for read-only and read-write access. Simply select the appropriate profile when creating user accounts.
If you are using on-premise mfusion, you may want to create a custom permission profile to control customer access rights (e.g. read-only access to their own devices only).
- Go to ADMIN → Permissions and click New Profile.
- Give the profile a name and description.
- Select the appropriate access rights.
- Click Save Changes.

Create mfusion User Account
To create additional user accounts for admin or read-only access:
- Navigate to ADMIN → Accounts and click New User.
- Fill in the user details.
- From the Profile dropdown, select the target permission profile.
- Set Rights to
read-only. - Click Save Changes.

Tip
- If you want the customer to receive email alerts (e.g. device failures or network anomalies), enter an accurate email address. The customer can also use this email to recover and reset their password.
- You can optionally upload your company or customer company logo for white-labeling/branding purposes.