HotSpot Gateway
RansNet HotSpot Gateway (HSG) is a dedicated captive portal gateway that controls and authenticates guest Internet access for enterprise and venue deployments — hotels, shopping malls, F&B outlets, clubs, stadiums, hospitals, and schools. It provides flexible, differentiated Internet access for guests, VIP members, and visitors, with granular policy enforcement per user or user group.
Sitting at the Internet edge, HSG integrates four core functional modules into a single appliance:
- Router and firewall — WAN uplink management, NAT/PAT, traffic shaping, and security policy enforcement at the network edge
- HotSpot Access Controller — per-session captive portal interception, user authentication, and bandwidth/policy enforcement for all connected clients
- Captive Portal (CP) — a built-in web server that presents a fully customisable login page to unauthenticated users, supporting multiple sign-in methods and optional advertisement injection
- AAA / RADIUS Server — validates user credentials and returns per-user access profiles to the Access Controller, including bandwidth limits, session time, data volume quotas, and VLAN assignment
One HSG appliance supports multiple simultaneous HotSpot Access Controller instances. Each instance maps to a distinct network segment (VLAN or physical interface), allowing independent portal themes, authentication methods, and access policies per segment — for example, a hotel property could run separate instances for lobby guest Wi-Fi, executive lounge access, and back-of-house staff networks.
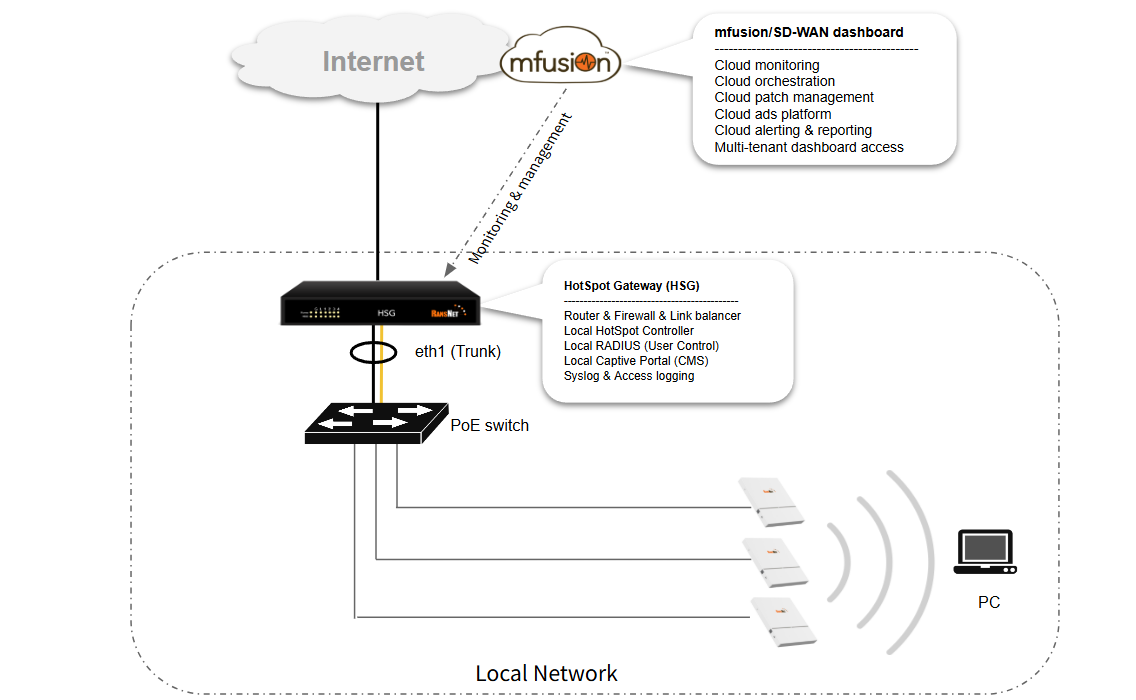
Architecture
HSG is deployed as an on-premise gateway at the Internet edge, integrating into any existing wired or wireless network. It is AP-agnostic — any third-party access point or wireless controller can be used, as long as client traffic is trunked to the HSG via a VLAN. HSG intercepts all unauthenticated client traffic and enforces access control before allowing Internet connectivity.
Deployment Modes
HSG supports two primary deployment modes:
- Inline (routed) mode — HSG acts as the default gateway for guest VLANs, performing routing, NAT, DHCP, and captive portal enforcement in a single device. All guest traffic passes through HSG before reaching the Internet uplink. This is the most common deployment.
- Out-of-path (transparent) mode — HSG is deployed alongside an existing router, with guest VLANs steered through HSG via policy routing or VLAN assignment on upstream switches. The existing router handles WAN routing while HSG handles authentication and access control only.
In both modes, HSG can coexist with the operator's existing upstream firewall, router, or SD-WAN gateway.
Captive Portal
The built-in captive portal web server intercepts unauthenticated client HTTP/HTTPS requests and issues an HTTP 302 redirect to a login page. The portal is fully customisable — operators can upload branded HTML/CSS templates, configure sign-in options per hotspot instance, and set terms-of-service acceptance requirements. Each hotspot instance can present a distinct portal, allowing a single HSG to serve multiple venues or network zones with different branding and access rules.
Authentication Methods
HSG supports a broad range of user authentication and onboarding methods:
| Method | Description |
|---|---|
| SMS OTP | One-time password delivered via SMS; no pre-registration required |
| Email OTP | One-time password delivered to a verified email address |
| Username / password | Local user database or RADIUS/LDAP directory authentication |
| Voucher / coupon | Pre-generated time- or usage-limited access codes |
| POS integration | Automatic access grant tied to point-of-sale transaction (F&B, retail) |
| PMS integration | Hotel Property Management System integration for in-room guest access |
| Payment gateway | Self-service paid access via credit card or e-wallet |
| RADIUS / 802.1X | Enterprise authentication via external RADIUS or LDAP directory |
| WISPr | Wi-Fi roaming and operator authentication (Wireless Internet Service Provider roaming) |
| API | RESTful API integration with third-party CRM, loyalty, or user database systems |
Access Policy Enforcement
Once a user is authenticated, the AAA server returns a RADIUS Access-Accept response containing the user's access profile. The Access Controller enforces the following attributes per session:
- Bandwidth rate limiting — upstream and downstream throughput caps per user
- Session time limit — maximum connected duration per login
- Data volume quota — total upload/download allowance per session
- VLAN assignment — dynamic VLAN steering per user group or role
- Idle timeout — automatic session expiry after a period of inactivity
Content Management & Monetisation
HSG integrates with the RansNet cloud advertisement and content management server to enable venue monetisation:
- Interstitial ads — full-screen advertisements displayed to users after login, before Internet access is granted
- Pop-up ads — overlay advertisements injected into user browsing sessions at configurable intervals or triggers
- Sponsored access — users can earn free or extended access time by engaging with advertisements (ad-supported Wi-Fi model)
- CMS templates — centralised management of portal content, branding, and promotional campaigns across multiple HSG deployments from a single dashboard
User Access Flow
The following describes the end-to-end flow for a new guest connecting to a captive portal network.
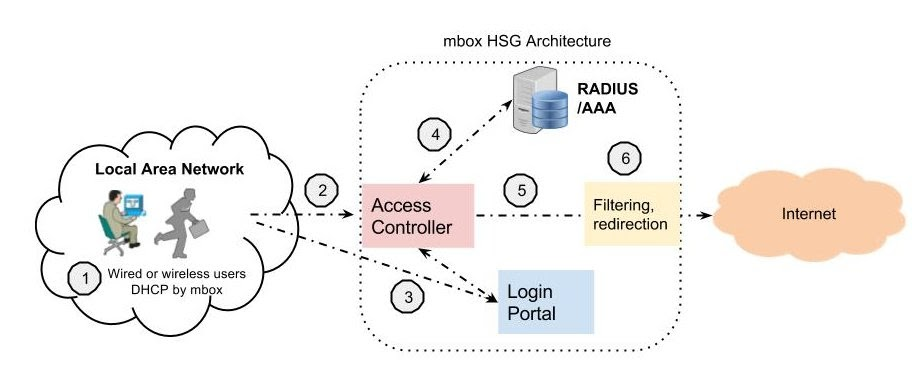
Step 1: Client connects to AP/Network
The user's device connects to a wireless SSID or wired LAN port. For wireless access, the AP bridges the SSID traffic to a VLAN and trunks it to the HSG. For wired access, the switch port is assigned to the access VLAN and trunked to HSG.
Step 2: Device receives IP (DHCP)
HSG issues a DHCP IP address to the client from the respective VLAN pool. The client can now send traffic.
Step 3: Network detection & captive portal redirect
The client OS automatically initiates an HTTP request to a well-known URL (e.g., connectivitycheck.gstatic.com for Android, captive.apple.com for iOS) to detect Internet connectivity. This requires successful DNS resolution first — if DNS fails due to an upstream issue or firewall policy, the probe is never sent.
The HSG Access Controller intercepts this HTTP probe and issues an HTTP 302 redirect to the captive portal login page.
Note
Each redirect is session-specific and short-lived for security reasons. On slow or congested wireless connections, the redirect may expire before the user reaches the login page. If users see a blank or error page, they should disconnect and reconnect to their SSID to restart the flow.
Step 4: User authentication via captive portal
The user enters credentials on the captive portal (username/password, OTP, voucher code, or social/POS/PMS login). The portal submits credentials to the RADIUS server for validation.
Note
Sign-in methods such as SMS OTP and Email OTP involve additional sub-steps — OTP generation, delivery, and expiry handling — before the RADIUS authentication exchange completes.
Step 5: RADIUS validation and access decision
The RADIUS server validates credentials and returns an Access-Accept response containing the user's policy profile (bandwidth limits, session timeout, data quotas, VLAN assignment, etc.). The HSG Access Controller grants Internet access and enforces the assigned policies.
Step 6: Firewall filtering & redirection to Internet
Before traffic exits the HSG WAN interface, optional firewall rules further control access (e.g., application filtering, address translation, content filtering). Guest traffic is then routed to the Internet.
Tip
Advertisement display (optional) — if integrated with the RansNet cloud ads server, a pop-up or interstitial advertisement can be displayed at step 3 (overlayed on login page). This enables ad-supported or sponsored Wi-Fi models.
Product Range
HSG is available in multiple throughput and capacity tiers to match deployment scale:
| Model | Max Throughput | Max Concurrent Devices | Form Factor |
|---|---|---|---|
| HSG-200 | 500 Mbps | 200 | Desktop |
| HSG-400 | 500 Mbps | 400 | Desktop |
| HSG-800 | 2 Gbps | 800 | Desktop |
| HSG-1000 | 2 Gbps | 1,000 | Desktop |
| HSG-2000 | 2 Gbps | 2,000 | 1U rack |
| HSG-5000 | 2 Gbps | 5,000 | 1U rack |
| HSG-15000 | 3 Gbps | 15,000 | 2U rack |
| HSG-25000 | 3 Gbps | 25,000 | 2U rack |
Redundant PSU is available from HSG-2000 and included as standard from HSG-15000.
HSG can be paired with UAP-520 enterprise access points (indoor/outdoor, IP67, Wi-Fi 6) managed via mfusion or EasyMesh, or integrated with third-party APs over a standard VLAN trunk.
Deployment Workflow
Deploying a hotspot gateway involves six sequential steps. Each step builds on the previous one, from infrastructure planning through live access control. Follow this workflow to configure HSG from initial deployment through guest access.
Prerequisites: HSG is provisioned and onboarded to mfusion, with network connectivity to your Internet uplink.
Step 1: Design the Architecture
Define your deployment mode and network topology before configuring interfaces:
- Inline (routed) mode — HSG acts as the default gateway for guest VLANs. Most common deployment. See Deployment Modes above.
- Out-of-path (transparent) mode — HSG is placed alongside an existing router; existing router handles WAN while HSG handles authentication only.
Sketch your network topology showing: - Guest VLANs and interfaces - Wireless APs or wired switch ports where clients connect - HSG's position in the network - Upstream Internet uplink (ISP connection, SD-WAN gateway, etc.)
Refer to: Your specific use case guide: - Hotel Wi-Fi Integration - Venue Guest Wi-Fi (general retail, F&B, malls) - Enterprise Visitor Access (office, campus, hospital)
Step 2: Configure Network Settings
Configure HSG interfaces and routing to ensure Internet connectivity.
- Set up WAN interface (uplink to ISP or SD-WAN gateway)
- Configure LAN interfaces and VLANs for guest access
- Set up DHCP pools per guest VLAN
- Configure DNS and routing to reach Internet
Refer to: Network Configuration
Verify: HSG can reach the Internet with ping 8.8.8.8 or traceroute to a public DNS server.
Step 3: Customize Captive Portal
Configure the login page branding and sign-in methods to match your venue.
- Upload custom HTML/CSS templates (logo, colors, branding)
- Select authentication methods (username/password, OTP, social login, voucher, PMS, etc.)
- Configure terms-of-service and privacy policy acceptance
- Set up optional advertisement injection (sponsored access, ads)
Refer to: Captive Portal Configuration
Test: Navigate to the portal URL in a browser to preview the login page and verify branding.
Step 4: Create User Accounts (If Needed)
Depending on your authentication method, create or import user accounts:
For username/password authentication: Create user accounts manually or import in bulk: - Manual entry for small deployments or staff accounts - CSV import for bulk user uploads - API integration for third-party CRM/membership systems - PMS integration for hotel guest accounts
For OTP, social login, voucher, or POS authentication: User accounts are created on-demand; no pre-creation needed.
Refer to: User Management
Note: If using PMS integration (hotels) or API/SMS OTP, skip this step — accounts are auto-created as guests arrive.
Step 5: Configure Hotspot Instance
Create one or more hotspot instances to combine all settings (VLAN, authentication, portal, access policies) into a deployable unit.
Each instance maps to: - A guest VLAN or physical interface (where clients connect) - An authentication method (RADIUS, UAM, social, etc.) - An access profile (bandwidth, session timeout, data limits) - A captive portal theme (branding, login form)
Refer to: Hotspot Instance Configuration
Verify: Run show security hotspot to confirm the instance is created and ready.
Step 6: Test End-to-End Access
Verify the complete flow: client connection → DHCP assignment → portal redirect → authentication → Internet access.
- Connect a test device to the guest VLAN or SSID
- Open a web browser — should see captive portal redirect within 10 seconds
- Enter credentials (username, OTP, voucher code, etc.)
- Verify Internet access is granted and bandwidth/session limits are applied
Refer to: Hotspot Instance Configuration — Verification
Troubleshooting: If portal doesn't appear, check: - Guest VLAN connectivity to HSG - DNS resolution (OTA check for captive portal detection) - Firewall rules on upstream router - See Troubleshooting for common issues
Next Steps
Once your hotspot gateway is live:
- Monitor and optimize — Track user sessions, bandwidth usage, and connection quality using Device Monitoring
- Manage user access — Review active sessions, revoke accounts, adjust bandwidth limits per user
- Scale to multiple venues — Deploy additional HSG instances across multiple locations; manage all from mfusion orchestrator
- Integrate with systems — Connect billing, loyalty, or CRM platforms via API or PMS integration for automated user management