Guest Management
Guest Management Console (GMC) is a user-friendly web GUI portal for non-administrator staff to quickly create Wi-Fi guest accounts (or access vouchers) on demand. These accounts are required for authenticating to the RansNet HSG/HSA captive portal before guests are granted internet access.
Accounts can be issued as username/password or as PIN code, and delivered to guests by export, email/SMS, or printed receipt.

The feature lives at HOTSPOT USERS → Guest Management, and is organized into five administrative tabs (for setup) and one operational tab (for front desk staff):
| Tab | Audience | Purpose |
|---|---|---|
| Front Desk | End user (reception staff) | Create and issue guest accounts during daily operations |
| Customization | Admin / support | Define print layout, generation rules, and account format |
| Access Info | Admin / support | Choose which billing plans, time limits, and data quotas Front Desk can assign |
| User Info | Admin / support | Define which guest-information fields Front Desk must collect |
| Printer Setup | Admin / support | Configure the receipt printer and select which fields to print |
Part 1: Administrative Setup
Configure these tabs before handing the system to Front Desk staff. Settings here control which options appear and which defaults apply when Front Desk creates accounts.
Customization: Account Generation and Print Layout
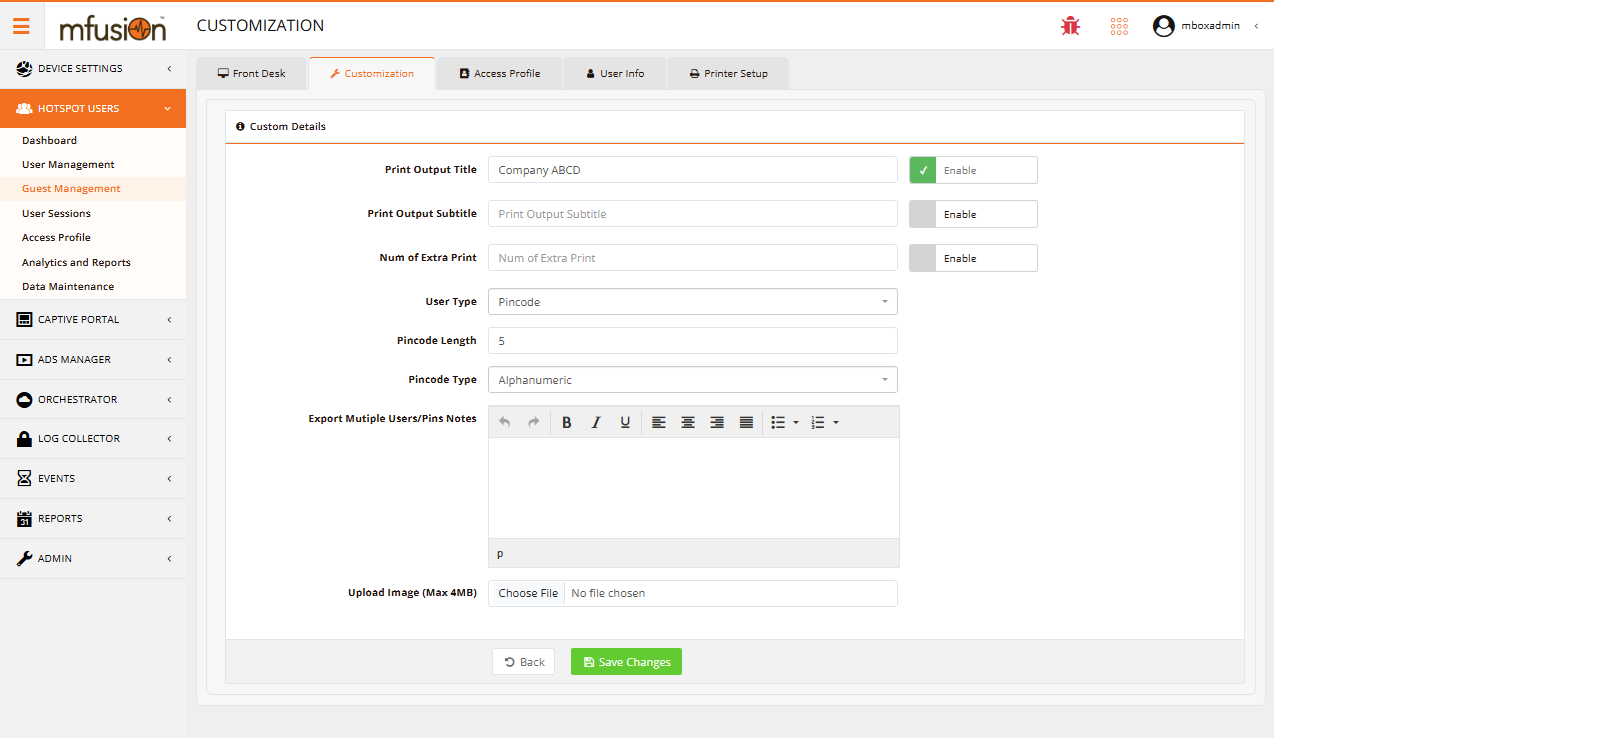
The Customization tab defines how accounts are generated (username/password format, length, character set) and how printed slips are laid out.
| Setting | Purpose | Options / Notes |
|---|---|---|
| Print Output Title | Header line on printed receipt (e.g., company name). Toggle Enable to display. | Free text; appears at top of print layout |
| Print Output Subtitle | Optional second header line below title | Free text |
| Num of Extra Print | Number of additional copies printed per account | Numeric (e.g., 2 prints 3 total copies: original + 2 extras) |
| User Type | Account format — collects guest info or issues anonymous code only | Userinfo (collect guest name, email, etc.) or PIN (anonymous numeric/alphabetic code) |
| Max Username Length | Length of generated usernames or PINs | Numeric (1–20 characters typical) |
| Username Type | How usernames/PINs are generated | Random, Sequential, or custom pattern |
| Password Type | How passwords are generated (only if User Type = Userinfo) | Random, Fixed (static), or Pattern |
| Export Multiple Users/PINs Notes | Free-text block appended to CSV exports | Terms of service, Wi-Fi name, password reset instructions, etc. |
| Upload Image | Logo/branding image displayed on printed slip | Max 4 MB; formats: PNG, JPG |
Tip
Set User Type first — it controls whether Front Desk asks for guest details or just issues a simple PIN code. This decision shapes all subsequent setup.
Access Info: Billing Plans and Access Attributes
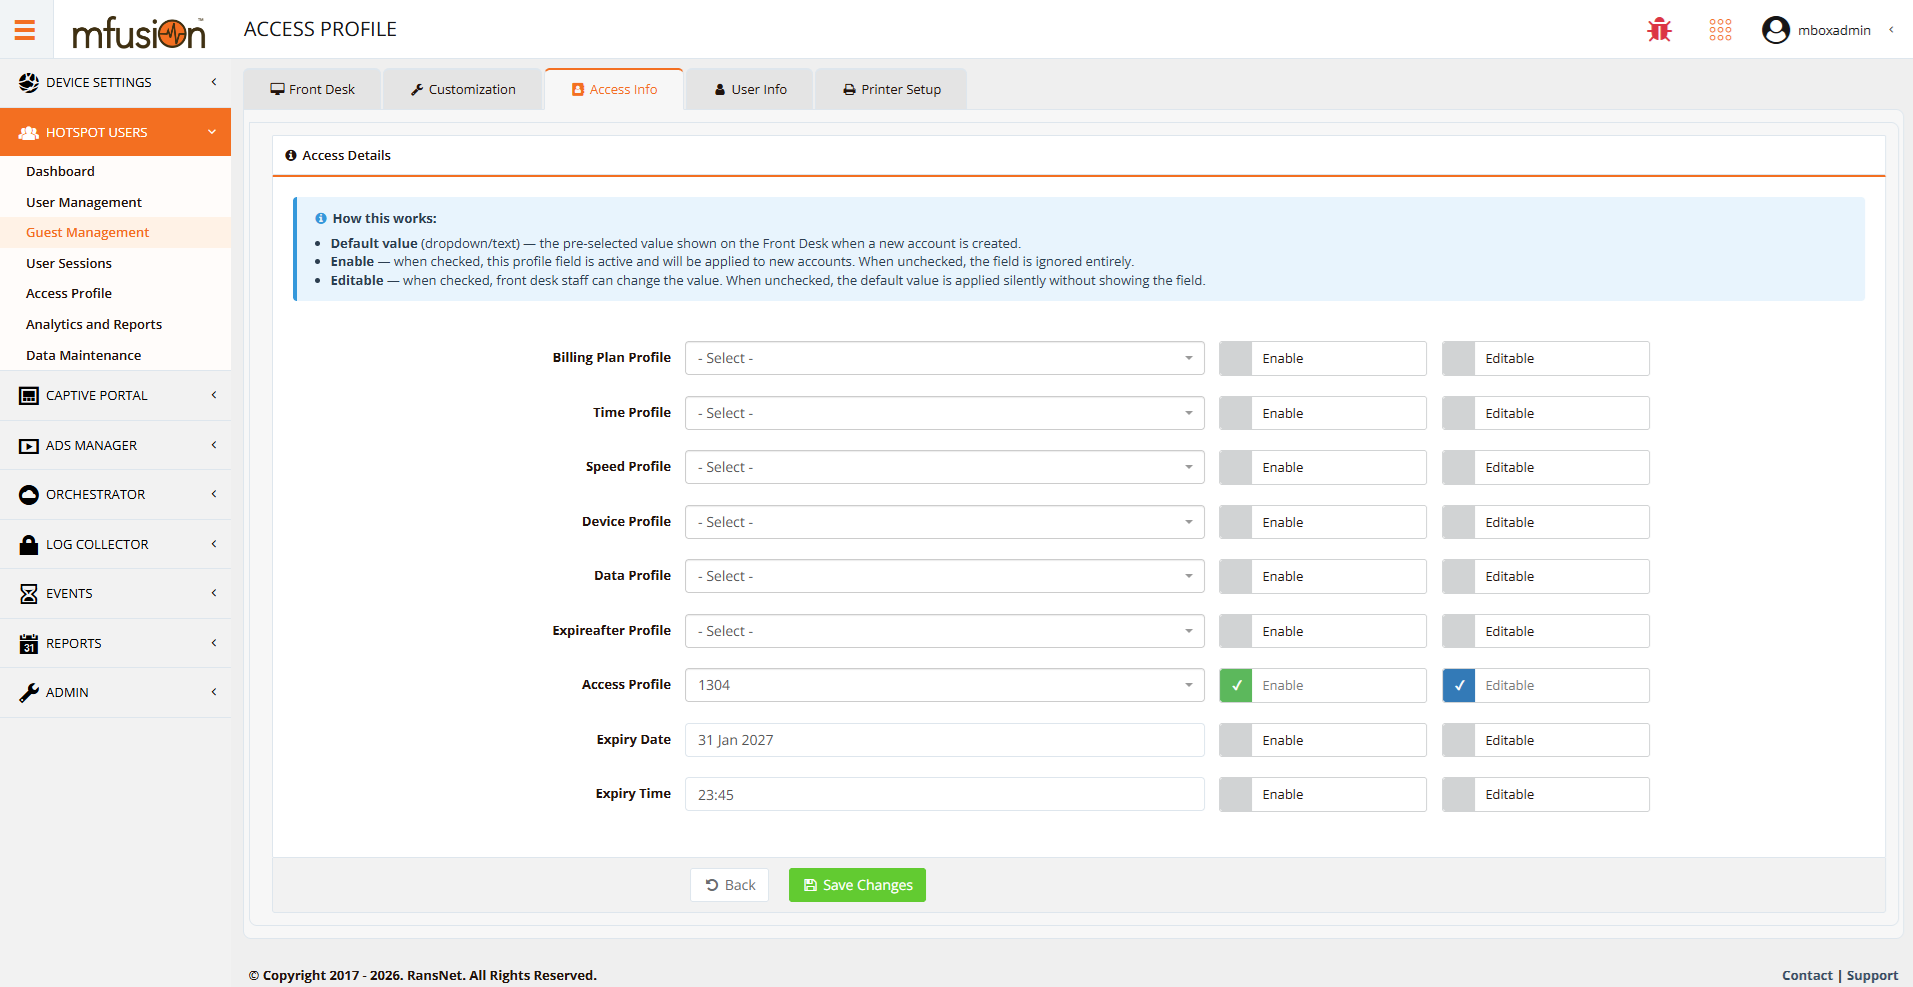
The Access Info tab defines which access attributes (billing plans, time limits, data quotas, bandwidth speeds) can be assigned to guest accounts. Each row enables one attribute type and controls whether Front Desk can change it.
For every attribute, configure three things:
| Column | Purpose |
|---|---|
| Default value | The pre-selected value shown to Front Desk when creating a new account |
| Enable | When checked: this attribute is active and can be assigned. When unchecked: the field is ignored entirely and not shown to Front Desk |
| Editable | When checked: Front Desk staff can change the default value. When unchecked: the default is applied silently without showing the field to staff |
Attribute Reference:
| Attribute | Type | Notes | Profile Name Prefix |
|---|---|---|---|
| Billing Plan Profile | Single | Pre-defined billing package (e.g., Standard, Premium, VIP) | — |
| Time Profile | Single | Session duration allowance (e.g., 1 hour, 24 hours, 7 days) | Time-User |
| Speed Profile | Single | Bandwidth cap (downstream/upstream limits) | Speed-Max or Bandwidth-User |
| Device Profile | Single | Max simultaneous devices per account | Device-Max or Session-Max |
| Data Profile | Single | Data quota (e.g., 1 GB per day, 10 GB per week) | Data-Max |
| Expireafter Profile | Single | Auto-expire N days after account creation or first login | Expiry-After |
| Access Profile | Multi | Other pre-created access profiles to attach together | — |
| Expiry Date | Single | Hard expiry date (YYYY-MM-DD) — account becomes invalid on this date | — |
| Expiry Time | Single | Time-of-day expiry (HH:MM) — account resets or expires at this time daily | — |
Note
Enable only the attributes Front Desk actually needs. Setting Enable ON but Editable OFF applies a fixed default silently — useful for site-wide defaults that reception staff should not override.
Profile Naming Convention
Each dropdown is populated by profile name prefix, not by profile type. A profile only appears under its matching attribute if its name starts with the required prefix.
Required Prefix by Attribute:
| Attribute | Prefix | Example Profile Name |
|---|---|---|
| Time Profile | Time-User |
Time-User-1Hour |
| Speed Profile | Speed-Max or Bandwidth-User |
Speed-Max-10Mbps |
| Device Profile | Device-Max or Session-Max |
Device-Max-5Devices |
| Data Profile | Data-Max |
Data-Max-Weekly-7GB |
Critical: If you rename a profile and remove the prefix, it will disappear from the corresponding dropdown, even though the profile still exists in the system.
Refer to Access Rights and Profiles for detailed profile setup.
User Info: Guest Data Collection Fields
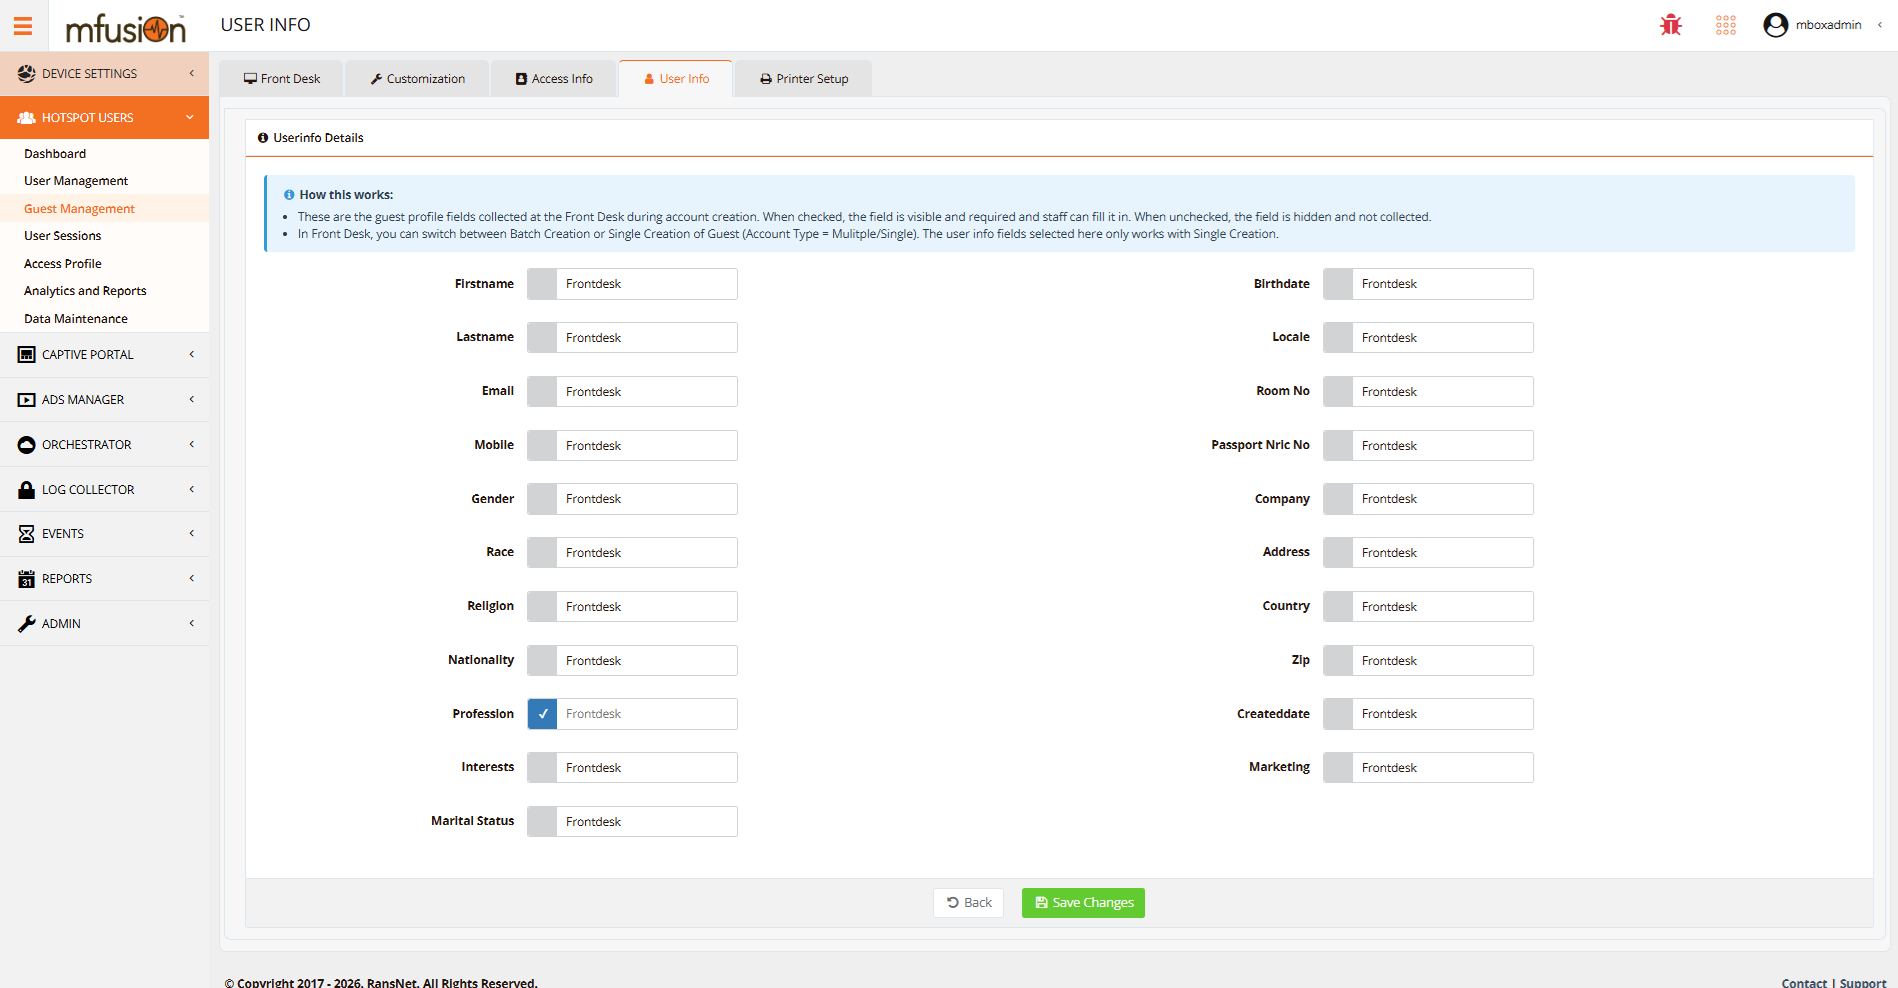
The User Info tab controls which guest-information fields Front Desk captures when User Type = Userinfo (not when using PIN codes). Toggle Frontdesk on each field you want staff to collect.
Available fields:
Firstname, Lastname, Email, Mobile, Gender, Race, Religion, Nationality, Profession, Interests, Marital Status, Birthdate, Locale, Room No, Passport/NRIC No, Company, Address, Country, Zip Code, Created Date, Marketing Consent.
Tip
Keep this list short. Each enabled field is a mandatory step at the counter, which slows down check-in. Enable only fields you actively use for analytics or follow-up.
Printer Setup: Receipt Printer Configuration
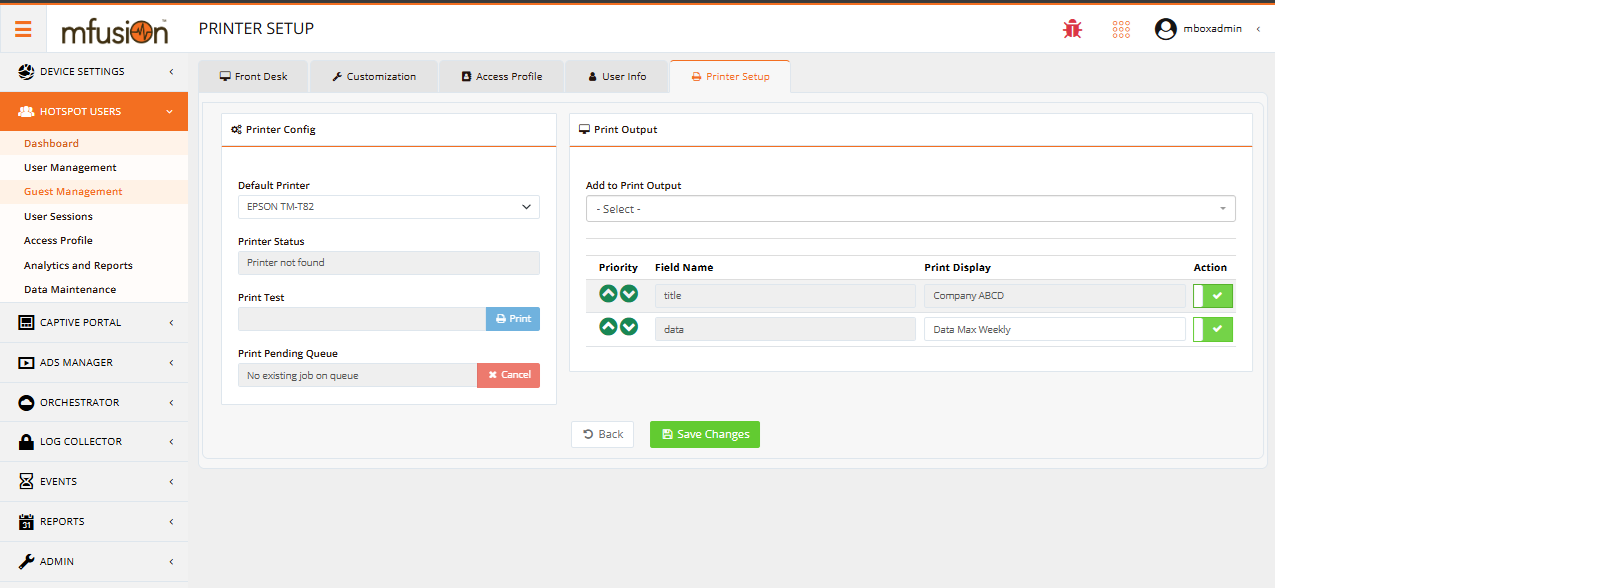
The Printer Setup tab is required only if Front Desk staff use the Print button to issue receipts. It configures which printer to use and which fields appear on the receipt.
Printer Configuration:
| Setting | Purpose | Notes |
|---|---|---|
| Default Printer | Select the receipt printer model | Examples: EPSON TM-T82, Star Micronics TSP100, Brother QL-800 |
| Printer Status | Live status indicator | Shows Connected (ready) or Printer not found (offline/misconfigured) |
| Print Test | Send a test slip | Verifies printer is working before production use |
| Print Pending Queue | Cancel stuck or failed print jobs | Clears backlog if printer jammed or lost connection |
Print Output Fields:
Define which fields appear on the printed receipt and in what order. Use the priority arrows to reorder:
| Priority | Field Name | Print Display | Example Output |
|---|---|---|---|
| 1 | title |
Company name or header | "Welcome to Hotel XYZ" |
| 2 | username |
Account username | "guest-12345" |
| 3 | password |
Account password | "ABC123XYZ" |
| 4 | data |
Access plan description | "7-Day Unlimited Data" |
| 5 | expiry |
Expiration date/time | "Expires: 2026-07-20" |
Warning
Without a physically connected printer, Printer Status stays Printer not found and the Print buttons on Front Desk fail silently. Test the connection before deployment.
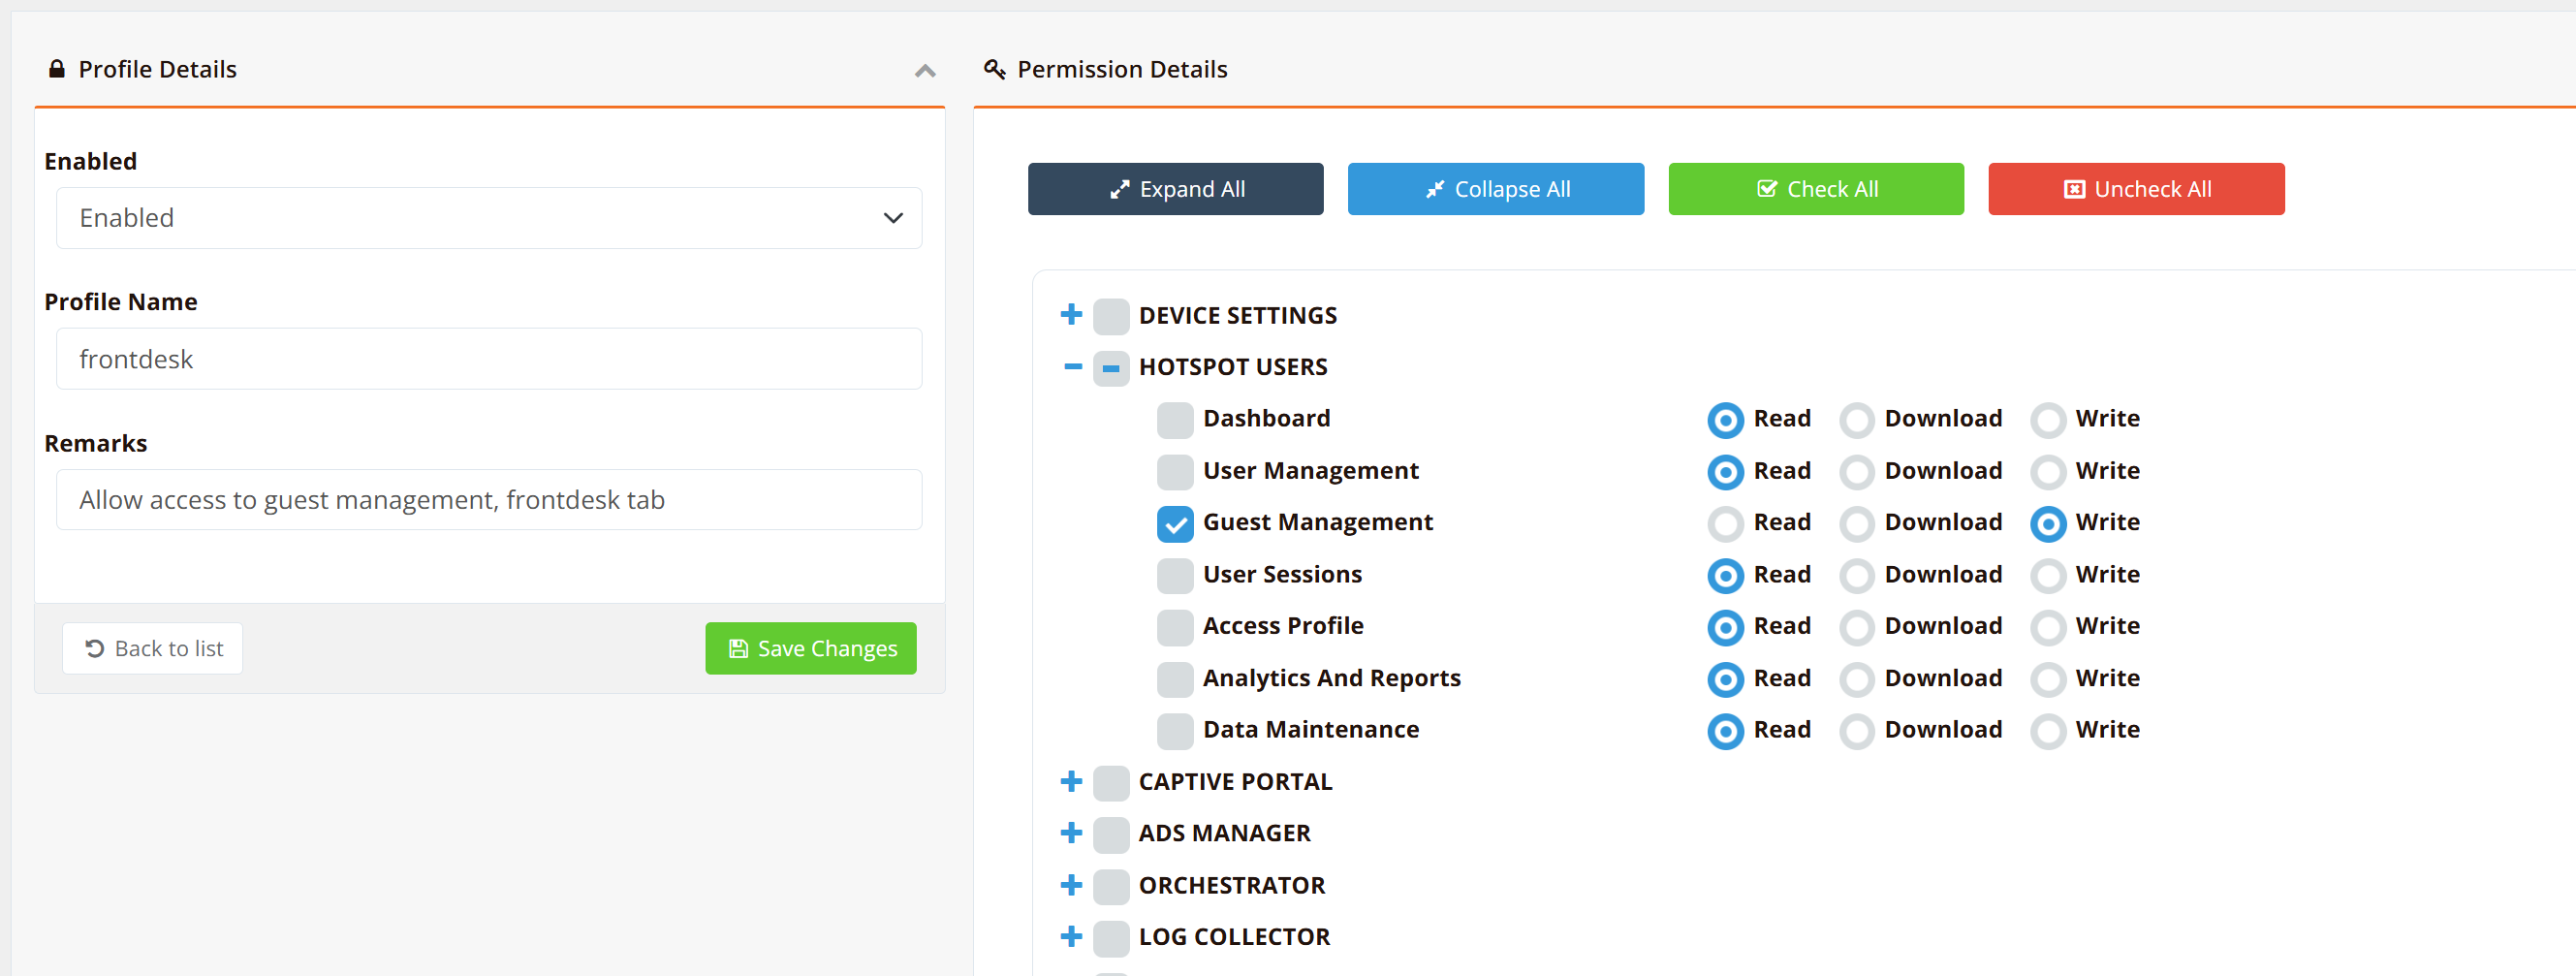
Admin Profile and Account Setup for Frontdesk
Before handing the system to Front Desk staff, create a restricted permission profile and frontdesk account that limits their access to Guest Management only.
Refer to Create Permission Profile and Create mfusion User Account for step-by-step instructions.
This ensures Front Desk staff can only access the Guest Management tab and cannot modify other critical system settings.
Part 2: Front Desk Operations
Daily Account Creation
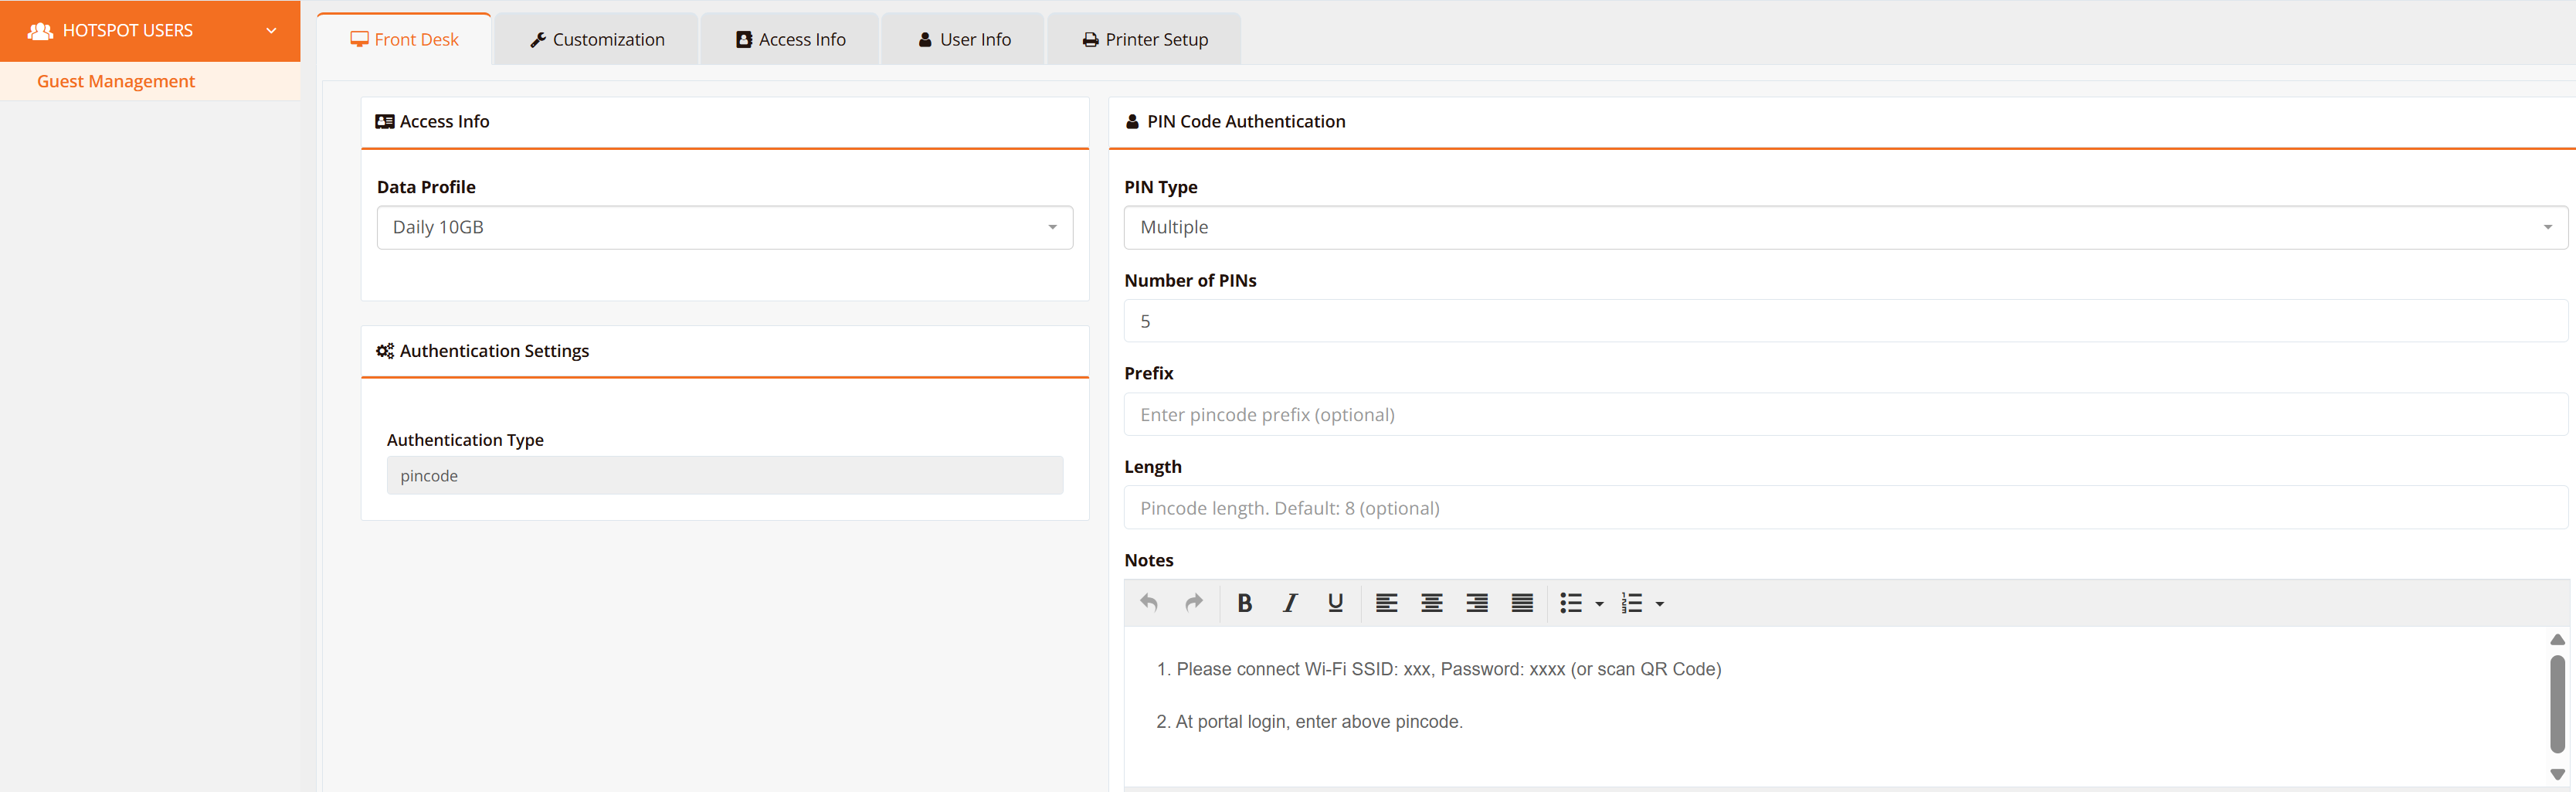
The Front Desk tab is where reception staff create guest accounts. The form only shows options that have been enabled in the administrative tabs.
To create an account:
- Access Profile → Access Data — Select the package (e.g., Weekly 7GB, 1-Hour Unlimited). Only enabled profiles appear in the dropdown.
- Guest Info → Account Type — Choose
Singlefor one guest, orMultiplefor bulk account creation. Selecting Multiple reveals a count field — enter how many accounts to generate. - Username/Password Option — Choose Alphabet (letters only) or Numeric (numbers only) to set the character set of the generated credential.
- Review the read-only Current Authentication Settings panel — confirms which authentication method, username format, and password format are active (pulled from Customization settings).
- Click one of the action buttons (see below).
Delivering Accounts to Guests
| Button | Action | When to Use |
|---|---|---|
| Display | Show the generated account(s) on the screen | Staff read credentials aloud or guest views on screen |
| Send to the configured receipt printer | Guest receives a printed slip with credentials and instructions | |
| Export | Download the generated account(s) as a file (CSV or text) | Bulk delivery via email, or integration with other systems |
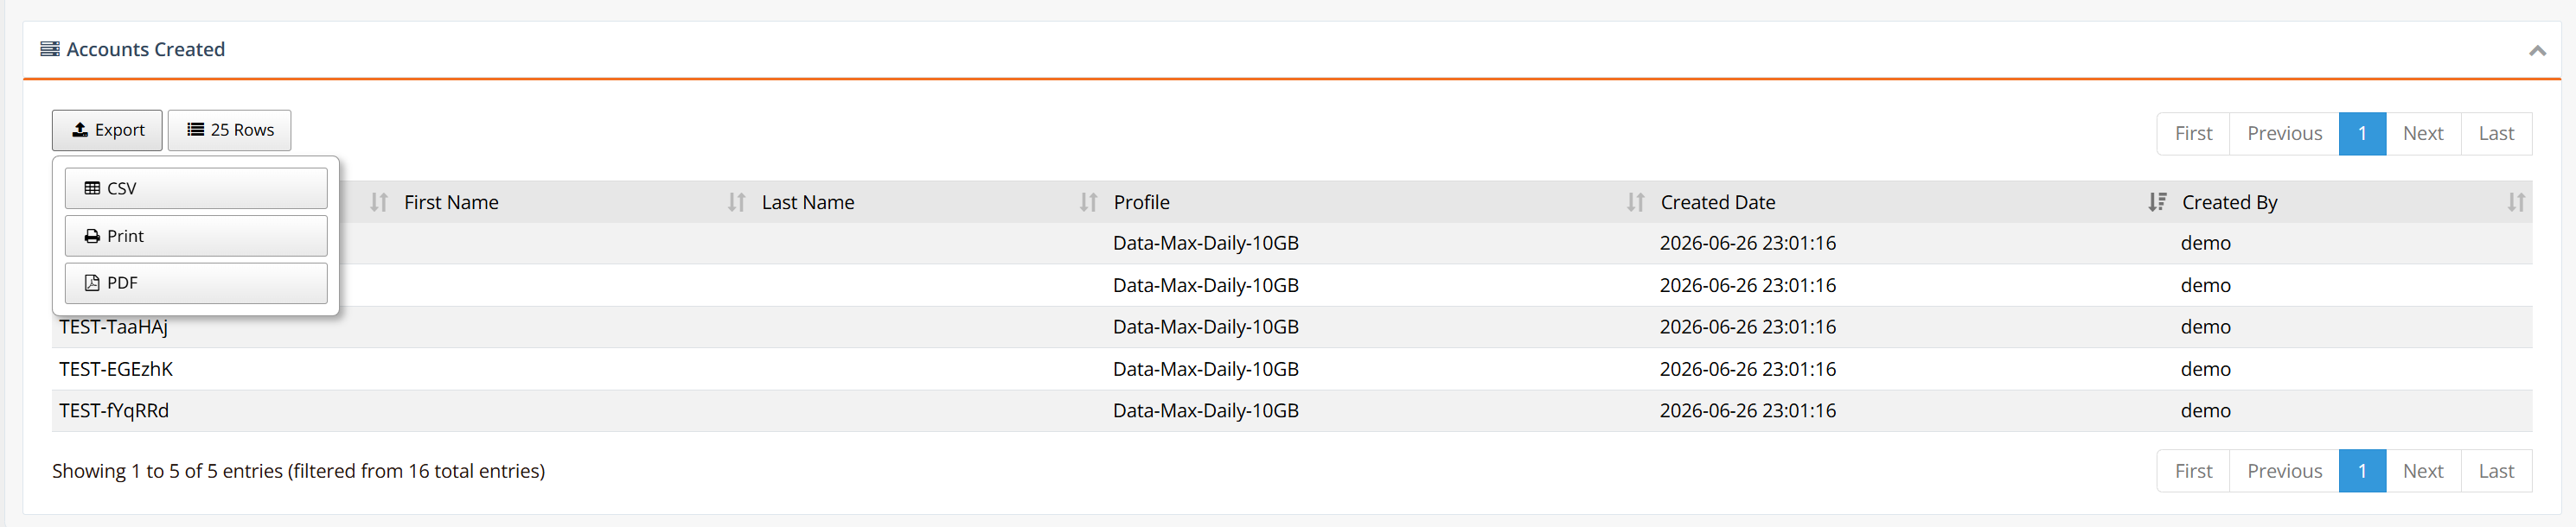
After creation, accounts also appear in the collapsible Accounts Created panel at the bottom of the page for review and reuse of the actions above.
Note
Print requires a physically connected receipt printer and proper Printer Setup configuration. Display and Export work without any hardware.
The created accounts can be printed or exported out to PDF.
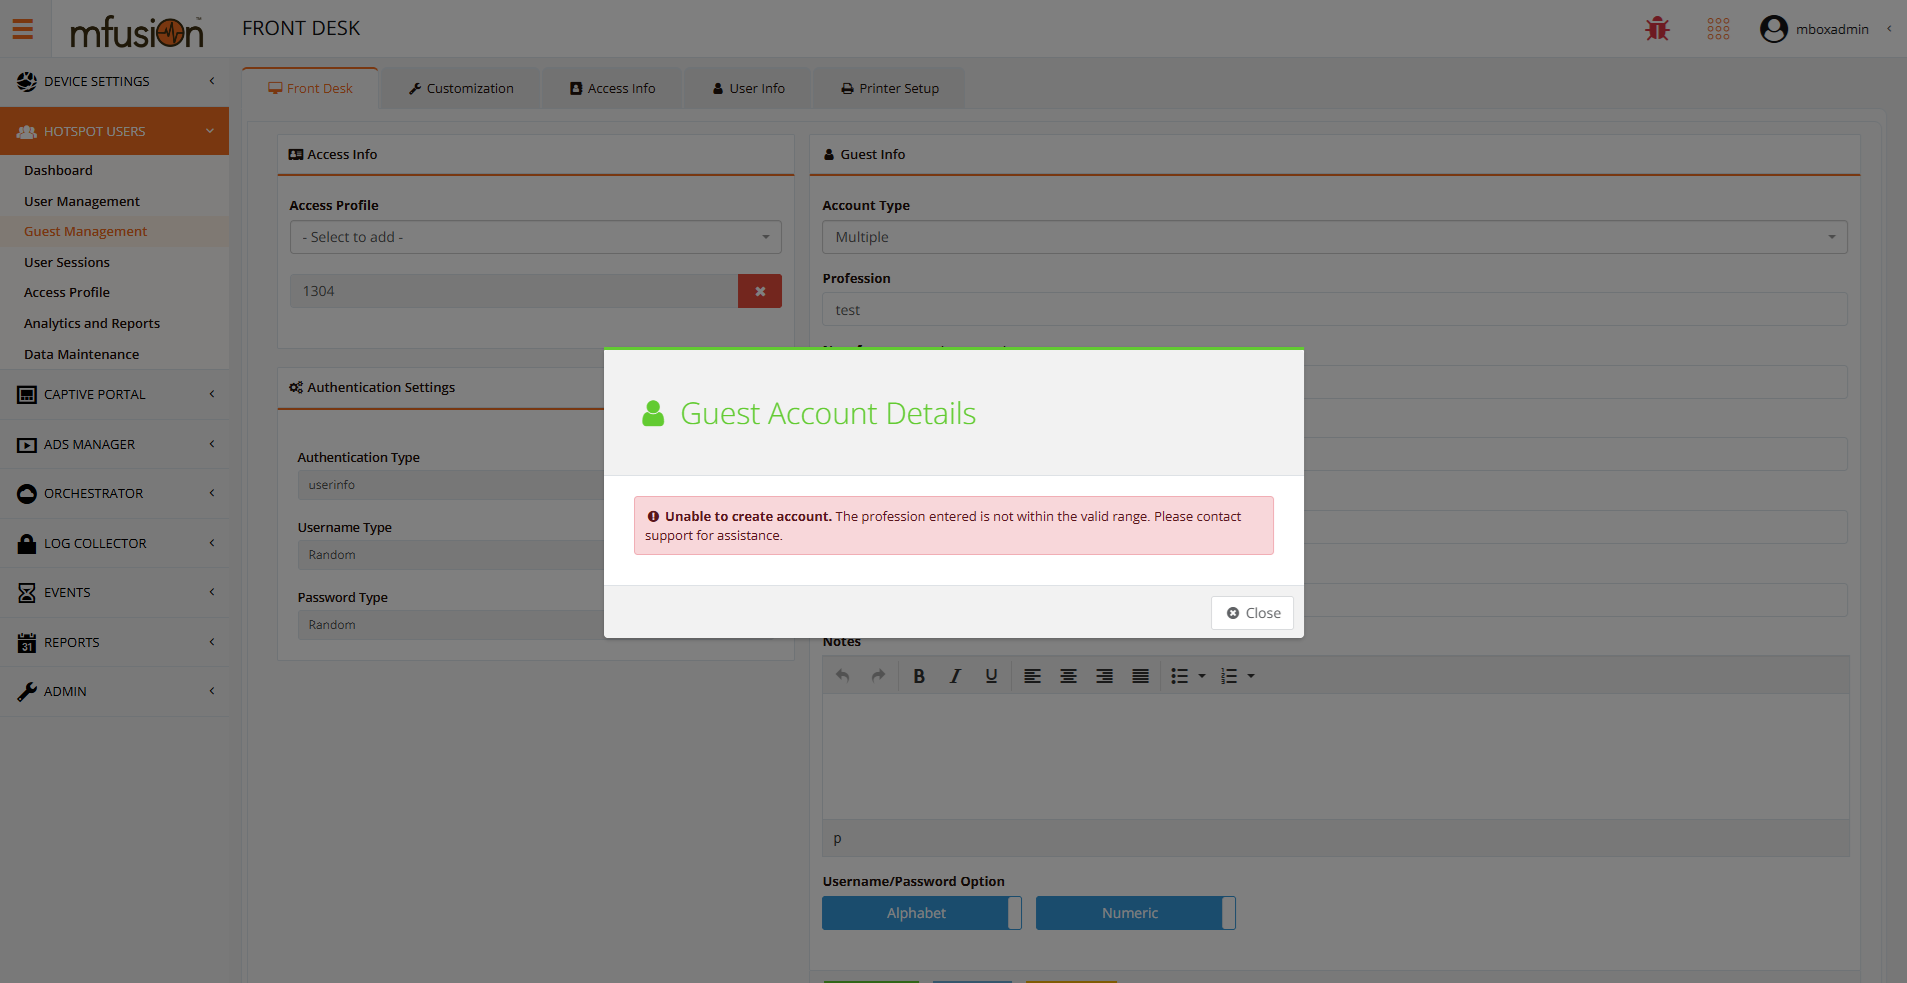
Account Creation Warnings
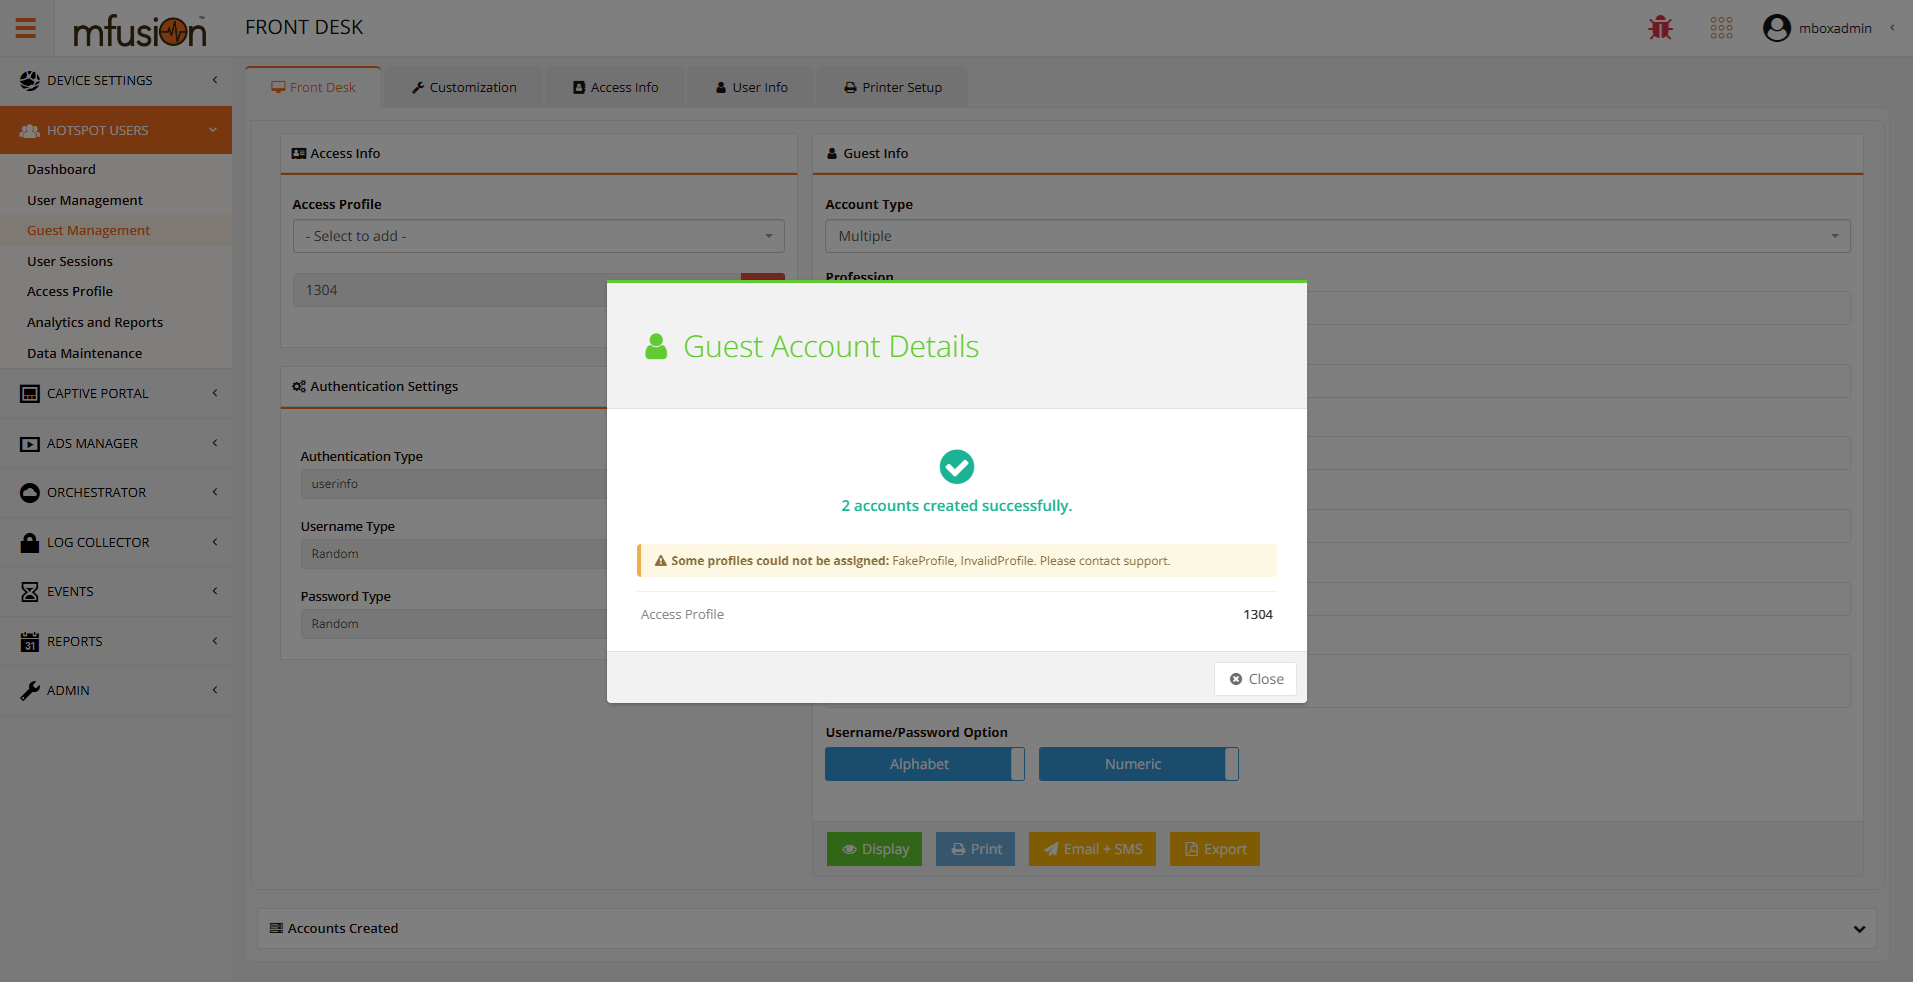
The Guest Account Details modal shows the result after submitting. Two warnings may appear:
Profession not in quota map — If User Quota is enabled and the entered profession is not in the quota rule map, account creation is blocked. No accounts are created.
Profiles could not be assigned — If one or more access profiles fail to apply (invalid or not found), accounts are still created but a warning lists the failed profile names. Contact support to verify Access Profile configuration.
Related Features
- Access Rights and Profiles — Detailed guide to creating and configuring access profiles
- User Management — Manual account creation, CSV import, and per-account access rights
- Hotspot Instance Configuration — VLAN, DHCP, and instance-level policies